A day in the life of five cities, compressed into three minutes.

When you hear the term 'high-res' thrown about with such abandon when it comes to images for web use, have you ever stopped to think just how big or how high quality and image meant for the web needs to be?
There's an assumption that high-contrast images are more dynamic, more compelling, more inviting. Have a go at some low-contrast photography. You might surprise yourself with the results.
Balance doesn't mean symmetry; it means an internal consistency and tension within your photos. And it's a vital element of composition.
Great photos might be down to a little bit of luck, but most of that 'luck' you make yourself. Don't believe us? Read on...
It took some serious deliberation. There were a lot of emails between us. There was even the odd expletive. Finally, however, Haje, Tom, and I have selected our five favourite photos from the Photocritic Long Exposure Competition. In no particular order I present to you the winners of Patience is a Virtue:
Set Fire to the Rain by Cybjorg
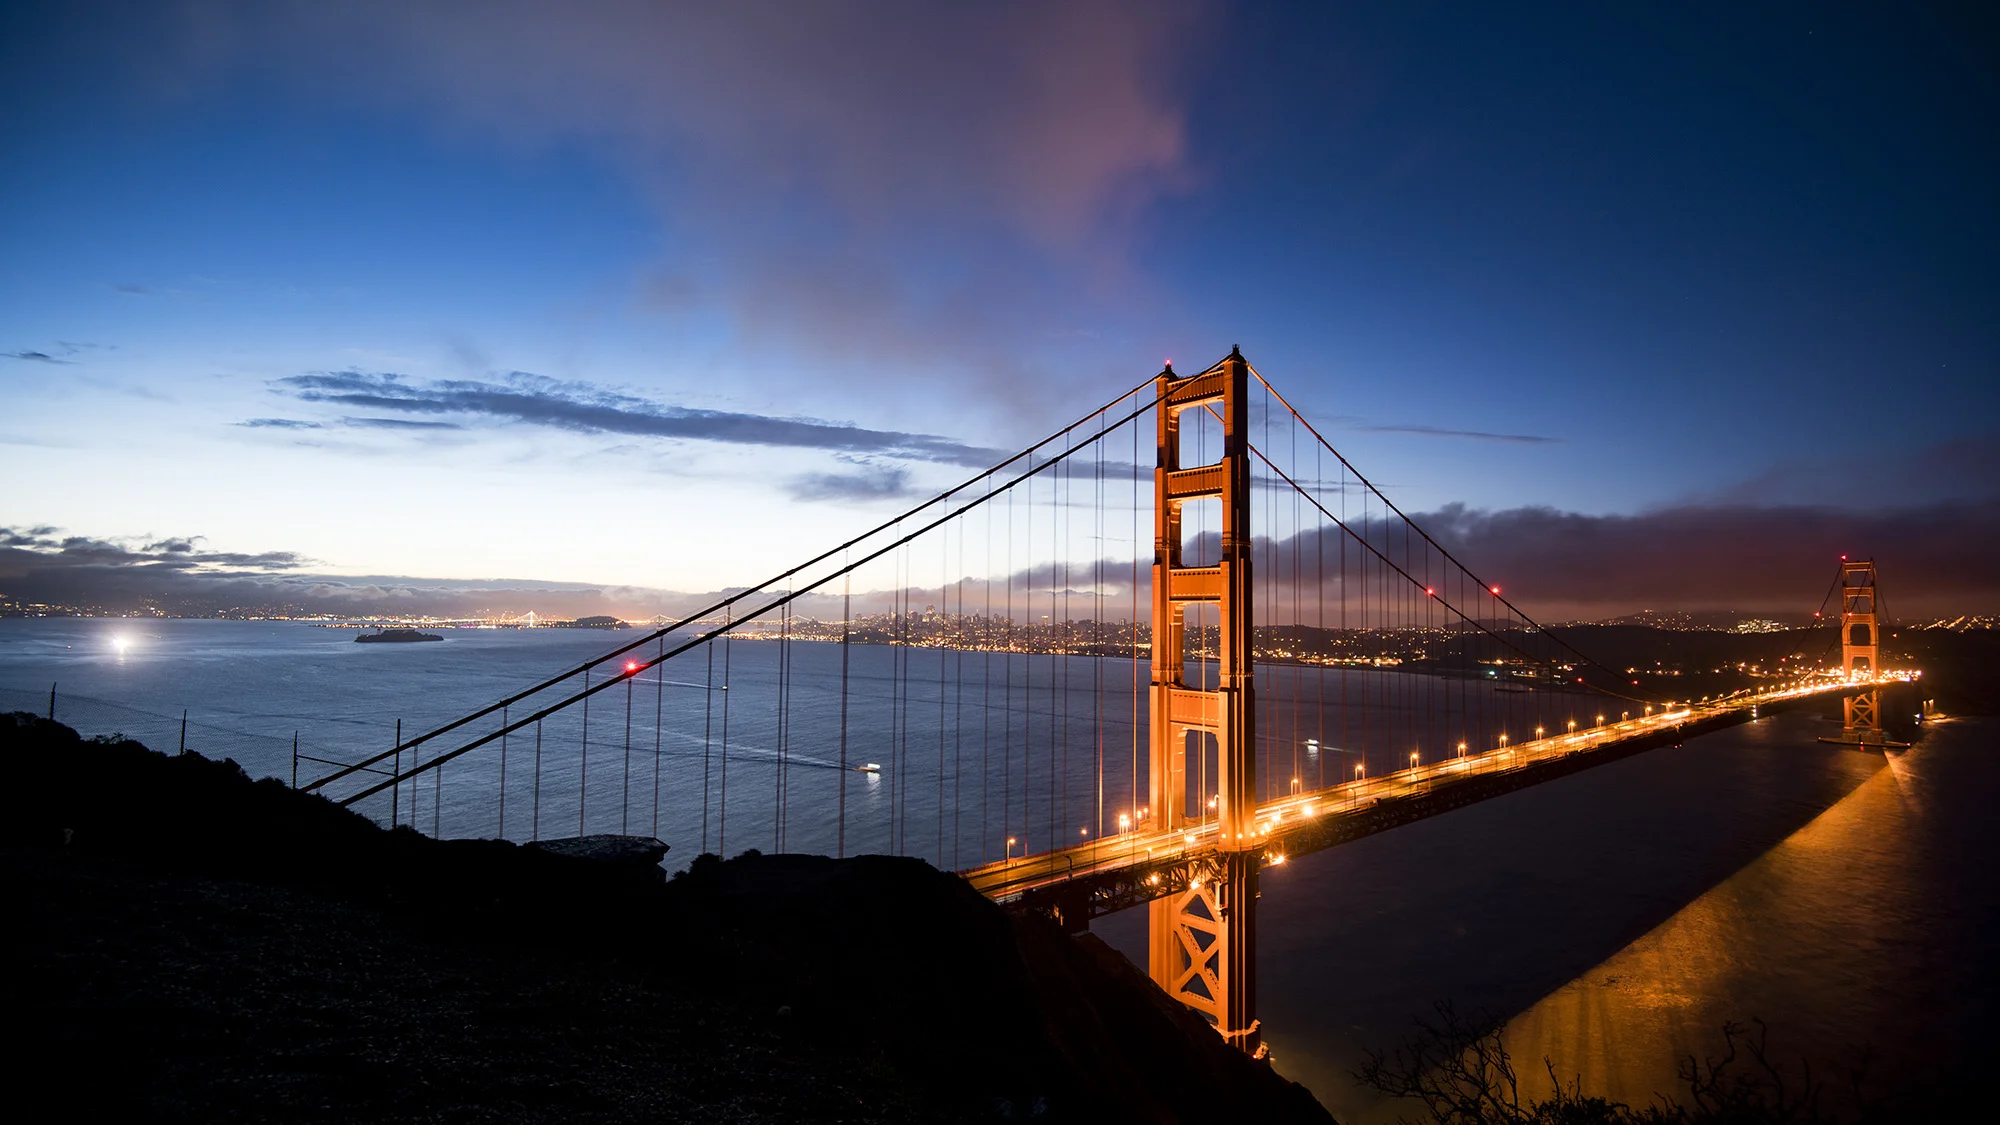
Sunrise at Botany Bay, Edisto Island by Luke Robinson
Tower Bridge traffic by Nick Jackson
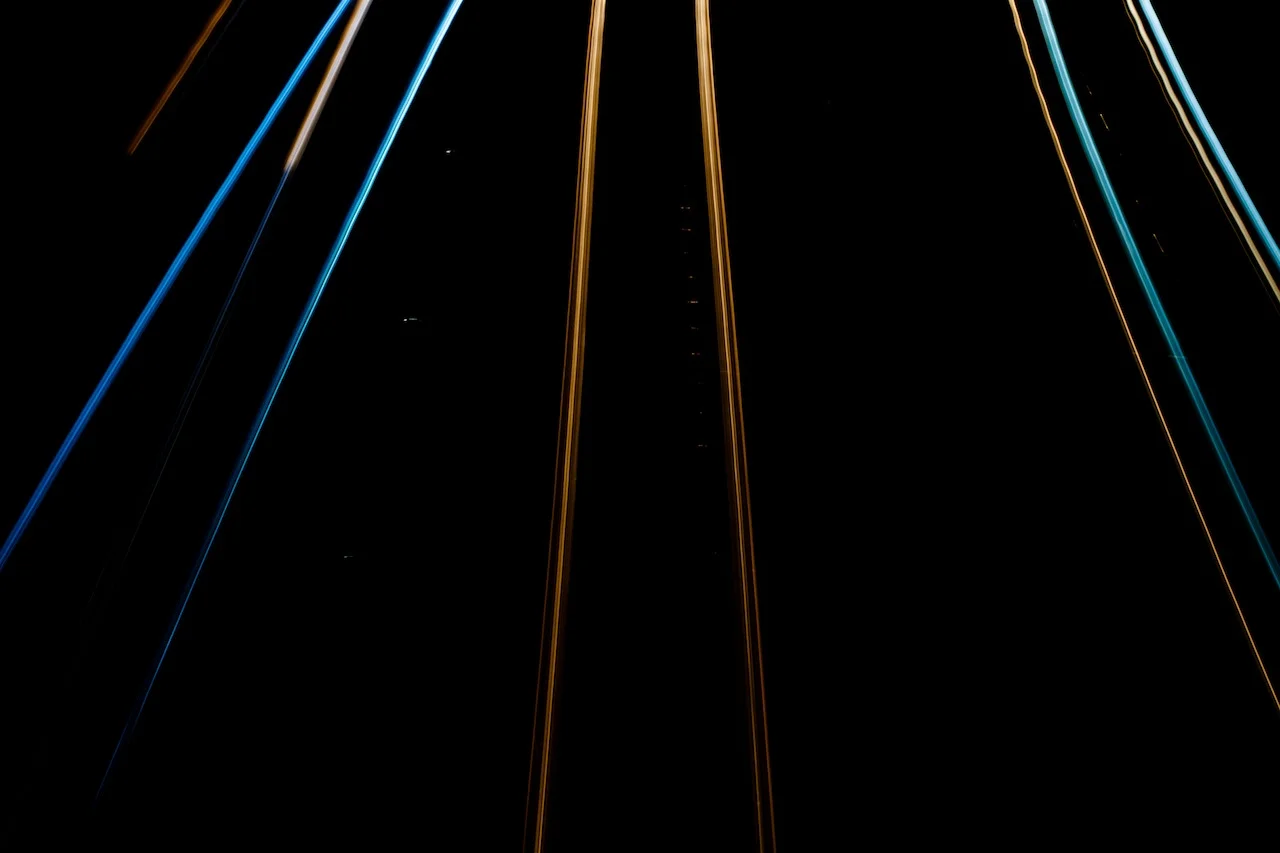
Blades of Light by Paul Shears
and Cairngorm Panorama by Ian Appleton
Many congratulations to the five of you! I shall be in contact presently to enable to you claim your Triggertrap gift card prizes!
We'd also like to say thank you to everyone who entered and made our lives a little bit tricky when it came to selecting a winner. As Haje said when we first sat down to draw up a shortlist of our favourites: 'There's some serious talent there!' Please do go look at the selection in the Flickr pool: there are some inspiring images.
Making money from photography can be hard. Between 'rights for reach', Getty permitting non-commercial use of some its images for free, falling stock percentages, and embedding rather than purchasing for website use, it feels as if there's a grizzly trend for photographers to make money in ways that uses their images as income generation leads, rather than income generators.
I'm far from keen on this descent of the photograph from product to income lead generator, but whining about the situation won't cure it. Rather, you need to harness all of your assets and put them to work for you. Even if you are continuing to make money from your photography, or if you're an amateur who doesn't sell their work, it is worth capitalising on your website views to have some other means of bringing in some pennies, especially if you find yourself thinking 'If only I had a pound for every time some bought a Really Good Widget on my recommendation!' Maybe you should consider affiliate marketing?
The theory behind affiliate marketing is fairly simple. You form some kind of partnership with companies and retailers related to your sphere of operation. If and when you mention their products or products that they sell on your website, maybe in an article or perhaps in an advertising box or a banner, you include a unique tracking link to their website or webstore. Should your readers click on that link and make a purchase, you get a kick-back from the sale. If you promote a product, consciously or not, you might as well benefit from it.
There's a welter of photography-related companies that run affiliate schemes that you can incorprate into your website. You can choose from retailers and e-tailers such as Adorama, Amazon, B&H, Jessops, and Waterstones. Plenty of printers and print firms offer affiliate schemes: Moo, Photobox, Shutterfly, and Snapfish, for example. Our publishers, Ilex, runs an affiliate scheme. And so does Triggertrap.
First, you really need to think about the content that you produce and the nature of your readership. You'll do best out of affiliate marketing if you form partnerships with companies that will appeal to your readers. After that, you need to decide on how mercenary you want to be. Are you prepared to link readers to any company in order to capitalise on their spending? Or are you more discerning and will use your affiliate links as more of an endorsement? If you're always using a particular product and singing its praises, encouraging other people to use it, why not make some pin-money from that?
Generally speaking there are two forms of affiliate marketing you can use: links and banners. When you form an affiliate partnership with a company, you'll be provided with a dedicated affiliate link. Every time that you mention the company or any of the products that it sells, you link to its website or the product in its webshop and add the affiliate link to the end of the URL.
For example, say I ran the Really Good Widget Company and you signed up as an affiliate partner. I'd give you an affiliate link which might look like ?afl=101. If you mentioned one of my Really Good Widgets in a blog post or article, you would link to its page in my webstore and apend ?afl=101 to its URL. If a reader clicked the link and bought a Widget, I'd give you a percentage of that sale.

Affiliate links can take a little time to insert: you need to hunt down the webpage to which you want to link and add your unique affiliate code, but it's not too much of a faff, especially if you were already going to link there. If you're handy with coding, you can write a bookmark to automatically add your code to a URL with a click.
As well as these links, some companies provide affiliate linked banners and boxes that you can insert into your website which look like advertising. If your readers click through from your website to their webstores and make a purchase, you'll receive a share of the sale. Provided that you can easily include a banner or some advertising boxes on your website, these are simple to use.
How long is a piece of string? For a start, I don't think that I've found two affiliate schemes that offer the same rewards. Ilex offers a 15% share of each sale; Triggertrap starts with a 5% share of the order value, but that rises to 10% after you generate 50 sales. Other companies are less generous, with 3 or 4% shares of order values. And it depends on the expiration length of your affiliate links, too. Some companies provide 7-day cookies but others offer 30-day cookies. This means that when someone clicks through a link, they don't necessarily have to make the purchase immediately. With a 7-day cookie they could return within the following week and buy their Really Good Widget and you'd still get your fee; but with a 30-day cookie, their click is remembered for almost a month.
Do take note of the scheme's minimum payment sum, too. Some companies set a high threshold and you'll need to generate a lot of sales before you can reap the benefits in cash. Also give some consideration to payment method. Cashing an international cheque is expensive. Do you have or want to have a Paypal account? Is an electronic bank transfer best?
You also need to deploy your affiliate links effectively. Bombarding your readers or viewers with affiliate links that you've shoe-horned into blog posts or image captions at every opportunity might not win you many favours. But if you used a technique mentioned in an Ilex book, link to the book when you blog about it. If you shot an image using Triggertrap, link to Triggertrap when you caption it. You need to be positive about your linking, but not overly enthusiastic.
I'm sure that there are some people who've managed to sustain their empires through affiliate marketing alone, but they're likely very scarce. Don't expect affiliate marketing to make you a fortune, but with careful management it will be preferable to a poke in the eye with a sharp stick.
Yes. EU law demands that if you use cookies on your site you must declare this to your visitors. Seeing as affiliate marketing relies on cookies, you will need to include a cookie banner on your website should you be based in the EU. The good news is that for anyone using WordPress, there are a welter of cookie banner plug-ins available. Pick one and away you go.
Some companies want you to have a minimum number of visitors to your site each month before you can sign up. It helps to have your figures to hand before you try to forge any partnerships.
Finally, signing up for a US-based affiliate programme when you're extra-US can be a headache when it comes to the IRS. I know this from experience. Affiliate marketing is meant to make you money, not cost you money in terms of time or frustration; do consider fiscal geography when signing up for an affiliate programme.
Most companies that offer affiliate marketing have a link at the foot of their websites. This will take you through to an affiliate programme portal, which is usually operated by a third party. Affiliate Window is popular. Triggertrap uses LeadDyno. For some you need to provide quite a bit of information from the outset, others are quite minimalist.

Once you've done that, you'll be given your affiliate code and banners to include on your website. Then you can start to watch the pennies roll in.
British Summer Time ends this weekend&Mdash;at 02:00 on Sunday, to be exact—which means that time is running out for you to submit your long exposure photos to our competition. We won't be accepting any more entries after the clocks move back, so if you want to be in with a chance of winning a £40 gift card for the Triggertrap shop, you'd better get your skates on.

All of the competition's rules and regulations, not that there are many of them, can be found on the Flickr pool page, the same place to which you need to submit your entries. There've been some cracking shots submitted so far, but we'd really love to see more in the pool!
Good luck!
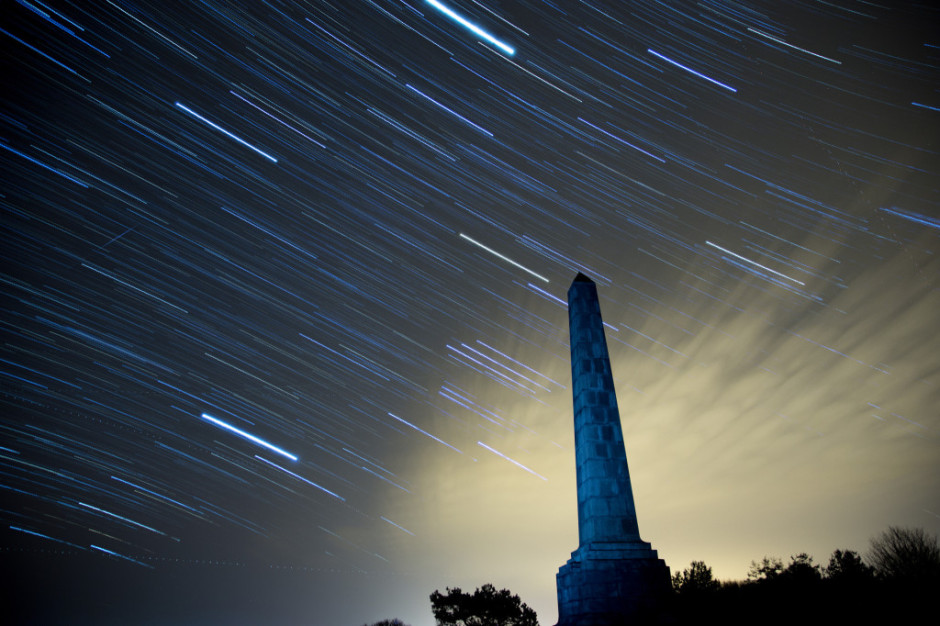
Halley's Comet made its last swoop past earth in February 1986. I remember it well because I was in primary school at the time, learning about the Norman Conquest. In addition to the boos, hisses, and cheers elicited by the key players and the confusion surrounding Harold Godwinson's death, Halley's Comet plays a starring role in the Bayeux Tapestry, which documents the invasion of a loosely termed 'England' by William of Normandy and his cronies. That we had the opportunity to experience the same celestial phenomenon as the people we were learning about, all of whom lived 900 years before us, was rather special. The timing could not have been better for a memorable series of lessons.

Seeing as Halley's Comet is on a 76 year schedule, it isn't expected again in all its glory until July 2061; however, we are being treated to an impromptu meteor shower in the next few days. The comet is likely to deposit a trail of cosmic dust into our atmosphere on 21 and 22 October 2014, giving us a shooting star display visible to the naked eye.
If that isn't an excuse for trying a little night photography, I don't know what is. So apart from the hoping for clear skies, what else can you do to maximise your chances of capturing the tail lights of Halley's Comet?
Whatever means you use to take your photos, capturing a meteor shower is fundamentally the same process: shooting a series of long exposures. There are a few options for how you go about it, but once you know that bit, it's fairly simple.
The darker the sky, the better the chance you will have of being able to see the streaks of light as the comet's dust burns through the atmosphere. Ideally, then, you need to be somewhere that doesn't suffer from too much light pollution and has an uninhibited view of the sky. Open and accessible heath- or park-land that's relatively far from city lights is ideal; just be certain you're not venturing somewhere you shouldn't, either because the land is privately owned or you're disturbing a sleeping bull! I'd advise not going alone, either. Shooting in secluded or isolated locations is not necessarily a solitary activity.
Shooting the night sky means long exposures, so you're going to need a tripod, and an intervalometer will ensure the best results, although you can get by without one. Naturally we recommend Triggertrap, especially because its star trail mode makes life easy, but your mileage may vary. For your lens, a fast, wide-angle lens is advisable. You're never quite certain where they'll start or where they'll end, so the wide-angle provides you with sufficient flexibilty, and it gives you the option to introduce an interesting foreground to the shot, too. The darkness of the sky means that you need fast glass to let in enough light. And an empty memory card is a good idea: you'll be taking a lot of images.
While shooting stars can turn up anywhere, they are most likely to cluster around a single point called the radiant. Don't aim your camera directly at the radiant, when you've worked out where it is, but about 45° to one side of it. You also want to compose the frame so that it is visually interesting beyond just the shooting stars. Think about including something intriguing in the foreground. Turn off the auto-focus, use as wide an aperture as you dare—you might not want it all the way open for sharpness—and focus to infinity.
The best option to photograph a meteor shower is very similar to capturing a star trail image, when you compile a series of long exposures shot over a significant period of time into a single image, but with a few key differences. You can read our star trail tutorial here, and if you'd like to shoot a star trail image that hopefully captures some shooting stars, go right ahead. Otherwise, you can tweak the process and use it as the basis to capture a series of photos from which you'll select the ones that show shooting stars streaking across them.
What are these tweaks you'll need to make, then? First and most obviously, you'll not compile all of your frames into a single image that charts the movement of the celestial bodies across the heavens. Instead, you'll pluck out the indvidual images displaying shooting stars, or maybe composite several images showing shooting stars.
Second, you might need to use a slightly shorter shutter speed than you would with a star trails sequence, to ensure that you don't capture the turn of the earth. With a star trails shot, the movement of the earth is exactly what you want, but with single meteor images, not so much. Between 10 and 25 seconds is recommended, but a few test shots should help you to decide what you need to use. This slightly shorter shutter speed will require you to adjust the ISO to get a good exposure, too.
Finally, you can chance not taking your series of images with very short intervals between them, as you would with a star trails sequence, but leave the gaps a little longer. That means you might miss a few opportunities, but the law of averages suggests that if you shoot over a period of a few hours, the odd photo will have a shooting star zooming across it.
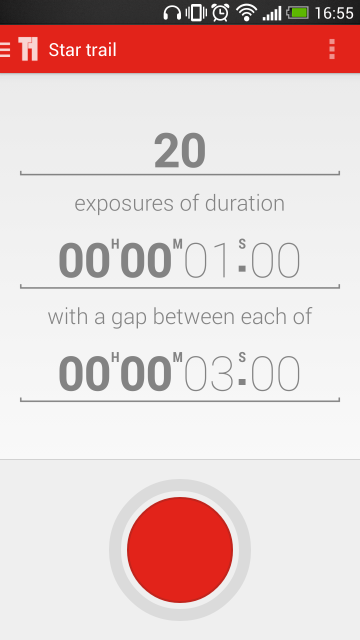
When you have set the focus and established your shutter speed and ISO, you will need to set your intervalometer as you would for a recording a time-lapse sequence, using the exposure time that worked best in your test shots. If you're using Triggertrap's star trail mode, set the exposure time that you established in testing with your chosen interval between frames, and select the number of frames you want to take. With a slightly longer interval between frames, say five or ten seconds, you could shoot for hours!
If you don't have an intervalometer, there's no reason why you can't try your hand at meteor shower photography. Instead of relying on a remote triggering device to release your camera's shutter, you'll be doing it yourself, which might get tiresome. Just as you would with a star trail-based sequence, aim your camera in the right spot and focus to infinity. With your camera in manual mode, use the widest aperture you can, select a shutter speed between 10 and 25 seconds, adjust the ISO accordingly, and press that trigger. Over, and over, and over, again!
Remember to keep warm, and here's hoping for clear skies.
You've just under a week left to submit a maximum of five of your favourite long exposure photos to our competition, and be in with the chance of winning one of five £40 gift cards for the Triggertrap shop. We've already had some terrific entries over in our Flickr pool, but we'd love it if you made the judging even more difficult for us!

To enter, upload your image to Flickr and share it in our competition pool. There are some rules and regulations, you can find them on Flickr pool page or here on Photocritic.
We can't wait to see your photos!
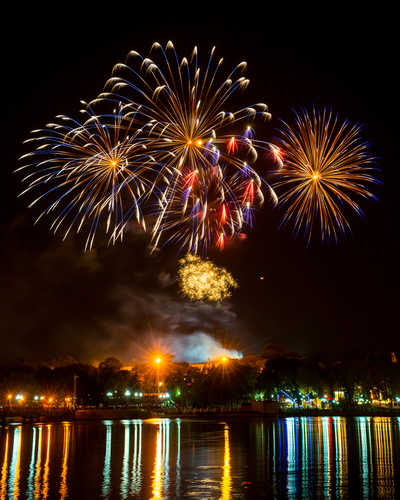
Good things come to those who wait, or at least good things come to those with the requisite degree of patience required to capture a scintillating long exposure shot. Not only do you land yourself with a fabulous photo, but for this competition, rewards also come in the form of five gift cards valued at £40 to spend in the Triggertrap shop! We're on the look-out for the five best long exposure shots produced by you lovely lot. That's not the royal or editorial 'we', by the way, but Haje, Tom, who's Triggertrap's Head of Photography, and me. We don't mind what kind of long exposure shot you try: from urban scenes to light painting to smoothed waterfalls. What we want to see is a longer-than-expected shutter speed being used to creative effect to tell a story. We want to see images that leave us giddy with admiration.

Flickr is providing the image-hosting power for the competition; all you need to do is share your photos—up to five per entrant—in the Patience is a virtue Flickr pool before British Summer Time ends. So that's 01:59 (BST) on 26 October 2014. Consider it preparation for longer nights if you're in the northern hemisphere. We'll do the rest, and hope to have the results by Guy Fawkes Night. (Or 5 November 2014.)
(Un)Usual rules apply: you need to own the copyright to the images you submit; you shouldn't have done anything icky to achieve them (like sell your granny); you keep the copyright but we (that being Photocritic and Triggertrap) will want to be able to display it in conjunction with the competition; the prizes are non-transferable and can't be redeemed for cash; you can't be associated with Photocritic or Triggertrap to enter; the judges' decision is final; entry is at your own risk (quite what might happen to you because you enter I'm not sure, it's not like we're cannibals threatening to eat you, but we can't be held responsible all the same); photos have to be submitted to the Flickr pool before the closing date of 01:59 (BST) on 26 October 2014; and it's our competition so if we need to change the way it operates or the rules or heaven forfend chuck you out, we can.
That's about that. But if you need any advice on long exposures, you might want to check out our articles on shutter speed, bulb mode, zoom bursting, and light painting. Good luck: we can't wait to see what you produce!
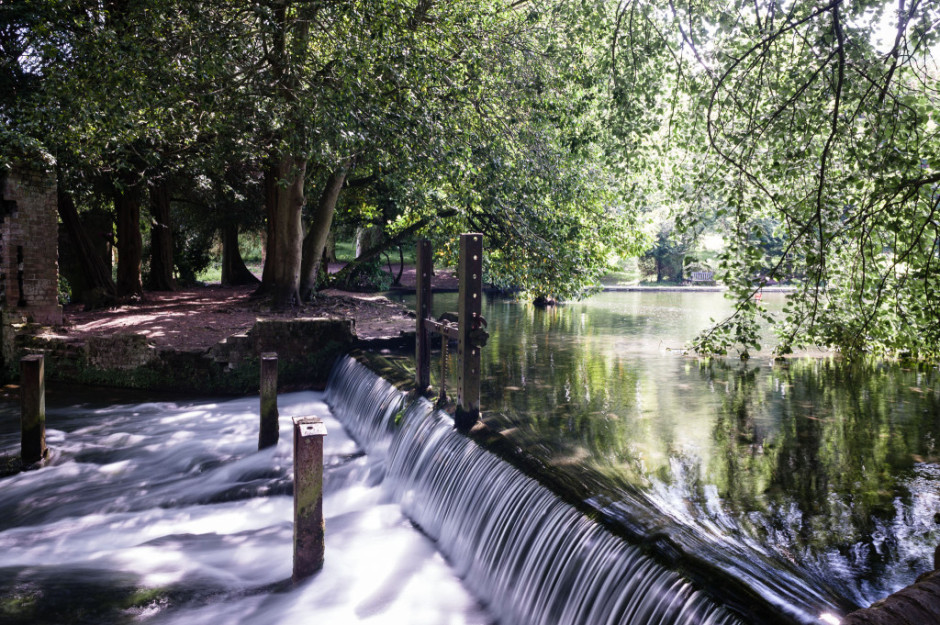
Photos that feature milky-smooth flowing water seem to have a Marmite effect on people: they're either loved or hated. I'm often rather ambivalent towards them, but it doesn't mean that it isn't a useful technique to have up your sleeve if you're faced with a weir or waterfall and you want to capture an image with smooth-looking water that has a sense of flow to it.

There's no great secret to shooting a photo that has water flowing through it that looks smooth: it's done using a long exposure. The slow shutter speed captures the the water as it moves, making it blurred. The blur, in this instance, gives the water a smooth appearance.
Shooting long exposures in daylight hours comes with an inherent problem, however. Over-exposure. Our cameras' sensors are capable of detecting far more light than we think they are, and even using the lowest possible ISO and smallest available aperture, a long exposure can result in an over-exposed photo when taking during the day. To get around this irritation, you might want to try a neutral density (ND) filter over your lens.
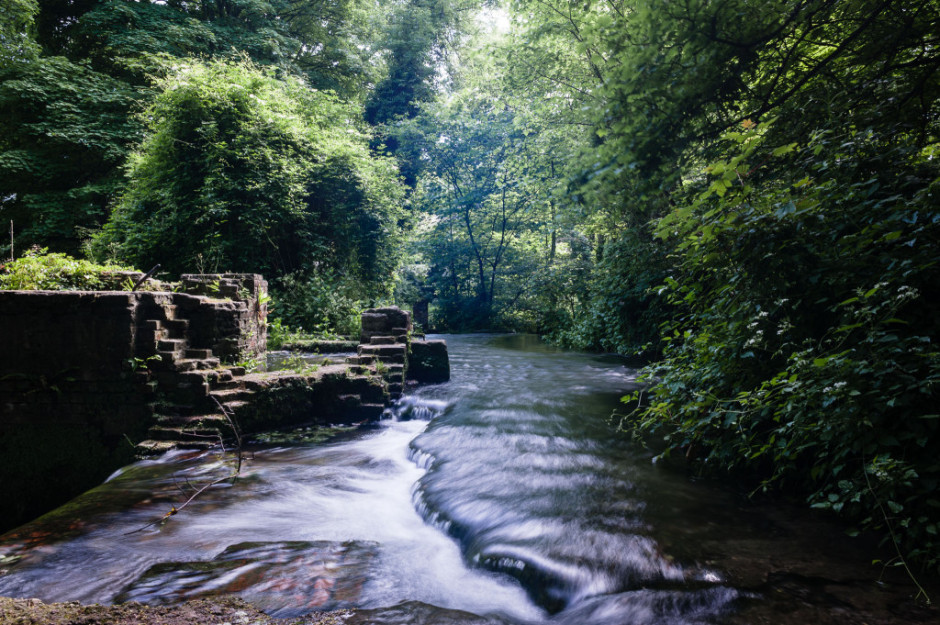
ND filters are grey filters that cut down the amount of light that enters your lens without affecting the colour of your images. They come in different grades, or densities, blocking out between one stop and 12 stops of light. Screw one over your lens and you'll give yourself a great deal more flexibility when it comes to shooting daytime long exposures.
Then of course you'll need a tripod. You might want to capture the motion blur of the water, but you'll want to avoid camera-shake and the rest of the scene getting the wobbles. Even though you'll be using a very small aperture with an enormous depth-of-field, still think carefully about your framing of the shot and its point-of-focus. Make sure it's telling a story.
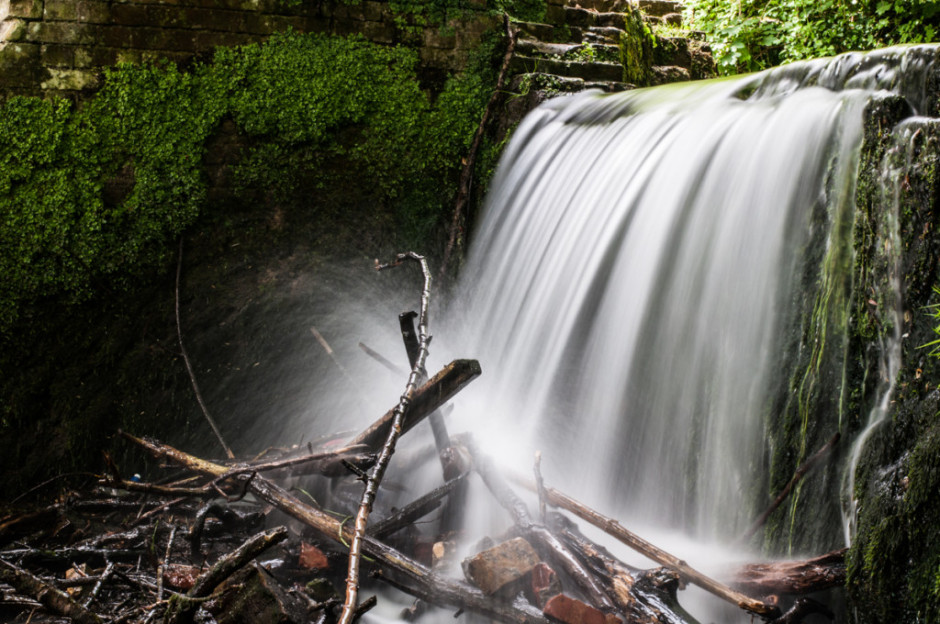
Obviously you'll need to have your camera in manual mode to ensure that you can adjust the shutter speed, ISO, and aperture to get the photo that you want. Almost certainly you will need to use the lowest ISO and smallest aperture avalable. When it comes to shutter speed, you might find that you need to venture into bulb mode to get the shutter speed you need. And we recommend that you use a remote shutter release to prevent jolting your camera on its tripod and shifting its focus, too.
Then it's a case of hitting the cable release and leaving the camera to do its thing.
All images are courtesy of Triggertrap. You can learn more about using remote releases on the awesome Triggertrap How-to site!
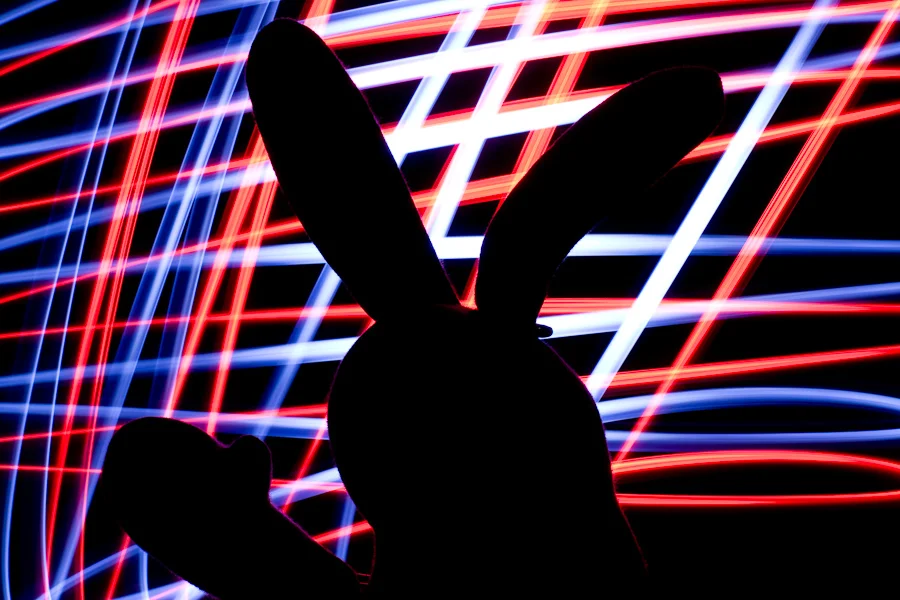
If you'd like to try a more unusual approach to lighting a photo, whether that's because you want to experiment or because you don't have access to studio lights, you might want to consider light painting. This isn't the type of light painting when you make patterns and shapes and designs with light sources to create your image, but using light sources to illuminate your scene during a long exposure. At its simplest, it involves outing the lights, setting your camera to bulb mode, and using a torch to 'paint' light onto your subject. Want to give it a go? Read on!

You don't need anything especially fancy for light painting: a camera on a tripod, a scene that you want to illuminate, and a torch are the minimum requirements. You might find it easier to control your camera's shutter using a cable release for flexibility and when you're more confident you might want to try some more advanced techniques, but let's start here.
Before embarking on your light painting adventure, it's best to think about the scene that you want to illuminate and the story that you want to tell. While you might herald some impressive results from waving your torch about in random formations, that's unlkely to result in the image that you anticipated. Take a little time to consider your subject and how you want to light it.

Scene set and lighting scenarios imagined, you need to secure your camera on your tripod and select your exposure. For light painting, try bulb mode controlled by a cable release, a low ISO, and an aperture that gives you the look you want. You'll need to manually focus on your subject, too!
Turn out the lights and start your long exposure.
Use your torch to begin to paint light over your subject. There's going to be some trial and error involved in getting the effect that you want, but that's half of the fun! Not keen on what you see? Try it again!
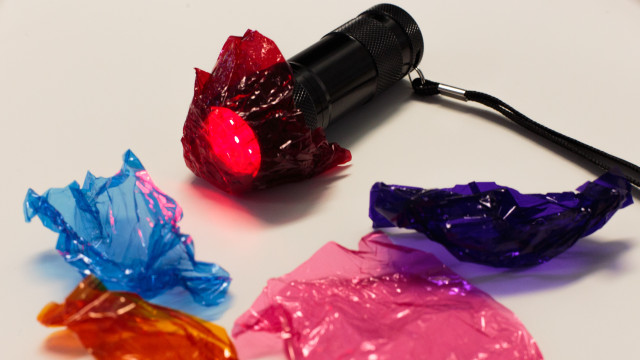
When you've mastered the basics, you can push your experimentations further. Try introducing coloured light to your images by covering your torch with coloured gels, or even sweetie wrappers. You can make cut-out filters to shape your light. Or direct your light more accurately with a snoot manufactured from cardboard and gaffer tape. You're not limited to inside, either. Try light painting buildings and monuments or flower pots - whatever takes your fancy and you've sufficient fire-power to illuminate!
This is something that doesn't have to cost the earth but can render some fabulous results.
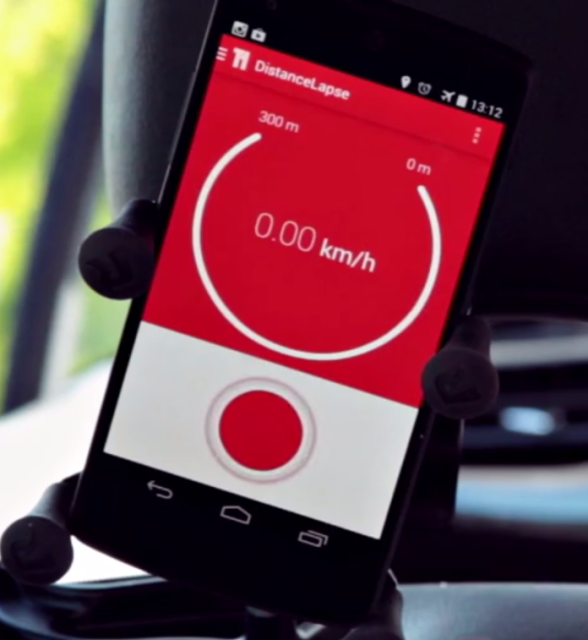
I'm meant to be driving to Edinburgh tomorrow—good health permitting—and if my car weren't due to be crammed to the gunwales with my brother's belongings, I might've considered turning it into a drive-lapse. Or a time-lapse of the journey. It would be possible to do this using a common-or-garden time-lapse technique, but if I were to find myself stuck in a traffic jam (heaven forfend), we'd have shot after shot of my car stationary on the A1, which isn't so thrilling. The clever people at Triggertrap have developed a way around this problem, however: distancelapse mode. Rather than triggering your camera to take a photo at timed intervals, it exploits your smartphone's GPS to take a photo at specific distance intervals. How very nifty!
Shooting a drive-lapse will necessitate mounting your camera and triggering device securely in your car, with a decent view of where you're going. While this might seem simple, whatever means you choose to mount your camera in your vehicle, you must do it safely. Laws will vary from country to country, but the primary consideration is that your kit mustn't obscure the driver's vision and neither must it be a distraction. Do be sure of the regulations before you go anywhere.
You have a few options to mount your camera in your car. A superclamp attached to the passenger seat's headrest stalks is ideal: it won't obscure the driver's vision and the camera has a great view. Alternatively, you could opt for a suction cup on the windscreen or a tripod wedged in the backseat. Remember: it's about being safe.
Choosing your preferred shooting mode for a drive-lapse can be a bit of a conundrum. If you're likely to encounter changes in the weather conditions or light throughout the duration of your journey, manual mode will leave some shots over-exposed and other under-exposed. Aperture priority mode can solve the exposure issue, but leave you with a flicker problem. You're going to have to weigh up which mode will suit your journey, and therefore your final video, best.
If you're going on an especially long journey, you'll need to make provision for this, in terms of your personal needs and your kit's. Your memory card will require sufficient space and you might need an external charger for your phone, too.
With all of these considerations, ehm, considered, it's time to do this!
As we've already discussed, your camera needs to be mounted legally and securely. You don't want it wobbling about if you encounter potholes or sleeping policemen.
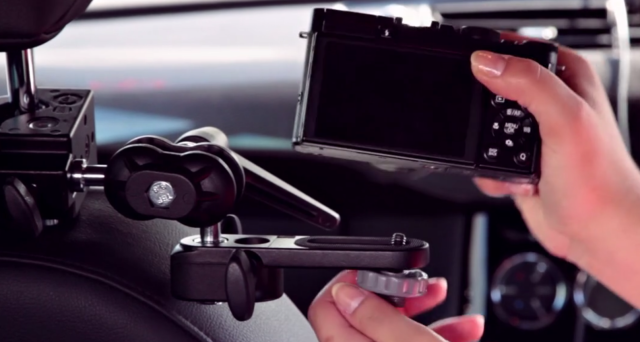
Hook up your camera to the Triggertrap dongle and the dongle to your smartphone. Secure your smartphone, too, as you don't want that moving about.
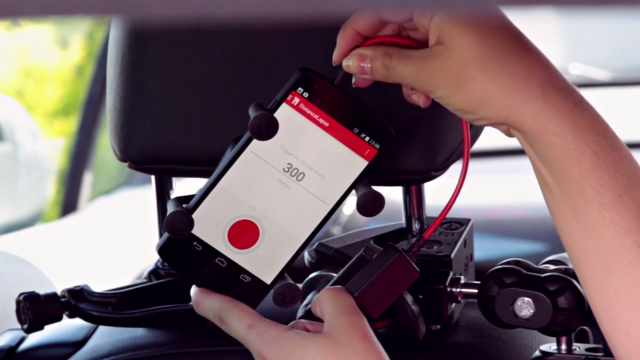
Your camera needs to be in manual focus mode in order for Triggertrap to function, so if it isn't already, switch it to manual focus and adjust to get the image sharp. You also need to choose between aperture priority and manual exposure modes, and set your exposure accordingly.
Open up the Triggertrap app and select the Distancelapse mode. If you're driving on the motorway, 300 metres is a good interval. Hit the big red button, allow the GPS to settle, and then off you go!
When you've completed your journey and have all your images, it's time to compile them into a video. We'll save that for another article, but this one should get you started. Then you get to relive the journey, in shortened form.
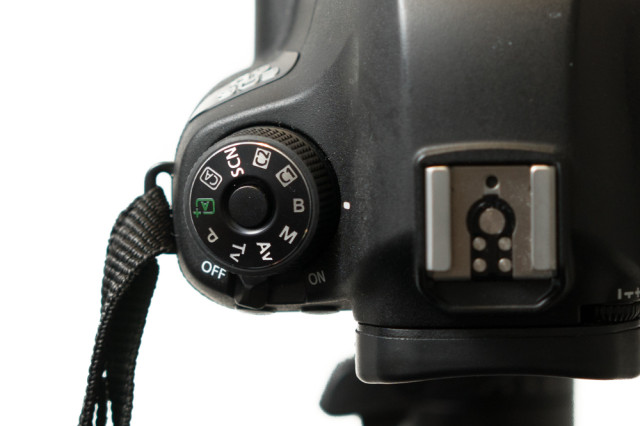
When setting your shutter speed, have you ever wound the adjustment wheel so far into long exposure that you've gone past seconds and found 'B' or 'Bulb' on your screen? Or maybe you've noticed that you have a 'B' option on your mode wheel, somewhere between Manual and Custom settings? This is bulb mode, and it allows you to control the duration of the exposure for precisely as long as you would like. It's perfect for exposures in excess of the 30 seconds that most cameras have as their longest shutter speed, or for when you need to be in control, for example if you're practising high-speed photography. First, a quick word on why it's known as 'bulb' mode. Haje has a much more thorough explanation here, but it doesn't have anything to do with light bulbs. It's from back in the day when you could control your shutter speed using an air bulb connected to your camera.
When your camera is in bulb mode, you open the shutter by depressing the shutter release button; as soon as you raise your finger off of the button, the shutter will close. Seeing as it isn't terribly convenient to stand with your finger on your shutter release button for minutes or even hours on end—and it's not fabulous for camera-shake, either—most people use bulb mode in conjunction with a remote shutter release. And a tripod, but that's probably quite obvious.
Plenty of remote shutter releases come with a locking mechanism, so that you don't need to hold your finger down there, either. However, if you go for something such as our much-beloved Triggertrap, you can select from a variety of different modes to control your super-long exposure, including a timed release that lets you set the duration of your exposure down to fractions of a second, a star-trails setting, and even a bulb-ramping option to fine-tune exposure during very long time-lapse recordings.
Even if you're shooting at night, your camera's sensor will be able to detect far more light than you think it can, especially with a very long exposure. Consequently, using a small aperture is recommended. If you're photographing during the day, you might benefit from a neutral density filter to prevent unavoidably over-exposing your images, too.
It is worth bearing in mind that using bulb mode can drain your battery enormously. Don't set off to capture star trails with a less-than-fully-charged battery. Take a spare if you have one, too. It's a complete waste to maroon yourself in the middle of nowhere with limited light pollution only for your camera to keel over halfway into the exposure.
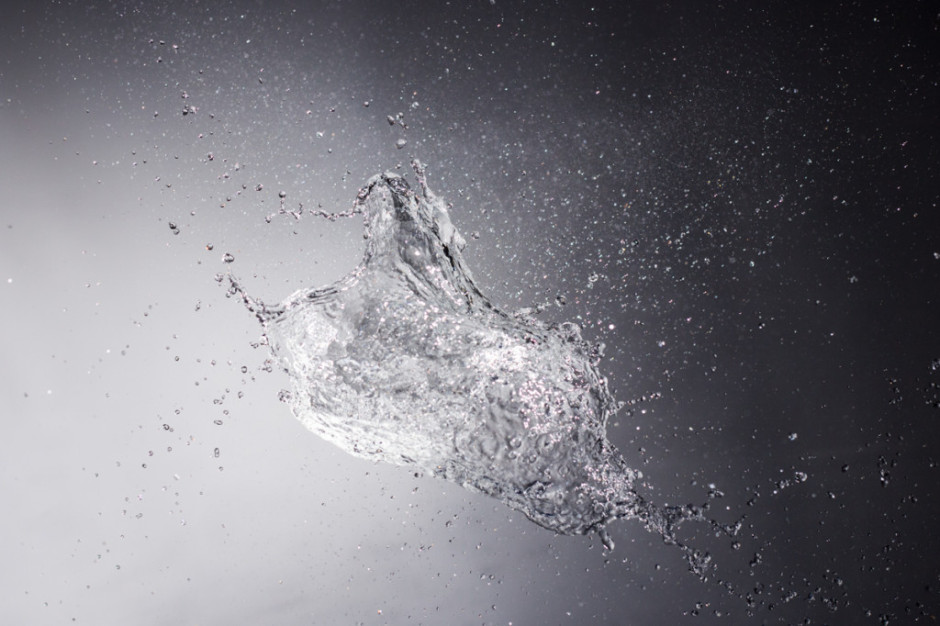
Now that you know what bulb is, what can you do with it? Perhaps you'd like to try some long exposures of landscapes? Or maybe capture some smooth, milky-looking water tumbling from a fall. You might want to try your hand at a star trail, or have a go at light painting. You could even grab a flash adapter and have a crack at some high-speed photography and burst some water balloons. So many options presented to you with so much time from bulb mode!
Once you've got a proper handle on your camera and what it's capable of, and you've built up an understanding of your lenses, you might find that you want to extend your photographic experimentations to flash so that you can create alien space lemons and bright and breezy high-key portraits. It's probably easiest to start out using through-the-lens (TTL; iTTL; or eTTL) metering, but much the same as you progress and take more control over your camera, there will probably come a point when you need to exert more control over your flashes and have to change the mode to manual. Adding a new variable into any mix can be a daunting prospect, but don't let it put you off. It's another skill to master and put to use.
TTL stands for through the lens metering. Rather than you dictating how much power your flash puts out, your camera and your flash will combine to make the calculation. It does this by emitting a small pre-flash to determine how much light is required for the scene and your camera settings.
The primary advantage of TTL metering is that you don't need to think too hard, so when you're photographing an event or something fast-moving, you won't miss your shot for need of fiddling.
But if you need consistency in your exposure between shots, then TTL isn't very useful. You'll have to switch to manual mode.
Much like using manual mode on your camera gives you complete control over your exposure, manual mode on your flash gives you complete control over the power it emits. Between them, they will provide you with consistency.
The power out-put on a flash is typically displayed as fractions. Full power is 1/1; the least powerful setting is usually 1/128.
Don't forget that if you set your flash to full power, it'll be working at its hardest and will take longer to refresh in between shots.
When you're experimenting with your flash, you might want to set the power to 1/16, which is roughly half-power. You won't have too far to move in either direction if you need to make adjustments.
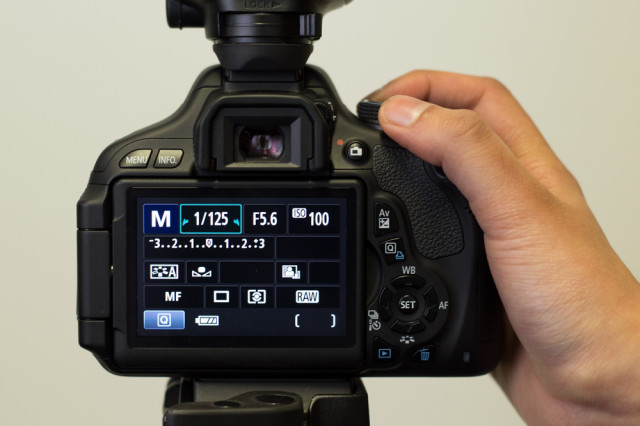
Your camera and flash need to synchronise in order for the sensor to be able to detect the flash. Open the shutter for too short a period of time and it won't be able to catch the flash, rendering the entire process futile. Cameras, therefore, have a maximum shutter speed that can be used in conjunction with an off-camera flash; it's known as the sync speed. The maximum sync speed tends to be 1/125 second, but do check your camera's manual to be sure.
Seeing as you'll be using manual mode on your camera, you'll need to be certain of the impact that altering shutter speed, aperture, and ISO will have on your exposure.
First: changing your shutter speed will not have an impact on your flash exposure. Shutter speed will have an impact on ambient light. Want more ambient light? Use a slower shutter speed.
Second: adjusting your aperture will have an impact on your flash exposure.
Third: ISO has an effect on both flash and ambient exposure.
Now that the theory is in place, how about some practical photography?
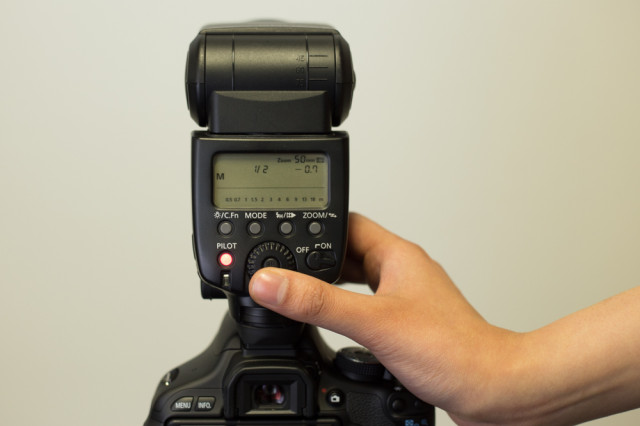
Turn on the flash and set it to manual. This is normally achieved by cycling through the MODE button on most flashes. If you’re not sure about this bit, check the information in your flash manual.
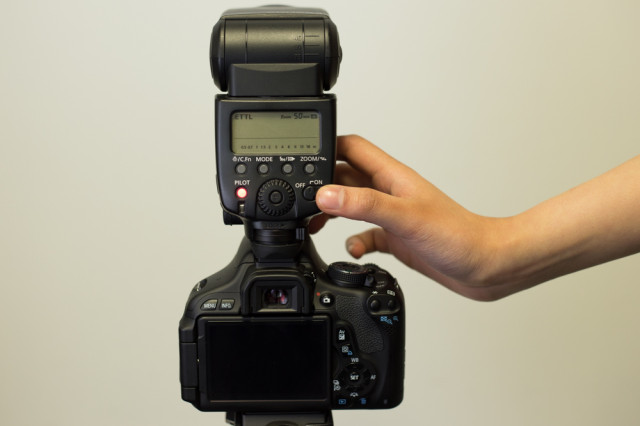
Now you can adjust the power by pressing the arrow keys. 1/1 is full power, and each click down will decrease the power.
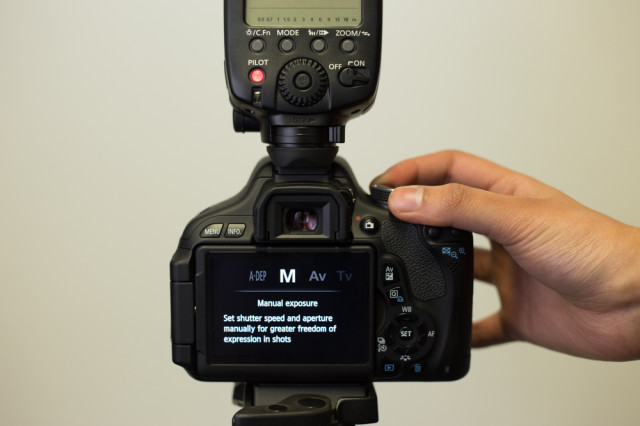
Place the flash on the hotshoe of the camera, or attach the lead or radio trigger if you're using either of those, and switch on the camera. In manual mode, set the shutter speed to 1/125 second and adjust your aperture and ISO.
Take some photos!
If your images are too bright you can:
If your images are too dark, do the opposite!
Experiment with different combinations of flash power, aperture, and ISO to get a feel for what you can achieve with flash photography. After that, the world is your playground!
For a video version of this tutorial, here's Team Triggertrap explaining things:
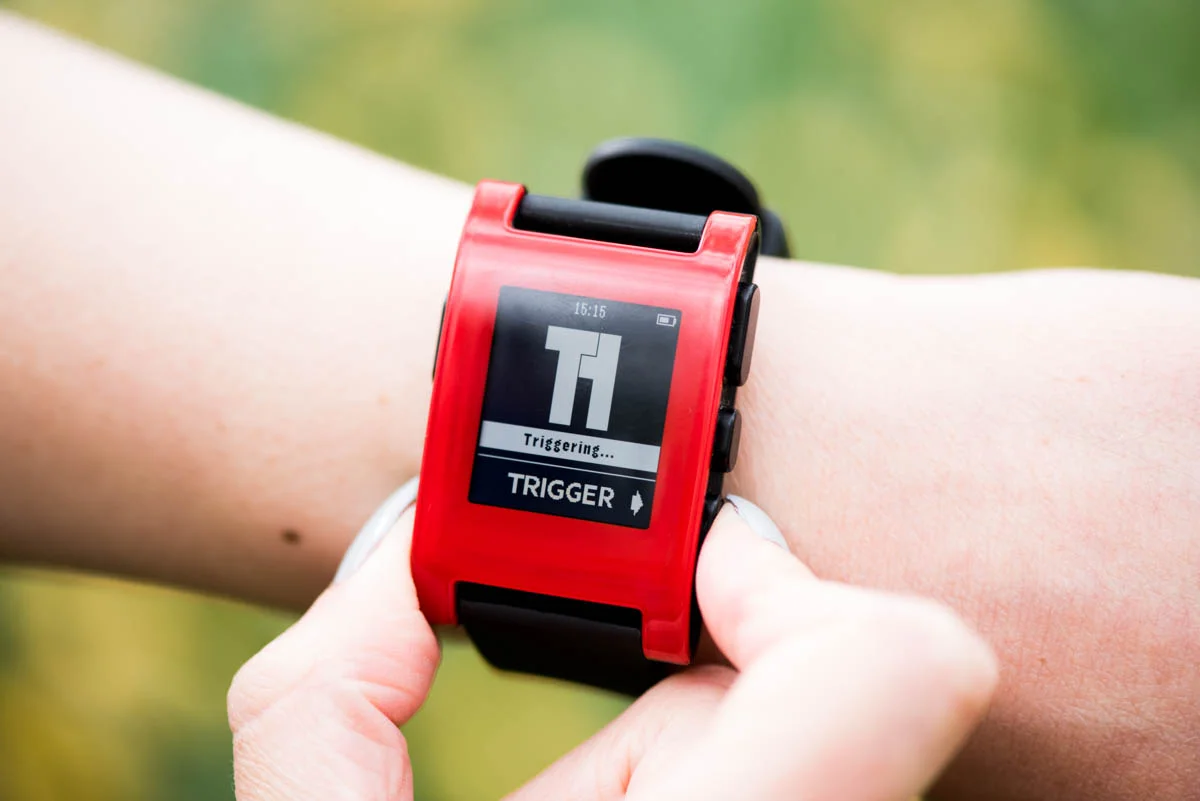
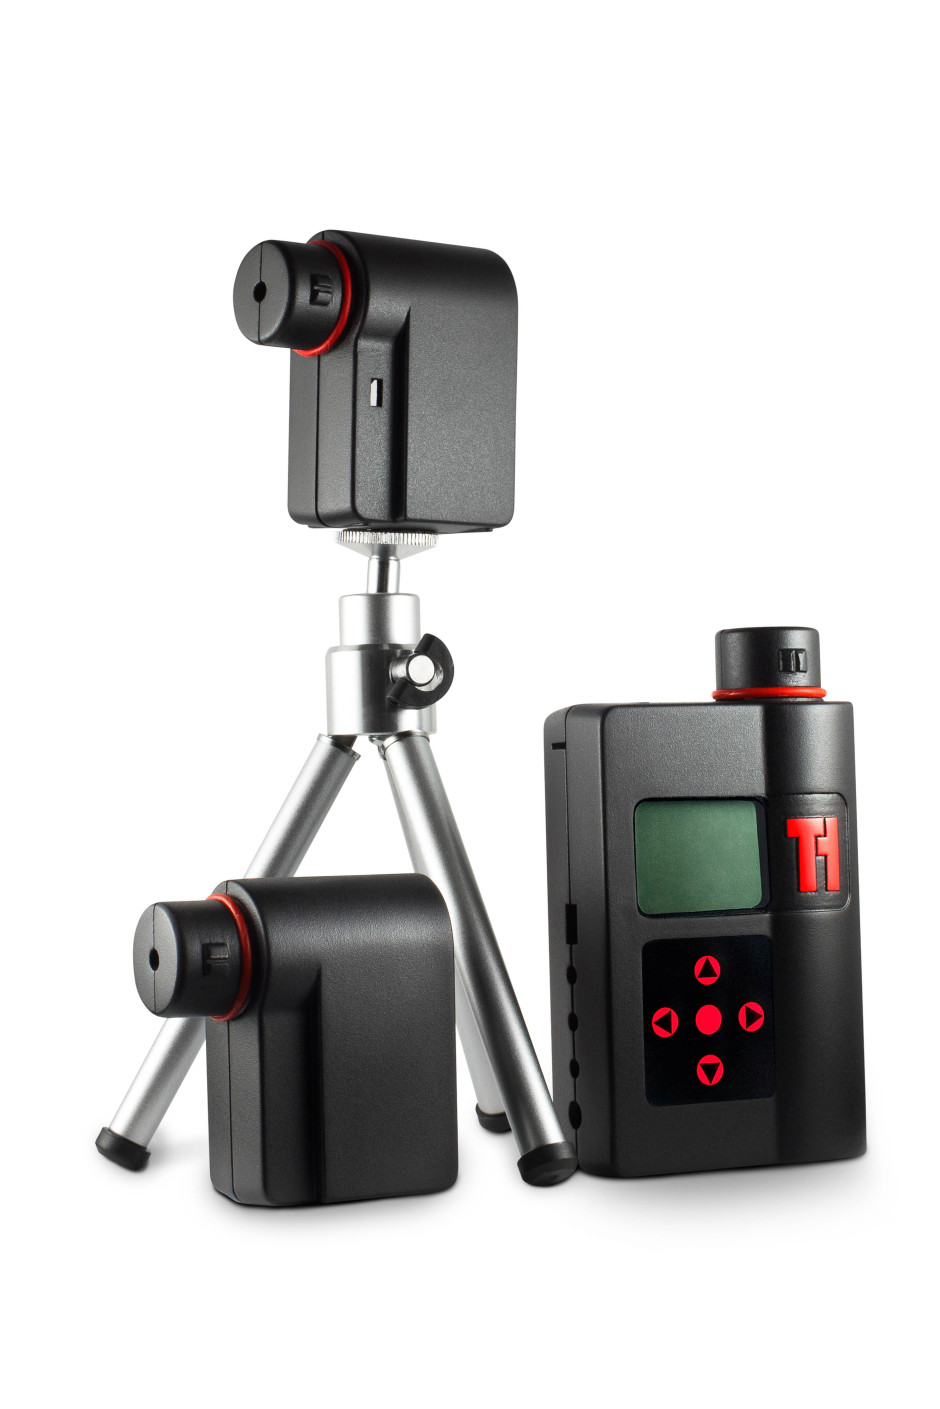
When Haje Jan Kamps (that is the very same Haje Jan Kamps who publishes Photocritic) launched his first Kickstarter project to deliver the Triggertrap universal camera trigger, back in 2011, little did he know that it would spawn a mobile app with 14 ways to trigger your camera, a high-speed triggering device, and an actual company with offices and employees. Now, Triggertrap is returning to Kickstarter to bring you Redsnap: an infinitely expandable high-speed camera triggering tool. Redsnap is a modular system, offering photographers the ability to build the camera trigger that they need for each shoot.
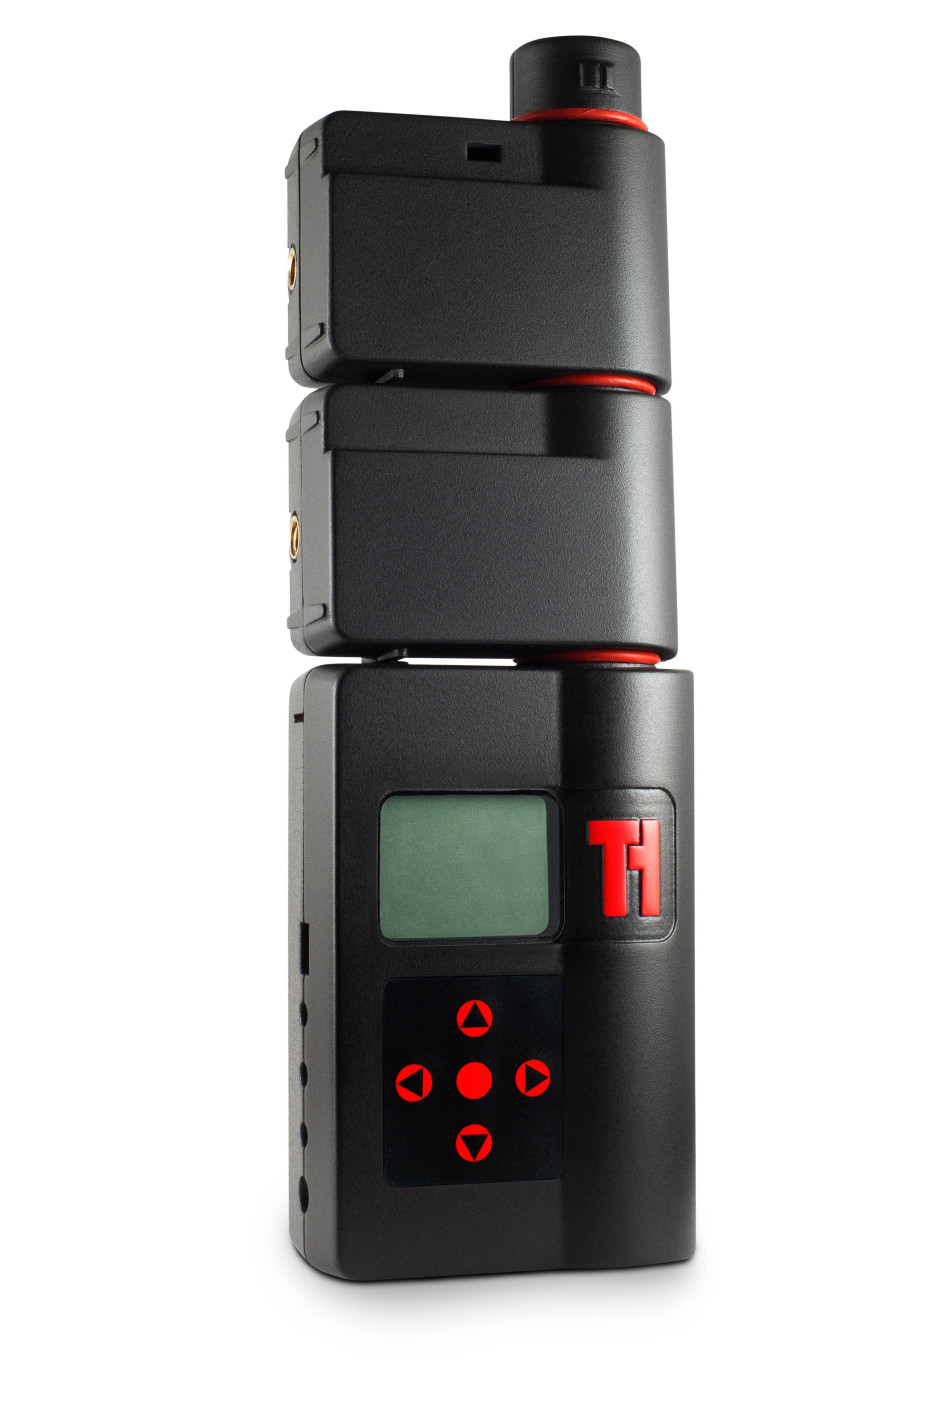
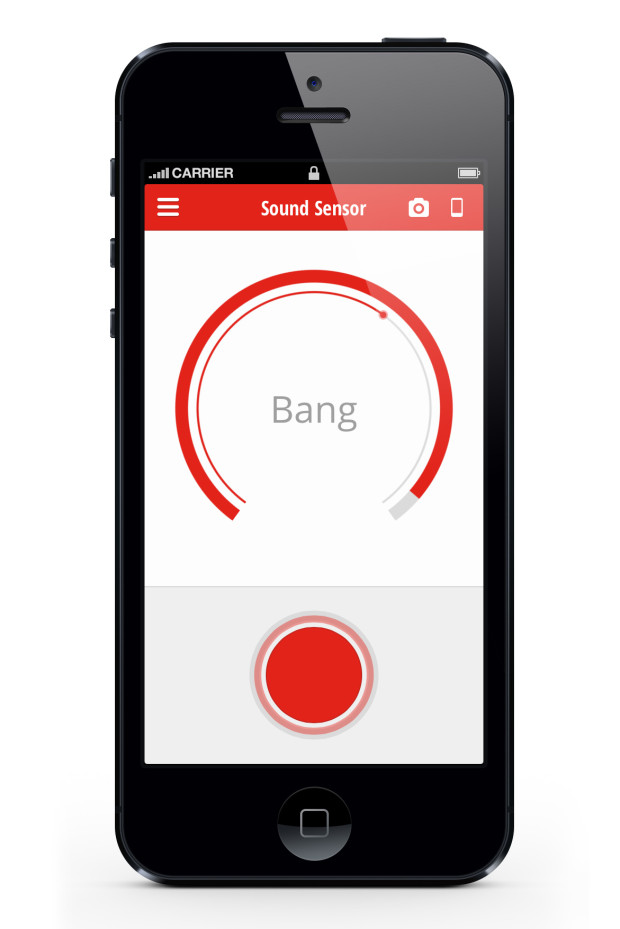
The base block includes the time-lapse options Triggertrap is known for: timelapse, TimeWarp (timelapses that include acceleration), long exposure HDR, and star trail mode. On top of that you can add a high speed laser sensor, great for capturing a bullet in flight; a high speed sound sensor, to capture bursting balloons and smashing vases; a high-speed light sensor to make sure you snap a lightning strike; and a passive infrared sensor (PIR) that's ideal for stalking lions and tigers and bears. Or butterflies, if you feel like something a little less adventurous. That's the initial offering of modules; more are in the works.
Redsnap has three outputs to connect it to three cameras, three flashes, or a combination of both. There's also a connector that allows it to communicate with the Triggertrap mobile device, bringing its triggering options into play, too.
What do you get for your Kickstarter backing, then? The timelapse kit is £35; the wildlife kit is £120; and multiple-sensor kits are priced between £125 and £190. If you're really, really desperate, you can pledge £1,000 and be first in line for a pre-production prototype.
Even more information awaits you on the Kickstarter page, and of course there's a video, too.
It's sleek, it's smooth, it's the new Triggertrap Mobile 2.0 that allows you to trigger your dSLR in 14 ways using your smartphone and a dongle. Want to record a timelapse—that is a sunset timelapse that makes use of bulb-ramping, or timewarped timelapse that has varied intervals between shots, or an HDR timelapse? Or trigger your camera using sound or vibration? How about create a distance-lapse? Maybe record star-trails? Fancy having a go at long-exposure HDR? And do it all wirelessly? Triggertrap has you covered. There's even a wireless flash adapter you can hook it up to for high-speed photography.
The new version is available for both iOS and Android devices and has a simplified design that's not just a pretty screen: switching between triggering modes is now easier. There were a few bugs in the old version that should now be squashed and Android users will be happy to hear that the app can now run in the background, even when the phone is locked, allowing you to timelapse away until your heart is content without fatally draining your battery.
The Triggertrap team is rather proud of version 2.0: 'We saw the opportunity to combine what we learned from the first generation app with the tips we received from our diehard fans to make Triggertrap what we always envisioned it could be,' said CEO and Triggertrap inventor Haje Jan Kamps. 'It certainly helps that our fans wear the pants around here and aren’t shy about letting us know what could be improved, and as a result, Triggertrap Mobile 2.0 is the best triggering solution you’ll find anywhere.'
If you don't already use Triggertrap, you can download the app for free from Apple's App Store or Google Play. It works with your device's internal camera or can be hooked up to supported dSLRs or flashguns using hardware available from the Triggertrap shop.
And if you'd rather watch a video, Triggertrap's made you one of those, too!