

We originally published this article on 7 August 2014. Seeing, however, as Media Space at the Science Museum is currently running a high-speed photography competition in conjunction with its fabulous Revelations: Experiments in Photography exhibition, we thought that it was worth republishing it. Enjoy!
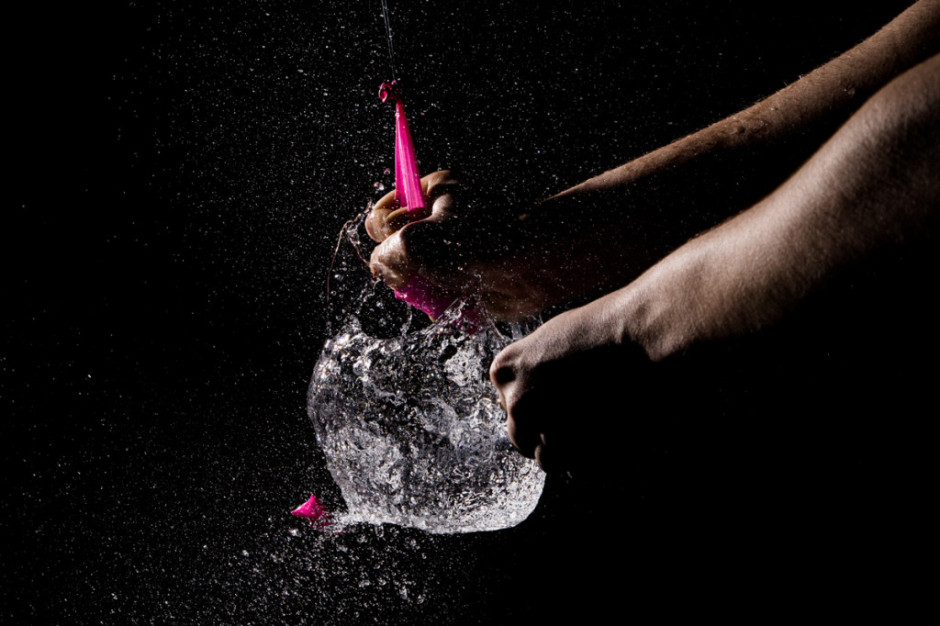
Ever wanted to capture a water balloon going pop? It looks impressive when you get it right, but it isn't as simple as just setting your shutter speed to as fast as it will go. That's still not fast enough. Fear not, however: we've a tutorial to set you straight.
When a fast shutter speed isn't enough
When your camera is in manual or shutter priority mode you can set your shutter speed to its shortest duration to freeze the motion of very fast events. (Or to let in as little light as possible if the environment is very bright, but that's another side to the exposure story.) As fast as 1/4000th of a second might be, which is the fastest shutter speed on my Canon 6D, it isn't always fast enough. Combined with the period of time it takes to actually fire the camera and the duration of an event as quick as a balloon bursting, you might miss it.
Bring out the flash
To overcome this technical failing, you do something that initially might seem counter-intuitive, but when you think about it, makes sense.
You shoot in a dark room using a long exposure and a flash. The dark room means that your sensor won't pick up any light while the shutter is open until the flash fires. The duration of the flash is much, much shorter than your shortest shutter speed, therefore freezes motion far more effectively when it exposes the sensor. Your flash speed—fastest at its lowest power out-put—controls your exposure duration.
Triggering the flash
To accomplish this you'll need a flash adapter and a sound sensor that, between them, will trigger your flash. The balloon goes pop, the sound sensor detects this and triggers the flash, the flash exposes the sensor.
Absolute darkness
Being able to shoot in absolute darkness is critical to the success of high speed photography. Any stray light will reach the sensor and can result in a blurry image. Not what you want.
Giving it a go
Theory grasped? Onwards to the practice!
Step 1: Set your scene
You're going to need a bit of a shopping list to accomplish this:
- Camera and tripod
- Flash and lighting standing
- Sound sensor and flash adapter
- Balloons and water
- Thread and something from which to suspend your balloon (a lighting boom works)
- A sharp implement to pierce the balloon
- A large receptacle, such as a paddling pool, to collect the splash
- Freezer bags and a torch

Start by attaching a balloon to your lighting stand (or other suitable support) with thread, and positioning it over something to catch the water. It's a good idea to test the set-up with an air-filled balloon or two before going the whole hog with water, but when you do fill your water balloons, blow a little air into them first: it helps to ensure they make a popping noise.
And of course, this all needs to be set up in a room that you can make completely dark.
Step 2: Set up your camera
When you've set the balloon scene, pop your camera on its tripod and compose your shot. Use manual focus to get the balloon sharp. Try using an aperture of ƒ/4.0 and a low ISO. Rather than set a shutter speed, opt for bulb mode. If you think that you might struggle to open and close the shutter in the dark using bulb mode, because you will be doing that bit in the dark, try a long exposure of 10 or 15 seconds instead.

Step 3: Set your flash
Position your flash and hook it up to a flash adapter (we recommend the Triggertrap Flash Adapter, but then we would). Switch your flash to manual mode and set it to the lowest power output.

Step 4: Add your sound sensor
Plug in your sound sensor (again, Triggertrap to the resecue) to your flash. The Triggertrap team points out that if you’re using Triggertrap Mobile, plug the flash adapter into the mobile dongle first, and then the dongle into your smart device.

Set the threshold fairly low so that the flash fires on a moderate sound. Don't forget to add a sensor reset delay of around one second to ensure the flash only fires once.
Step 5: Take some waterproofing measures
Water plus electronic equipment equals potential disaster; a bursting water balloon will soak your kit. Protect anything in splash range with freezer bags.

Step 6: Lights out!
Everything should be ready to go! Turn out the lights and get ready to take some photos. Having a torch is handy.
Step 7: Testing, testing?
Is the flash awake? Is the sound sensor working? Turn off your torch and start the bulb exposure. Make a loud noise, such as a shout. The flash should fire. Once the flash has fired, stop the bulb exposure and check your exposure. If things are too dark, try bumping up your ISO rather that boosting the flash power. Test until you're happy.

Step 8: The real thing
Now for some balloon popping. String up your balloon (maybe try an air-filled one first), test the flash again, make sure that everything is completely dark, and then open the shutter. As soon as you can after opening the shutter, burst the balloon. This should fire the flash. When that's happened, close the shutter again. (If you struggle to open and close the shutter in bulb mode in the dark, try setting a long exposure instead, say 10 or 15 seconds.) You should have a photo of a gush of water bursting out of a balloon!
Finally: if you prefer a video, here's one prepared by Team Triggertrap:
Much of this, including all the images, is based on the fantastic
How to capture a water balloon popping
tutorial found on Triggertrap's How-To microsite, and it's reproduced with permission.
is full of great content for making the most of your camera. You should take a look.