


Blur isn't always bad. We show you why, and how to manipulate it to your creative advantage.

When you hear the term 'high-res' thrown about with such abandon when it comes to images for web use, have you ever stopped to think just how big or how high quality and image meant for the web needs to be?
There's an assumption that high-contrast images are more dynamic, more compelling, more inviting. Have a go at some low-contrast photography. You might surprise yourself with the results.
Balance doesn't mean symmetry; it means an internal consistency and tension within your photos. And it's a vital element of composition.
Great photos might be down to a little bit of luck, but most of that 'luck' you make yourself. Don't believe us? Read on...
We're probably all familiar with the notion of aperture controlling the depth-of-field in our photos. By using a faster aperture, you create a shallower depth-of-field. To keep more of your image in focus, you need to use a smaller aperture. But there's a whole lot more to depth-of-field than adjusting your aperture to get more or less of the scene in focus.
Let's start with setting out what we mean by depth-of-field. It's the range of distance in a photo that is considered to be 'acceptably sharp', or what we would regard as 'in focus'. Only the actual point of focus in a photograph is definitively sharp and 'in focus'; depth-of-field describes the zone of acceptable sharpness either side of it. A wider band of 'acceptable sharpness' running through an image equates to a greater depth-of-field. To introduce more blur into your photos you would want a shallower depth-of-field with a narrower band that's 'acceptably sharp'.

It's worth remembering that there's no sudden transtition from 'sharp' to 'unsharp': focus falls off gently on either side of the plane of focus, regardless of the aperture you use. It is fair to say, though, that larger apertures have a more rapid transition from in- to out-of-focus than larger apertures.
[gallery ids="6855,6856,6857"]
Controlling the depth-of-field in an image is achieved primarily by adjusting your aperture—a smaller aperture for a greater depth-of-field; a larger aperture for a shallower depth-of-field—however, there are other factors that affect it, too.
You'll often hear people say that telephoto lenses have a shallower depth-of-field than wider angled lenses. This isn’t strictly true. It’s more accurate to say that because telephoto lenses are mostly used to magnify subjects, and the subject will then fill more of the frame relative to the background, the depth-of-field appears to be shallower.

All the same, it's worth capitalising on the magnifying effect from telephoto lenses to pick out your subjects and surround them with blurred foregounds and backgrounds.
If you've ever practised macro photography, you'll appreciate how getting closer to your subject makes it harder to get it all sharp. The closer that you position your subject to your lens, the shallower your depth-of-field will be. Choose a subject further into the background and you'll find that the depth-of-field surrounding it is larger.

Depending on the focal length you use, you will find that the depth-of-field isn't divided equally in front of and behind the plane of focus. Instead, the area of acceptable sharpness behind the point of focus is generally larger than that extending in front of the focal plane. As focal length increases, so too does the distribution of the depth-of-field in front of the subject.
When you shoot with a focal length of 15mm about two thirds of the depth-of-field will be behind the subject and one third in front of it. When you get to 400mm it's closer to a fifty-fifty divide.
Depth-of-field: not just about aperture.
The picture-taking world appears to have been struck by an unfortunate bodily malfunction pandemic that is having an unnecessarily detrimental impact on the quality of photos the globe over. The malfunction affects camera users indiscriminately, with dSLR and CoSyCa owners, smartphoneographers, and compact camera users all under threat of its effects. It manifests itself as an inability for the camera user to hold her or his arms tight into the body when taking a photo, and instead standing with elbows projecting from the body, perpendicular to the torso. These unfortunately afflicted photographers resemble chickens attempting to flap their miserably clipped wings. Symptoms of this malfunction present themselves as camera-shake and unsalvageably blurry images, brought about by the inability to hold the camera steady. It leads to the records of hundreds, thousands of precious moments being consigned to the digital dustbin, notably those involving candles and birthday cakes, because the subjects are unclear, fuzzy, or even in double. Consequently, the emotional impact of the condition is thought to be quite distressing. If caught early, the condition is entirely treatable, but without speedy rectification there is no hope for affected photos.
The impact on photos taken by smartphoneographers is regarded as especially severe, as the reduced size and weight of these devices makes them inherently more difficult to stabilise.
Treatment involves a very simple modification of the body when holding a camera in preparation for taking a photo: the elbows need to be tucked into the abdomen and the arms held close to the torso. This enables the photo-taker to hold the camera with greater security and thereby minimise the chances of a photo obscured by blur and shake. In combination with other techniques, such as holding ones breath and taking a firm stance or leaning against something secure, positive results are anticipated.
Should photo-takers find it especially difficult to modify their stances, or should conditions be suggestive of camera-shake, it is recommended that a tripod or other stabilisation device is employed.
It is hoped that a general information campaign encouraging photo-takers to move their elbows down and in will see an overall improvement in the quality of photos taken and a reduction in people mimicking poultry.

There have been rumours floating around for a little while that Adobe was about to unveil Retina support in Photoshop; those have been confirmed today, along with some other new features for Creative Cloud subscribers.
Whether you have a Photoshop licence or a subscription to Creative Cloud, there's an update available to provide support for HiDPI displays.
If you're a Creative Cloud member your update will also enable to following:
There have also been some updates to Creative Cloud as a whole as well as other Creative Cloud products, not just its Photoshop features. You can now subscribe to Creative Cloud on a team basis; Creative Cloud Connection allows for desktop synching, a la Dropbox; and there's also Creative Cloud Training, which provides members with a library of tutorials and trial courses.
If you're not like one of the one million people already subscribed to Creative Cloud, an annual subscription comes in at £38.12 a month (excluding VAT). Creative Cloud for teams is more expensive whilst there are discounts for for students, teachers, and existing Adobe customers with CS3 or later.
Offering Photoshop updates to Creative Cloud subscribers before they're rolled out to stand-alone licence-holders is clearly a perk of the package, but there's been no indication when these new features (barring the retina support) will be rolled out to everyone. Combined with the discount for CS3+ licence holders, I'm intrigued to see if this is the beginning of a steady enforced obsoletion of the individual package, and a move to a subscription-only package.
Something to keep an eye on.
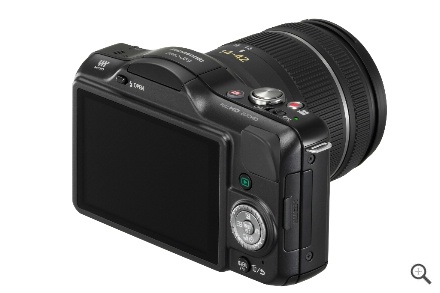
Just five days after Sony launched its diminutive NEX-C3, claiming it to be the smallest, lightest camera in its class (so that’d be without a mirror but with interchangeable lenses), Panasonic has wheeled out the Micro Four Thirds mount Lumix GF3 to wrest from it the crown of tininess. The camera doesn’t look that bad, either.

It comes with just about everything that you’d expect from a shiny new camera now. There’s a touch screen that allows you to pick your point of focus with the tap of a finger; there’s full HD video (1080i at 25 frames per second) that comes with full-time auto-focus and auto-focus tracking; there’s a range of in-camera editing facilities, such as retro and high-key; and of course there’s the all-singing, all-dancing intelligent auto plus function. The camera will choose the right mode for the picture, there’s anti-blur technology a-plenty, and a face recognition doo-dad.

If you want to have a go at 3D photography, there’s a lens for that, too.
At 12 megapixels, it seems as if Panasonic might be calling a truce in that particular arms race. Okay, so things might’ve switched to how small they can make things now, and it might get old pretty quickly, but for now it’s more fun.
Want one? They’re available in four different colours for £499 (US$599.99) with a 14-42mm kit lens from mid-July.
More details available from Panasonic.

Breaking the rule of thirds works well often - especially in scenes like this
Few things confuse me more than someone asking me what camera I use. I understand the question, but I can't help but wonder why the answer would tell them anything about me as a photographer. After all - a painter is rarely asked about what brand of brushes she uses, nor do people care much about which word processor a novelist used.
Great photographs aren't made by a camera-and-lens combination; the equipment you hold in your hands and the tools you use to take the image from RAW file to final JPEG are completely irrelevant to most discussions about photography as an art form. Why? Because none of these things are the wall that stands between you and your yet-to-be-taken masterpieces.
A great photograph needs two things: It needs a creative vision, backed up by a solid set of technical skills. A photo that has one of these two things nailed can be good - but it won't be great.
The technical side of photography has myriad different elements to it, and a good photographer has to juggle all of them to create the perfect photograph. Getting a photograph is an equation of lighting, shutter speed, aperture, ISO, focal length, depth of field, focus, blurring (or the absence thereof), and a whole boatload of other variables. As a photographer, you are akin to a scientist using a sophisticated optical instrument, measuring the world around you, one fraction of a second at the time.
Photographers who are just starting out tend to have the biggest problems with the technical side of photography: Over- or under-exposure were the arch-nemeses of many a fledgling snapper. The challenges of avoiding focus blur, camera blur, and subject motion blur... You name it, we've all been there.
Most photography classes (forgive the pun) focus on photography as a technical challenge. In a way, that makes sense: It's the first hurdle that causes many to stumble out of the starting blocks. Sadly, by making photography into science, many new photographers are turned off - there are only so many diatribes about f-stops a right-minded human being can take before they wander off and reach for the Playstation controller.
More depressingly, many photography teachers stop when their students have finally figured out how to get a classroom printer to vomit up a reasonably well-exposed, moderately in-focus image, forgetting what photography was meant to be all about. But I'm getting ahead of myself...
Over time, people learn their tools and what can be done with them. They'll pick up rules, tips and tricks that help them compose well-exposed, correctly white-balanced images that are tack-sharp, well lit, and generally attractive-looking, realistic and accurate depictions of the world.
As you become a more experienced photographer, it's likely that the technical side of photography becomes second nature. Your camera and lens become extensions of your brain, your fingers glide effortlessly over the buttons, and you find yourself tickling the settings to perfection every time. When the time comes to buy a new camera body, you feel that sinking, forlorn feeling of having to re-adjust after the manufacturer moved the buttons around by a fraction of a centimetre on the new version of the camera.
Whilst being able to take technically perfect photos is a surprisingly rare skill, a technically proficient photographer is still merely a technician. Granted, there are places where photographic technicians have a place (archeology, to pick an example at random), but in most cases, merely getting a photo in focus and correctly exposed is not enough.
Personally, I got started in photography because the technical side of it was interesting to me. Freezing motion with fast shutter speeds - or the exact opposite - was a thrill. Gradually, as I started getting better at the science side of things, I started realising there was more to photography. I started looking at masterpieces by well-known photographers, and after an embarrassingly long time, it dawned on me why their photography was so much better than mine: They had a story to tell.
You've probably been at a party where someone is telling a story and it seems as if everybody is clinging on to the storyteller's every word. The onlookers are practically cheering the narrator on to continue with the incredible tale. I'm willing to bet that this particular raconteur could make any mundane, trivial topic come to life.
If the technical side of photography is the 'how', then the creative side is the 'why'. A great photograph isn't the absence of blur or the perfect exposure: It is telling a visual story, and telling it in such a way that the viewer can't tear themselves away.
Whereas the technical discipline of photography has shutter speeds and ISO choices in its war chest, the creative camp has an impressive array of weapons tucked away, too. The crop of an image, angle, choice of colours, taking the photograph at the decisive moment, being in the right place at the right time, patience, persistence, and the ability to pre-visualise the perfect shot are all aspects of capturing the perfect creative shot.
If a technically proficient photographer without creative insight is a technician, the opposite - a creative snapper without technical skills - would be a whiney art student. You know the type: They'll have an extensive portfolio of 'artfully out of focus' shots that have been photoshopped, textured and filtered to within an inch of their miserable photographic lives.
Don't get me wrong - I don't have a problem with people who bend the 'rules' of photography for creative effect. Quite the opposite, in fact. I do, however, encourage people to understand the photographic principles they are flaunting. Break all the rules you like, but as a creative photographer, you have to know why and how you are throwing convention to the wind.
When I am teaching, I am secretly more excited about students who come brimming with ideas but no photography skills, than the ones who know a lot about photography but haven't had an original thought in their skulls: The challenge with the creative perspective of the photographic quandary is that creativity is bone-cursingly difficult to teach. Which is a shame, because whilst most photographers eventually become proficient with their equipment, only a few go on to use those technical skills with amazing outcome - and all of that is down to creativity.
Picasso, it is said, once drew a sketch on a piece of paper for someone, and then charged them a lot of money for it. "Hey, that only took you 10 minutes", the potential buyer reportedly said. "No, that drawing took me 30 years", was the retort. If we assume for a moment that this anecdote is true, I'm completely with Picasso on this one: A photo can less than a thousandth of a second to make, but nobody learns photography in a day.
To improve your photography, the key is to know where your weakness lies. Easier said than done, but I found that adding an extra step to my photographic workflow has been of immense value: For every photo (even if I'm about to bin it for any reason), I make a mental note of two things: A technical, and a creative thing I could do to improve that particular photograph. If, at the end of the photo editing session, it turns out I have made a lot of mental notes about focus, then perhaps the time is ripe to pencil in a practice session. If I seem to forget to leverage the angles of my photography to the best effect, then - guess what - perhaps that's what needs to be worked on.
The great thing about self-evaluation is that this technique works well to improve both your creative process and the technical side of your photography. For every shot you're looking at, the question is simple: What could I have done to make this better? Especially for the photos you are most happy with, the answers are going to be valuable additions to your mental checklist the next time you're out and about with your photography kit. Baby-step by baby-step, you'll get closer to that ever-elusive Perfect Photo.
