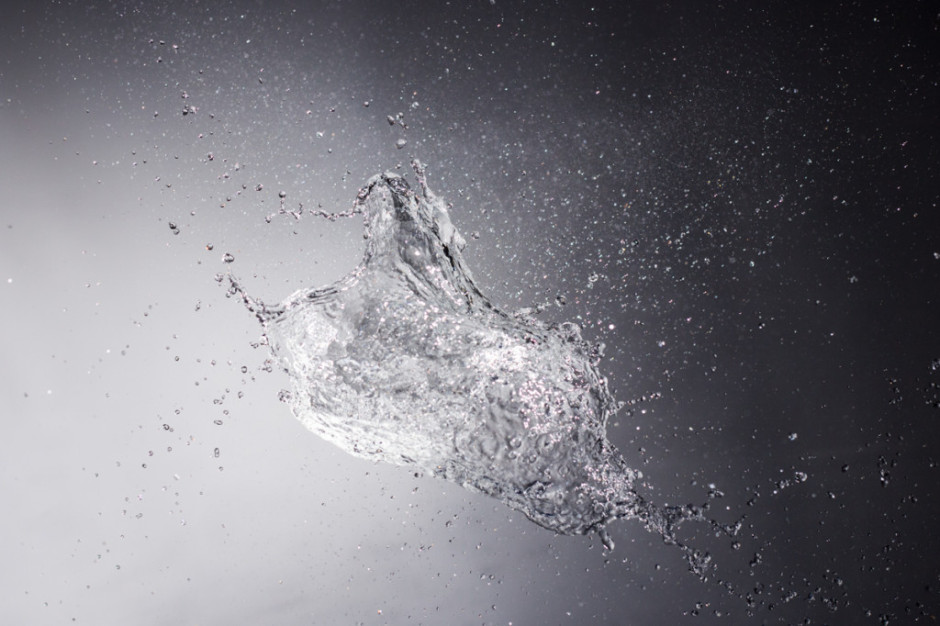
Pop! Squash! Splat! Learn how to capture amazing photos of balloons going bang!

When you hear the term 'high-res' thrown about with such abandon when it comes to images for web use, have you ever stopped to think just how big or how high quality and image meant for the web needs to be?
There's an assumption that high-contrast images are more dynamic, more compelling, more inviting. Have a go at some low-contrast photography. You might surprise yourself with the results.
Balance doesn't mean symmetry; it means an internal consistency and tension within your photos. And it's a vital element of composition.
Great photos might be down to a little bit of luck, but most of that 'luck' you make yourself. Don't believe us? Read on...
If you're up to date on your photography history, you'll be aware that some of the stuff we used to have to do to get artificial light was basically the same as setting off fireworks next to your camera to capture the photos. Quaint as that feels, this is still the reality for high-speed photographers... If you want a swift way to kill yourself with photography equipment, the high-voltage flashes used to stop fast-moving objects is an easy way to go.
Let me explain. When we're talking about 'high speed' photography, we're not talking about the time it takes to trigger a flash. With a good high-speed flash trigger, you can go from trigger event (say, a laser beam being broken, or a loud enough sound) to strobe flash in a matter of microseconds.
The challenge lies elsewhere: If you're trying to take a photo of something that moves very quickly indeed—say, a bullet—you need a very short burst of light. Now, what photographers traditionally think of as a very short burst of light—like the strobe from your studio flash—is actually a very long burst.
The problem is this: A standard .22 bullet has a muzzle velocity of 340 metres per second. So, if your very high-end camera with a shutter speed of 1/8000 second were to try and capture this bullet in flight, you'd be out of luck. Even at 1/8000 second, your bullet will travel 4.2 cm / 1.6 inches. That means you get a tremendous amount of blur in your photo — you certainly couldn't stop it.
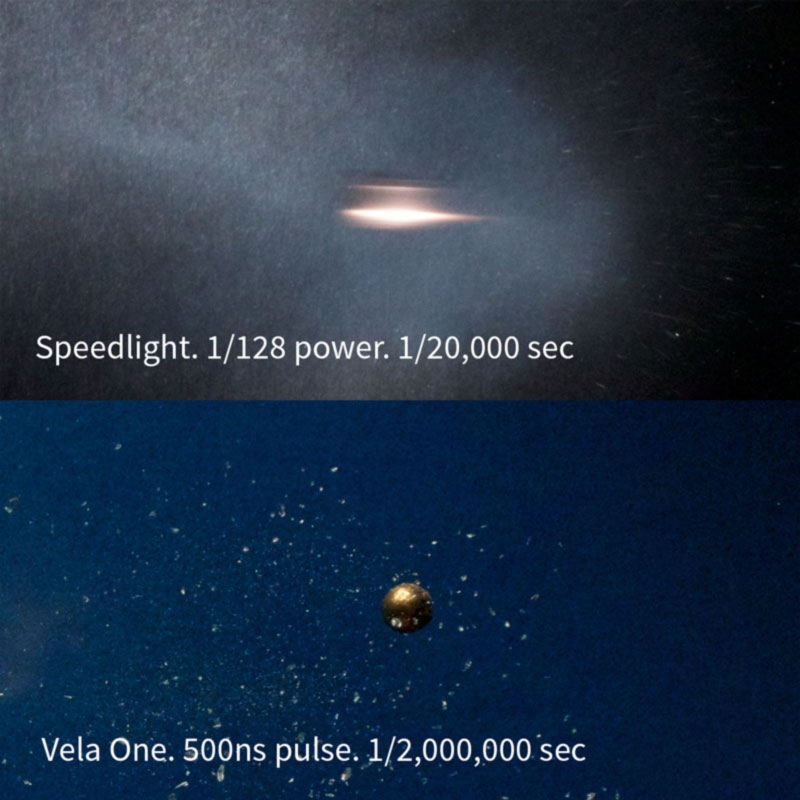
So, what is a poor photographer to do? Well, a flash has a much shorter duration. A PC Buff Einstein (known to have a very short flash duration) will be about 1/13,000 second—but, when translated to our flying bullet, we're left with a blur again—2.6 cm / 1 inch is still a streak of blur. That's no way to stop a bullet, photographicaly speaking.
Even really short-duration strobes—like a Nikon SB-80DX at its lowest power output—has a duration of 1/22,000 second. Impressive, but no match for our trusty bullet — 1.54 cm / 0.6 inches. That's more like it, but still results in a rather blurry image.
So, what's a poor high-speed photographer to do? Well, Harold Edgerton, who was the father of high-speed photography, used an 'air gap flash'. If that sounds fancy, trust me—it really isn't. Imagine an electrode and a cathode, with a spark jumping between the two. In essence, you've got lightning—yes, real lightning—happening in your photography. It isn't difficult—anyone with a basic knowledge of electronics can build one—but it's incredibly dangerous. As in, could-very-well-kill-you-type-dangerous. We're talking at least 20,000 volts to create a spark that's bright enough to use for photography.
There are some slightly-less-likely-to-kill-you solutions out there, but they cost the earth: Upwards of $2,000 for basic short-duration strobes. Interesting, yes, but you'd really have to love high-speed photography to lay down that sort of money to embrace your hobby.
The solution, it seems, might be in technology. The clever lot over at Vela Labs have come up with a device they call the Vela One. It's not available to buy yet, but a Kickstarter campaign is aiming to rectify that situation.
To solve the 'this thing might kill you' and the price-tag issue, they're using LEDs designed for architectural use (i.e. mega-bright LED bulbs), and then they blink them very, very briefly.

By dumping a ton of power (in fact, 2000 times what they are designed for) into the LEDs for a brief period of time, they're able to get a lot of light out of the LEDs, for a very brief burst. How brief? Well, guys at Vela Labs claim it can be done in 1/2,000,000 of a second—which translates to 0.017 cm—or about twice the width of a human hair. To a photographer, this means pin-sharp photos, even of objects of moving at high speed.
Of course, this doesn't come for free: The cost of super-brief flashes of light is brightness. That is true for an air-gap flash, but also for the Vela One; but it looks as if the One offers a pretty good trade-off between flash duration and brightness. The photos speak for themselves.
At £550, it's not cheap, but it's a lot more affordable than some of the other high-speed options out there (although there's a VIP Early Bird offer of £400, but you need to be quick with only ten available)... And at least it's unlikely to kill you as you use it, which I find is always a feature I look for in most of my photographic kit.
The results? Well, let's take a look:

If you want the Vela One to exist, you'll have to head over to Kickstarter, and be quick about it, too. The campaign ends in only 22 days, so get a wriggle on!
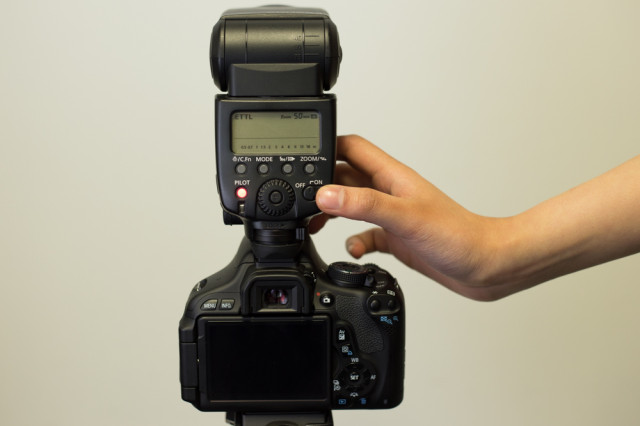
Once you've got a proper handle on your camera and what it's capable of, and you've built up an understanding of your lenses, you might find that you want to extend your photographic experimentations to flash so that you can create alien space lemons and bright and breezy high-key portraits. It's probably easiest to start out using through-the-lens (TTL; iTTL; or eTTL) metering, but much the same as you progress and take more control over your camera, there will probably come a point when you need to exert more control over your flashes and have to change the mode to manual. Adding a new variable into any mix can be a daunting prospect, but don't let it put you off. It's another skill to master and put to use.
TTL stands for through the lens metering. Rather than you dictating how much power your flash puts out, your camera and your flash will combine to make the calculation. It does this by emitting a small pre-flash to determine how much light is required for the scene and your camera settings.
The primary advantage of TTL metering is that you don't need to think too hard, so when you're photographing an event or something fast-moving, you won't miss your shot for need of fiddling.
But if you need consistency in your exposure between shots, then TTL isn't very useful. You'll have to switch to manual mode.
Much like using manual mode on your camera gives you complete control over your exposure, manual mode on your flash gives you complete control over the power it emits. Between them, they will provide you with consistency.
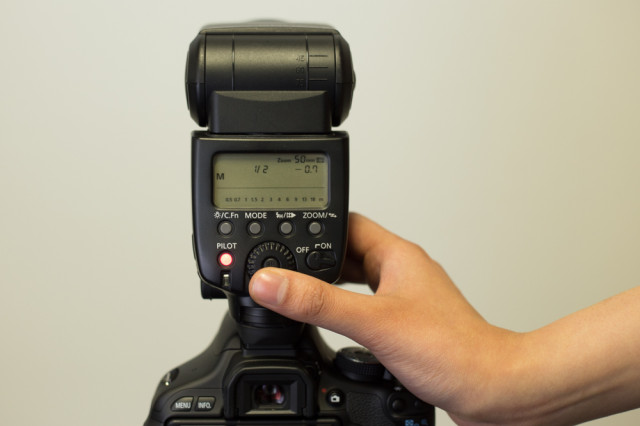
The power out-put on a flash is typically displayed as fractions. Full power is 1/1; the least powerful setting is usually 1/128.
Don't forget that if you set your flash to full power, it'll be working at its hardest and will take longer to refresh in between shots.
When you're experimenting with your flash, you might want to set the power to 1/16, which is roughly half-power. You won't have too far to move in either direction if you need to make adjustments.
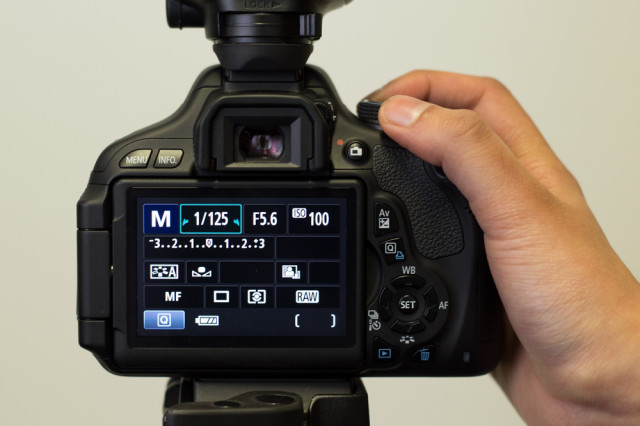
Your camera and flash need to synchronise in order for the sensor to be able to detect the flash. Open the shutter for too short a period of time and it won't be able to catch the flash, rendering the entire process futile. Cameras, therefore, have a maximum shutter speed that can be used in conjunction with an off-camera flash; it's known as the sync speed. The maximum sync speed tends to be 1/125 second, but do check your camera's manual to be sure.
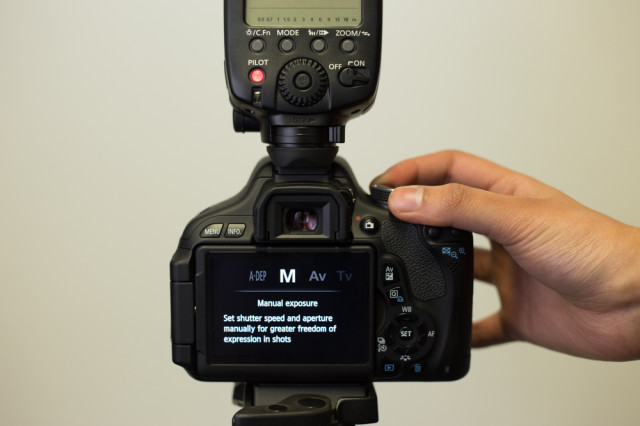
Seeing as you'll be using manual mode on your camera, you'll need to be certain of the impact that altering shutter speed, aperture, and ISO will have on your exposure.
First: changing your shutter speed will not have an impact on your flash exposure. Shutter speed will have an impact on ambient light. Want more ambient light? Use a slower shutter speed.
Second: adjusting your aperture will have an impact on your flash exposure.
Third: ISO has an effect on both flash and ambient exposure.
Now that the theory is in place, how about some practical photography?
Turn on the flash and set it to manual. This is normally achieved by cycling through the MODE button on most flashes. If you’re not sure about this bit, check the information in your flash manual.
Now you can adjust the power by pressing the arrow keys. 1/1 is full power, and each click down will decrease the power.
Place the flash on the hotshoe of the camera, or attach the lead or radio trigger if you're using either of those, and switch on the camera. In manual mode, set the shutter speed to 1/125 second and adjust your aperture and ISO.
Take some photos!
If your images are too bright you can:
If your images are too dark, do the opposite!
Experiment with different combinations of flash power, aperture, and ISO to get a feel for what you can achieve with flash photography. After that, the world is your playground!
For a video version of this tutorial, here's Team Triggertrap explaining things:
Inspired Photo Gear is steadily augmenting its range of photography accessories, adding two new lighting modifiers to its Faith lighting stands and Lollipod multi-use supports. As well as stocking the Lightblaster, which we looked at and loved a few months ago, it's now selling the RoundFlash modifier, too. The RoundFlash is a lightweight (230g) and portable collapsible ring light and soft box that can be used either on- or off-camera. On-camera, you fit it around your lens with your hotshoe-mounted flash feeding into it. Off-camera, you mount your flash on a lighting stand and then attach the RoundFlash to it.

The RoundFlash modifier fits around lenses with diameters upto 10cm and is perfect with lenses designed for portraiture (it is a ring light, after all) for example Canon's 85mm. If you've an especially small lens, try adding a lenshood to create more stability.
There's even a video demonstrating just how fast it is to set up:
The RoundFlash is available from Inspired Photo Gear for a special introductory price of £92.95. If you don't want to spend on a ring light when you already have a set of speedlights, it might be worth a look.
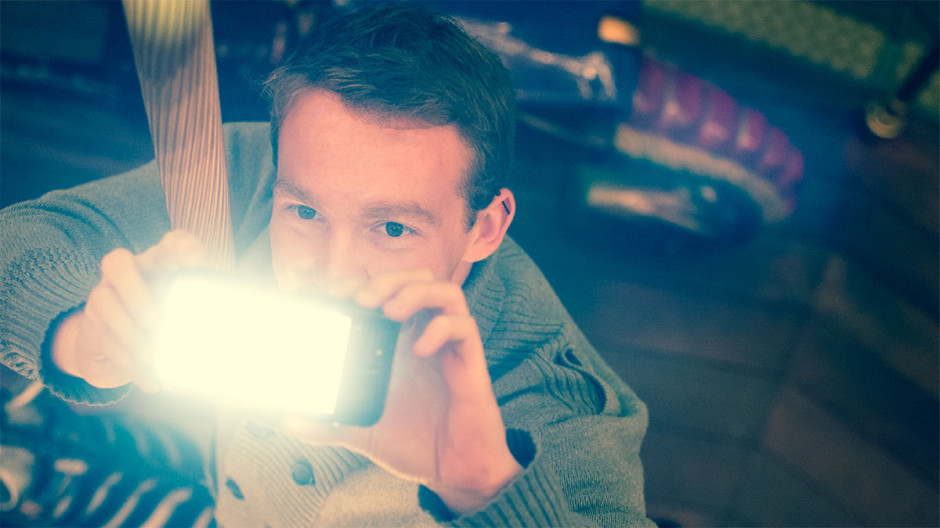
In December last year we featured a Kickstarter project called Lightstrap, which aimed to bring better lighting to smartphone photos. About a week into the campaign, Brick and Pixel, the team behind Lightstrap, pulled the plug on it citing that a better offer had come along. While quite a few people were disappointed by this decision, it has proved to be something of a small mercy for Ember, a new night photography tool that is looking for Kickstarter backing. Ember slides over your smartphone like a case. It comprises 56 LEDs and a diffuser, with the ability to adjust its brightness using a slider and a range of filters to control for light temperature. This should make for more evenly lit photos that don't wash-out people's skintones or give them evil red eyes.
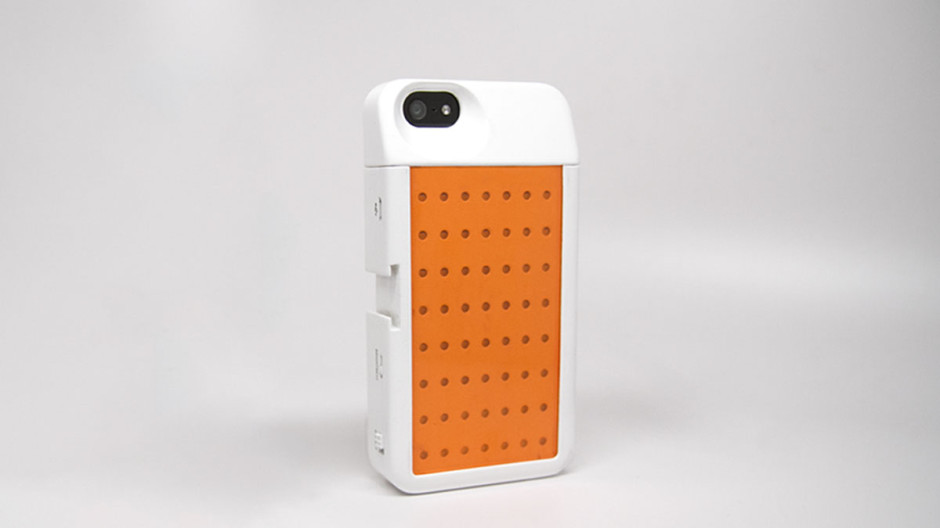
By removing the top of the Ember case, it's possible to continue to use add-on lenses, for example Olloclip or Moment. It's charged through a micro-USB port, making it independent of your phone's battery, and capable of providing light for about four hours of shooting.
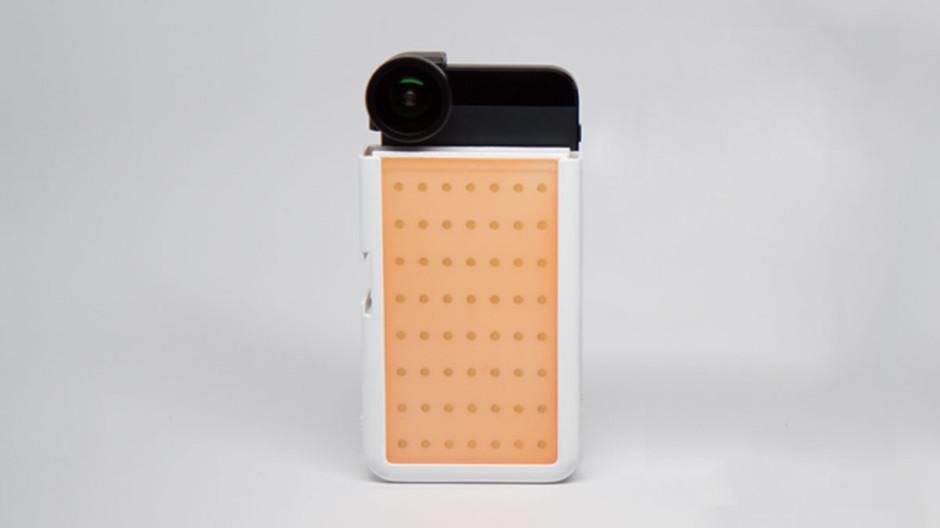
Embers are only iPhone 5 and 5S compatible, which is a shame for any other type of smartphoneographer; it's not as if we don't take photos or would appreciate some better lighting options. If, however, you're an iPhone 5 or 5S owner and interested, you can help make the Ember happen with an early-bird Kickstarter pledge of $59. Should you miss out on that level, it's $79 for one Ember.
Ember needs to raise $30,000 to make it a reality; with 25 days to go, it's raised just over $4,000. At this rate, it's touch-and-go if it makes it.
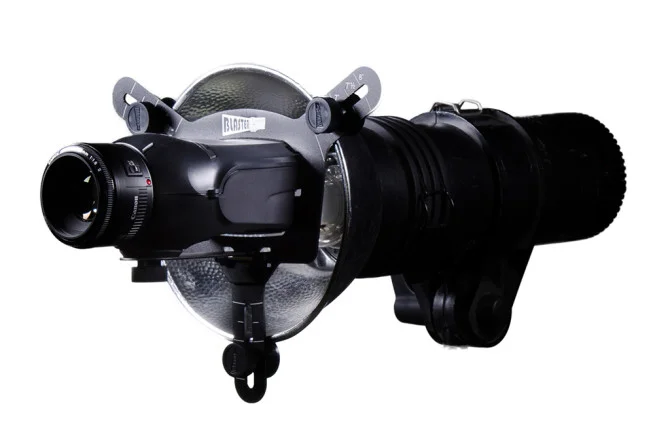
Rogue has announced a nifty, battery-free attachment that should enable anyone using the pop-up flash on a Canon or Nikon dSLR to send its light further than it could otherwise reach. The Safari Flash Booster has been optically engineered to focus up to eight times more light from a pop-up flash and optimized for lens focal lengths over 100mm. With luck, it should enable you to use faster shutter speeds and achieve sharper photos.

The Rogue Safari Flash Booster costs £25 and should be available in stores and online in time for Christmas. To check if your camera is compatible, check here, and the rest of the details are here.