


Once you've got a proper handle on your camera and what it's capable of, and you've built up an understanding of your lenses, you might find that you want to extend your photographic experimentations to flash so that you can create alien space lemons and bright and breezy high-key portraits. It's probably easiest to start out using through-the-lens (TTL; iTTL; or eTTL) metering, but much the same as you progress and take more control over your camera, there will probably come a point when you need to exert more control over your flashes and have to change the mode to manual. Adding a new variable into any mix can be a daunting prospect, but don't let it put you off. It's another skill to master and put to use.
Through the lens metering
TTL stands for through the lens metering. Rather than you dictating how much power your flash puts out, your camera and your flash will combine to make the calculation. It does this by emitting a small pre-flash to determine how much light is required for the scene and your camera settings.
The primary advantage of TTL metering is that you don't need to think too hard, so when you're photographing an event or something fast-moving, you won't miss your shot for need of fiddling.
But if you need consistency in your exposure between shots, then TTL isn't very useful. You'll have to switch to manual mode.

The advantage of manual flash
Much like using manual mode on your camera gives you complete control over your exposure, manual mode on your flash gives you complete control over the power it emits. Between them, they will provide you with consistency.
Understanding the power out-put
The power out-put on a flash is typically displayed as fractions. Full power is 1/1; the least powerful setting is usually 1/128.
Don't forget that if you set your flash to full power, it'll be working at its hardest and will take longer to refresh in between shots.
When you're experimenting with your flash, you might want to set the power to 1/16, which is roughly half-power. You won't have too far to move in either direction if you need to make adjustments.
Sync speed
Your camera and flash need to synchronise in order for the sensor to be able to detect the flash. Open the shutter for too short a period of time and it won't be able to catch the flash, rendering the entire process futile. Cameras, therefore, have a maximum shutter speed that can be used in conjunction with an off-camera flash; it's known as the sync speed. The maximum sync speed tends to be 1/125 second, but do check your camera's manual to be sure.
The exposure triangle
Seeing as you'll be using manual mode on your camera, you'll need to be certain of the impact that altering shutter speed, aperture, and ISO will have on your exposure.
First: changing your shutter speed will not have an impact on your flash exposure. Shutter speed will have an impact on ambient light. Want more ambient light? Use a slower shutter speed.
Second: adjusting your aperture will have an impact on your flash exposure.
Third: ISO has an effect on both flash and ambient exposure.
Actually doing this
Now that the theory is in place, how about some practical photography?
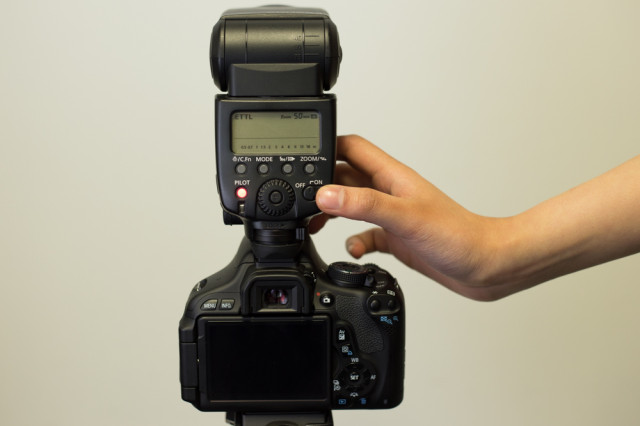
Step 1: Set up the flash
Turn on the flash and set it to manual. This is normally achieved by cycling through the MODE button on most flashes. If you’re not sure about this bit, check the information in your flash manual.
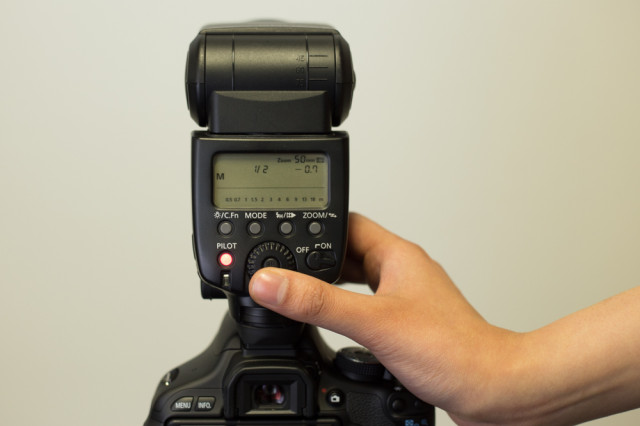
Step 2: Adjust the power
Now you can adjust the power by pressing the arrow keys. 1/1 is full power, and each click down will decrease the power.
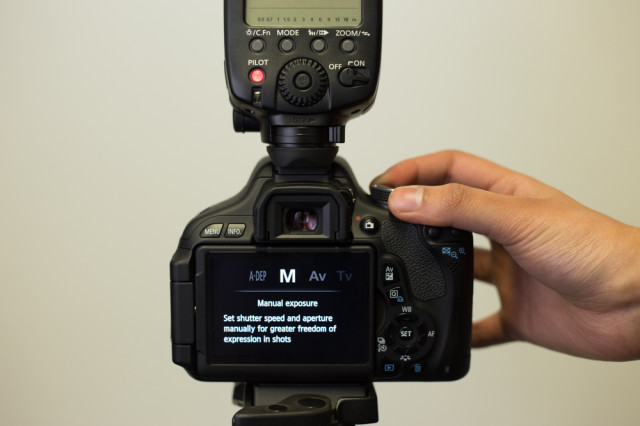
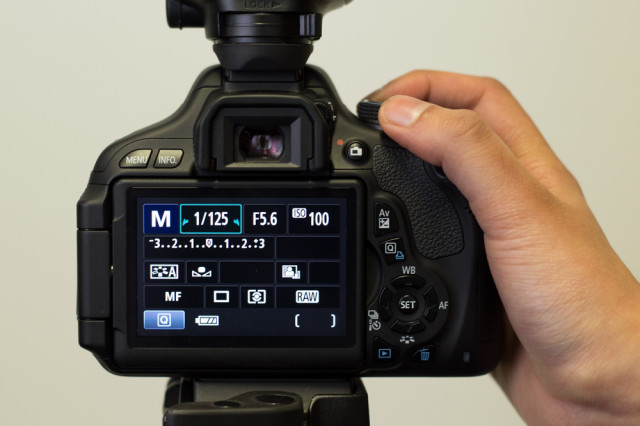
Step 3: Set the camera
Place the flash on the hotshoe of the camera, or attach the lead or radio trigger if you're using either of those, and switch on the camera. In manual mode, set the shutter speed to 1/125 second and adjust your aperture and ISO.
Step 4: Incremental adjustments
Take some photos!
If your images are too bright you can:
- Decrease the flash power
- Increase the aperture
- Decrease the ISO
If your images are too dark, do the opposite!
Experiment with different combinations of flash power, aperture, and ISO to get a feel for what you can achieve with flash photography. After that, the world is your playground!
For a video version of this tutorial, here's Team Triggertrap explaining things:
Much of this, including all the images, is based on the fantastic How to use manual flash tutorial found on Triggertrap's How-To microsite, and it's reproduced with permission. Triggertrap How-To is full of great content for making the most of your camera. You should take a look.