


Everything to have happened in photography has been iterative, slow, and gradual, building on technology that already existed, to create cameras that are slightly better than the previous generation. Not so with Lytro.

When you hear the term 'high-res' thrown about with such abandon when it comes to images for web use, have you ever stopped to think just how big or how high quality and image meant for the web needs to be?
There's an assumption that high-contrast images are more dynamic, more compelling, more inviting. Have a go at some low-contrast photography. You might surprise yourself with the results.
Balance doesn't mean symmetry; it means an internal consistency and tension within your photos. And it's a vital element of composition.
Great photos might be down to a little bit of luck, but most of that 'luck' you make yourself. Don't believe us? Read on...
I was reading through some of my earliest photography articles on this very blog - some of the oldest ones go back to 2004 - and one of the articles I stumbled across was 'how to choose a compact camera'. In it, I'm making a bold claim: "Choose Canon, Nikon, or Olympus, and you can't really go wrong. If I were you, I'd stay away from Sony, however". My argument - made about seven years ago, mind you - is as follows: 'Would you rather go with a camera manufacturer who's turned to electronics, or an electronics manufacturer who's having a go at creating cameras'? Well, let me be the first to announce that I'm currently eating those words, with a nice side-helping of humble pie.
You see, exactly a year ago today, I took delivery of my Sony A7, and a Sony/Zeiss 55mm f/1.8 lens. At first, I was worried. Then, I was elated. And then... I sold all my Canon photography gear. The true fact is that the Sony A7 is one of the best cameras I've ever used - for my particular uses. Yes, there's better cameras for sports, concert, and fashion work... but I rarely shoot any of those. Instead, I'm a frequent traveller, and unless I have a light camera that's capable of taking awesome photographs, I'm in for a disappointment.
In my Travel Photography book, I'm excited about the Canon 550D (the newest entry-level Canon at the time) and Canon's 50mm f/1.4. In fact, in that book, I think I'm making a compelling case for travel photographers shooting with that very combo. If I were writing the book today, I'd have recommended my current setup. The A7 has a full-frame sensor - which doesn't matter nearly as much as you'd think. It also is incredibly good in low light - which does matter - and once you get used to its quirks, it's a fantastic travel camera all-rounder, that is capable of delivering photos that are more than good enough to publish in a book.
Anyway, I'm getting off topic. My point is this: Seven years ago, I wouldn't have dreamed of recommending any Sony camera to anyone. Today, they have created my main, go-to camera for pretty much everything (including video!). Think about that for a second: If that much can change in seven years... What is going to happen in the next seven years?
It's an exciting time to be a photographer, that's for damn sure.
If you're up to date on your photography history, you'll be aware that some of the stuff we used to have to do to get artificial light was basically the same as setting off fireworks next to your camera to capture the photos. Quaint as that feels, this is still the reality for high-speed photographers... If you want a swift way to kill yourself with photography equipment, the high-voltage flashes used to stop fast-moving objects is an easy way to go.
Let me explain. When we're talking about 'high speed' photography, we're not talking about the time it takes to trigger a flash. With a good high-speed flash trigger, you can go from trigger event (say, a laser beam being broken, or a loud enough sound) to strobe flash in a matter of microseconds.
The challenge lies elsewhere: If you're trying to take a photo of something that moves very quickly indeed—say, a bullet—you need a very short burst of light. Now, what photographers traditionally think of as a very short burst of light—like the strobe from your studio flash—is actually a very long burst.
The problem is this: A standard .22 bullet has a muzzle velocity of 340 metres per second. So, if your very high-end camera with a shutter speed of 1/8000 second were to try and capture this bullet in flight, you'd be out of luck. Even at 1/8000 second, your bullet will travel 4.2 cm / 1.6 inches. That means you get a tremendous amount of blur in your photo — you certainly couldn't stop it.
So, what is a poor photographer to do? Well, a flash has a much shorter duration. A PC Buff Einstein (known to have a very short flash duration) will be about 1/13,000 second—but, when translated to our flying bullet, we're left with a blur again—2.6 cm / 1 inch is still a streak of blur. That's no way to stop a bullet, photographicaly speaking.
Even really short-duration strobes—like a Nikon SB-80DX at its lowest power output—has a duration of 1/22,000 second. Impressive, but no match for our trusty bullet — 1.54 cm / 0.6 inches. That's more like it, but still results in a rather blurry image.
So, what's a poor high-speed photographer to do? Well, Harold Edgerton, who was the father of high-speed photography, used an 'air gap flash'. If that sounds fancy, trust me—it really isn't. Imagine an electrode and a cathode, with a spark jumping between the two. In essence, you've got lightning—yes, real lightning—happening in your photography. It isn't difficult—anyone with a basic knowledge of electronics can build one—but it's incredibly dangerous. As in, could-very-well-kill-you-type-dangerous. We're talking at least 20,000 volts to create a spark that's bright enough to use for photography.
There are some slightly-less-likely-to-kill-you solutions out there, but they cost the earth: Upwards of $2,000 for basic short-duration strobes. Interesting, yes, but you'd really have to love high-speed photography to lay down that sort of money to embrace your hobby.
The solution, it seems, might be in technology. The clever lot over at Vela Labs have come up with a device they call the Vela One. It's not available to buy yet, but a Kickstarter campaign is aiming to rectify that situation.
To solve the 'this thing might kill you' and the price-tag issue, they're using LEDs designed for architectural use (i.e. mega-bright LED bulbs), and then they blink them very, very briefly.

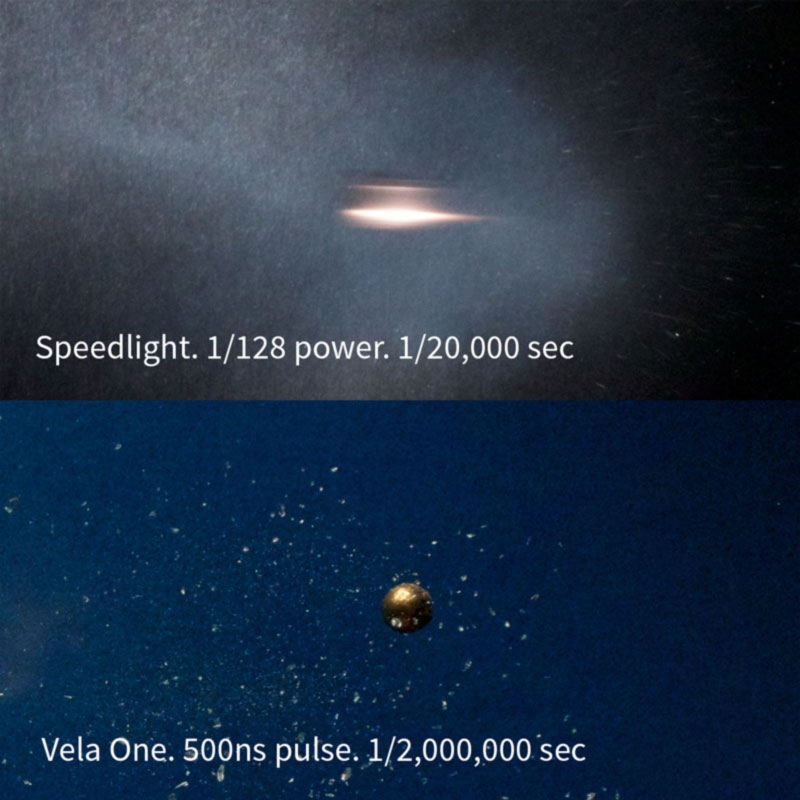
By dumping a ton of power (in fact, 2000 times what they are designed for) into the LEDs for a brief period of time, they're able to get a lot of light out of the LEDs, for a very brief burst. How brief? Well, guys at Vela Labs claim it can be done in 1/2,000,000 of a second—which translates to 0.017 cm—or about twice the width of a human hair. To a photographer, this means pin-sharp photos, even of objects of moving at high speed.
Of course, this doesn't come for free: The cost of super-brief flashes of light is brightness. That is true for an air-gap flash, but also for the Vela One; but it looks as if the One offers a pretty good trade-off between flash duration and brightness. The photos speak for themselves.
At £550, it's not cheap, but it's a lot more affordable than some of the other high-speed options out there (although there's a VIP Early Bird offer of £400, but you need to be quick with only ten available)... And at least it's unlikely to kill you as you use it, which I find is always a feature I look for in most of my photographic kit.
The results? Well, let's take a look:

If you want the Vela One to exist, you'll have to head over to Kickstarter, and be quick about it, too. The campaign ends in only 22 days, so get a wriggle on!
I'm not known for my physical exercising prowess - in fact, thinking of going to the gym sends me into cold sweats, which means that I felt I've exercised, so I don't go. When I realised I was going to have to spend six days straight at Photokina, on my feet, demoing demoing my little heart out for my day job, it served as a great reminder for why I stopped carrying a full-size SLR camera: Less weight = less exercise. Perfect. At Photo Plus back in October, I first saw the Sony A7, and I fell a little bit in love. I traded in my Canon 6D in favour of a Sony A7, and I haven't looked back - to my particular photography needs (I travel a lot, I want high quality photos, I don't really do sports, and I don't need fast auto-focus), the A7 is a perfect camera.
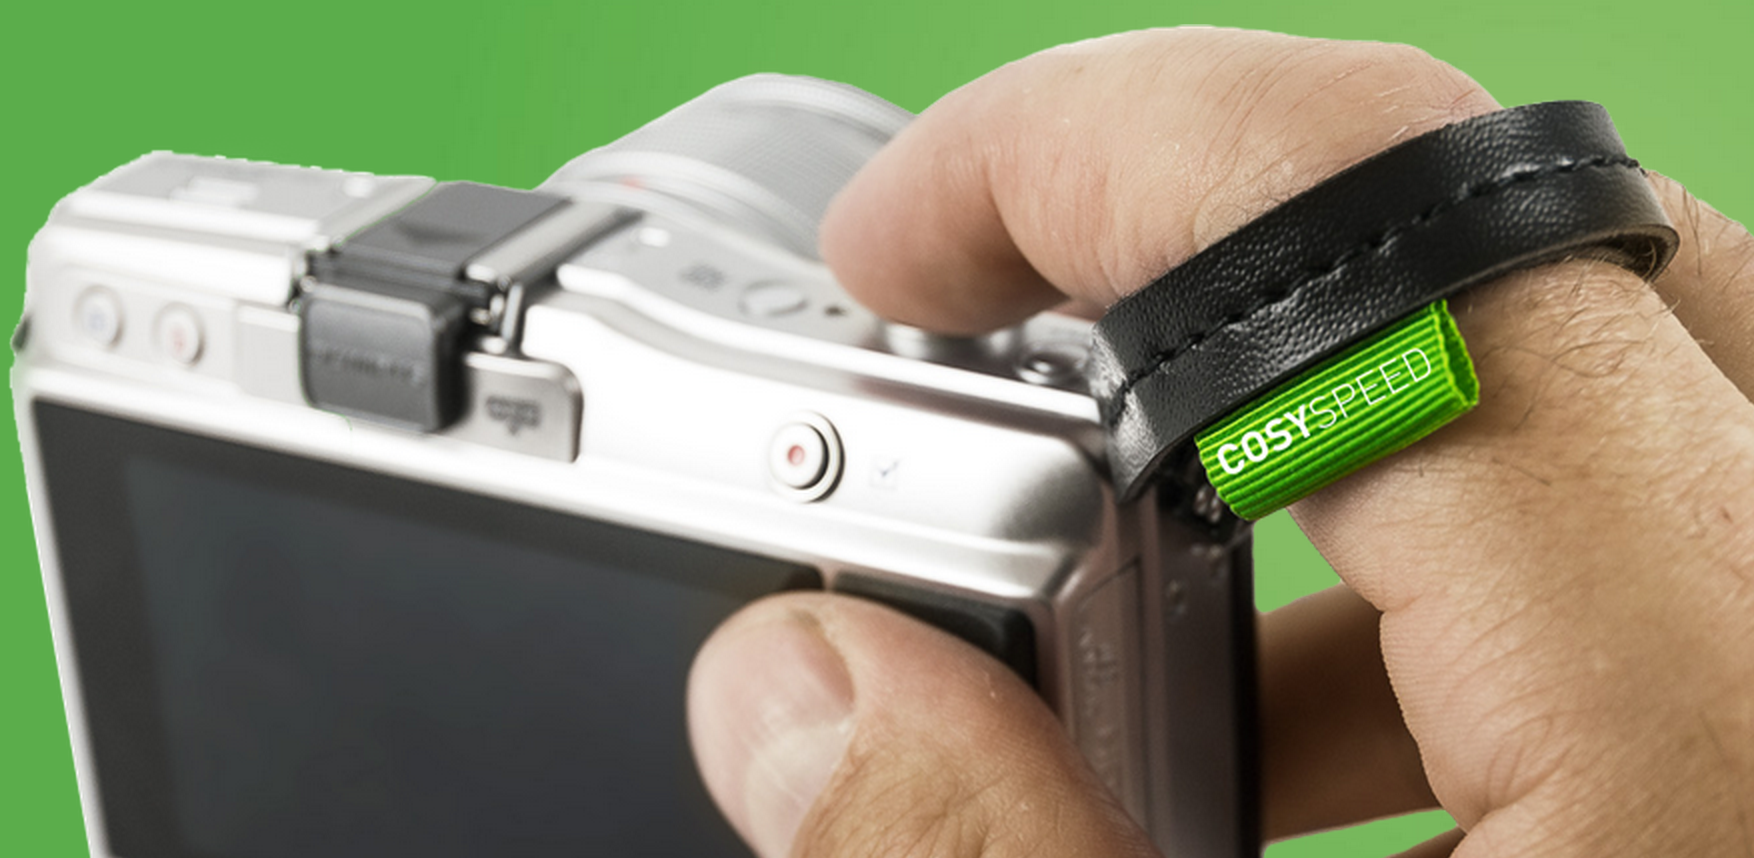
However the A7 is still an expensive piece of kit, and carrying it around safely for six days straight was always going to be a challenge: I need it to be easily available for demoing Triggertrap to people, but I also need it to be safely stashed away. That's where Cosyspeed Camslinger 160 comes in.

Cosyspeed is a relatively new company, and they're focusing on making product especially for mirrorless cameras (hence the name - Cosy, I'm going to guess, is short for Compact System, which is one of the names that didn't quite stick for mirrorless cameras, alongside 'EVIL' - short for Electronic Viewfinder, Interchangeable Lens). The camera bag comes in two sizes, the slightly smaller 105, and the larger 160. Both of them are designed to wear at the hip - and it does make you feel a little bit like a cowboy wearing them.
I've tried a great many carrying systems in my life; some of them - especially Peak Design's offerings - are fantastic for large SLR cameras with honking great lenses attached. But the one problem all other carrying systems have, is that you have to keep your camera exposed to the world: Unprotected from rain or bumps. Of course, with a full-size camera, you don't really have the option of protecting it - but surely, these kinds of innovations are precisely why we are looking at more compact cameras in the first place?
I was amazed by the Cosyspeed Camslinger bag - I wore it for 6 days, 12-16 hours per day, and I was constantly demoing, so I found myself accessing the bag hundreds of time per day. It's a great quick-draw solution, meaning that your camera can stay protected whenever you don't need it - and easily available when you do need it.
At this point, I briefly have to sing the praises of the closing mechanism...

I've never seen these kind of pushbuttons used on a camera bag before, but they're brilliant. To close it, you simply push down, but at that point, the bag is securely closed (you can also use the bungee cord to add a second layer of security on top). It takes a little bit of time to get used to, but it's a fantastic system, meaning I can have my hands free, then suddenly just magic my camera out of the bag to show someone something (or to take a photo, of course).
With the bag, it doesn't really make sense to use a camera strap - good job, then, that the guys have also created a finger-strap. I think in the longer term perhaps a proper hand-strap might be a better way go to, but in the couple of weeks I've used the fingerstrap, I've grown to love it - it's small and simple, and just means you have a second chance in case someone bumps into you and you drop the camera - another advantage of the mirrorless cameras, of course: Try trying to save a full-size camera with one finger!
All in all - if you shoot with a compact SLR or a mirrorless camera, I think it's very much worth giving the Cosyspeed bags a closer look - They are by far the best camera bags for mirrorless cameras out there - They're well designed, well made, and I'll certainly be using mine for many years to come - it's a perfect match with my Sony A7 and the way I like to shoot.
Sony announced its A5100 yesterday. It has been referred to as both a replacement for the NEX-5T and as a camera sitting between the A6000 and the A5000. It has a 24.3 mepagixel CMOS sensor, auto-focus that's been described as 'lightning fast' (although not quite as fast as the A6000), upper sensitivity of ISO 25,600, a pop-up flash, wi-fi, and a touchscreen. But there's no EVF.
It'll come in black or white and Adorama has them available for pre-order. Body-only, it'll cost $550; if you'd prefer an A5100 with the 16-50mm lens, that'll be $700.
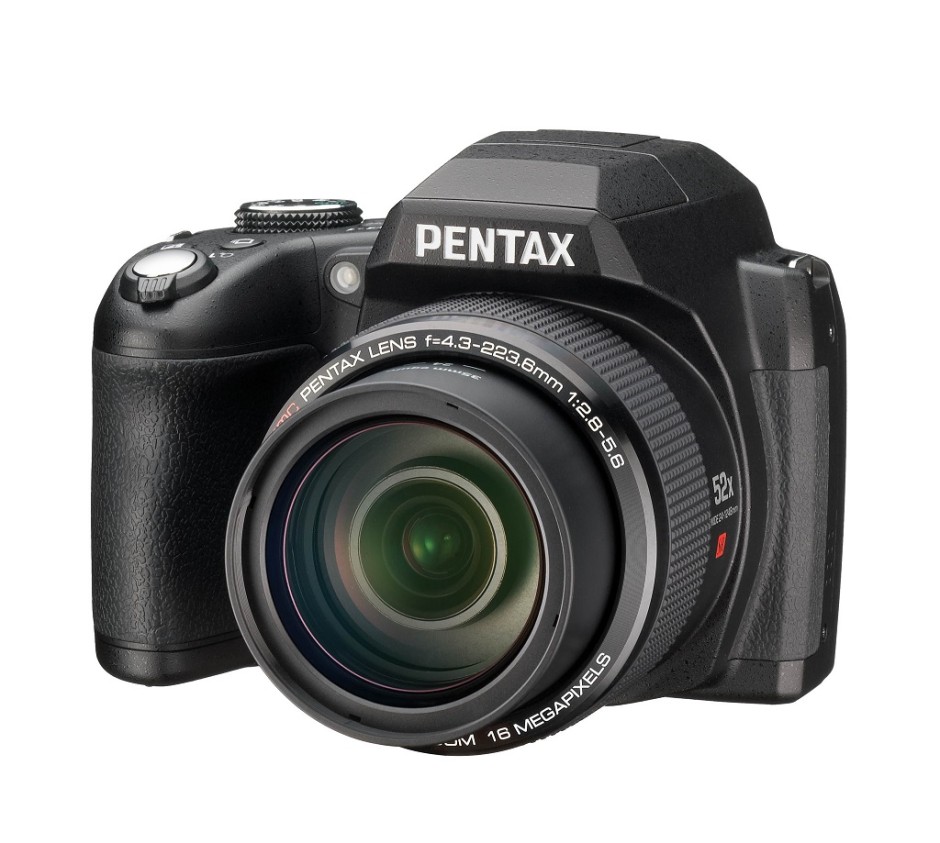
In the early hours of this morning (if you're in Europe), Ricoh announced a new bridge camera, the Pentax XG-1. But what exactly is a bridge camera, and who constitutes the target market?
It's all in the name, really. A bridge camera spans the gap from small compact cameras with fixed lenses to larger and heavier dSLRs with interchangeable lenses. They're fixed lens cameras that enjoy impressive optical zoom capabilities—in the case of the XG-1 a 52× zoom or the 35mm equivalent of 24 to 1,248mm—and the full manual control that you'd expect from a dSLR. However, although they might share a similar shape to a dSLR with its characteristic pentaprism hump, they don't share the mirror and the optical viewfinder mechanism. They function akin to compact cameras, making them smaller and lighter than their dSLR cousins.
Although a bridge camera usually comes in bigger and heavier than a compact camera, they're smaller and lighter than dSLRs; this means you get the advantages of manual control and impressive telephoto prowess but without the bulk. As the lens with all the optical zoom is built into the camera body, there aren't any expensive, bulky lenses to schlep about, either. You can switch from wide angle to telephoto with the movement of a button, rather than the inconvenience of a lens change and the potential of subjecting your sensor to dust and dirt. If you're shooting in dirty or dusty conditions, a bridge camera might be preferable to an interchangeable lens model.
Bridge cameras present you with control and magnification in a neat, cheap package. The new Pentax XG-1 is priced at £250 £280*; the Canon, Nikon, Fujifilm, and Olympus equivalents aren't too far off that mark and have generally similar specs.
My 70-200mm zoom lens doesn't extend nearly as far as the 1,248mm of the Pentax XG-1. But it does have a fixed maximum aperture of ƒ/2.8. So whether I'm zoomed in or out, I can open my aperture as wide as ƒ/2.8. This isn't usually the case with bridge cameras. At its maximum zoom, the XG-1 has a maximum aperture of ƒ/5.6. (When it is zoomed out, the XG-1 has a maximum aperture of ƒ/2.8.) While this might not be a terrible state of affairs where depth-of-field is concerned because the magnification factor is so high, it can be an issue with respect to letting in sufficient light.
With such an enormous zoom, camera shake is a big issue for bridge cameras and to help mitigate that, you need a fast shutter speed assisted by a large aperture. Most bridge cameras do have image stabilisation to help prevent camera shake making itself obvious in your photos, but that smaller aperture at maximum zoom can be problematic.
The huge zoom can you close to the action with a bridge camera, but they don't always enjoy lightning fast autofocus and the EVF can be slow to refresh if you're shooting action scenes. That might mean the difference between shot made and a shot lost, particularly if you're trying to photograph sports or anything fast-moving.
Most bridge cameras use a 1/2.3" sensor. Although that gives them more klout than many compact cameras, they aren't as well endowed as dSLRs, which come with APS-C or full-frame sensors. This can be detrimental to image quality, with noise rearing its ugly head in images.
While both bridge and EVIL cameras tend to be smaller than dSLRs, there remain significant differences that set apart the two groups. EVIL cameras come with a range of different sensor sizes, but they need separate lenses. They're also more expensive than bridge cameras, particularly when you factor in lenses, which doesn't place them in direct competition.
People who want the flexibility of manual controls, incredible zoom, and a lightweight camera are the ideal consumers for bridge cameras. They're excellent for travel, even if they can struggle in low-light and be a little slow to focus. Bridge cameras don't require an arsenal of lenses, but do get you close to your subjects. And they tend to be afforable, too.
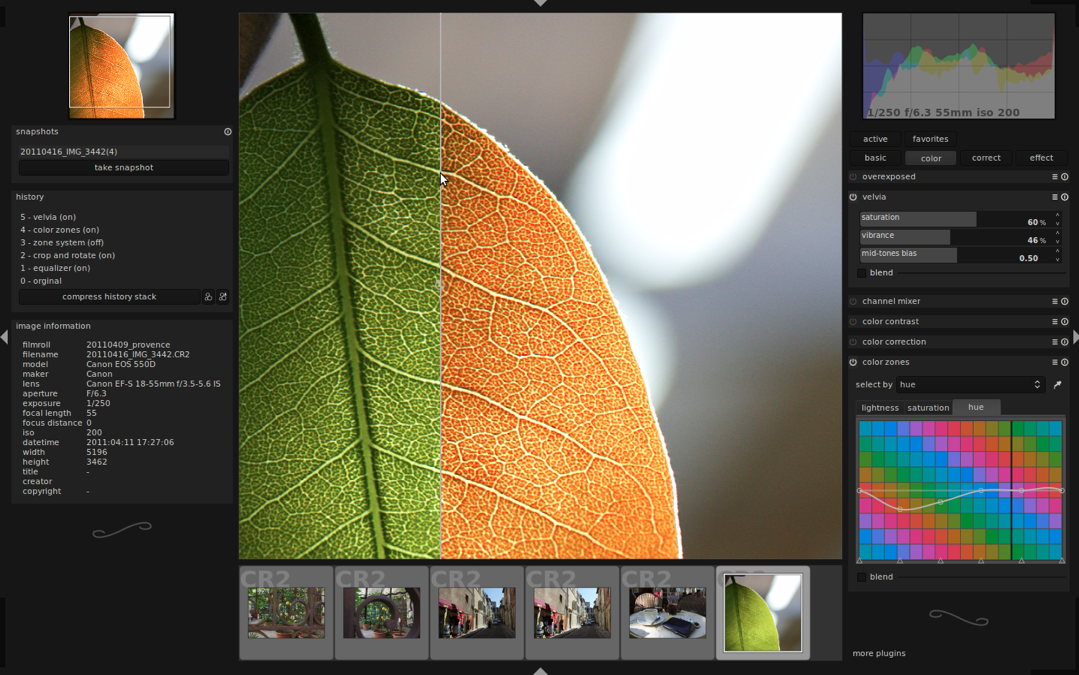
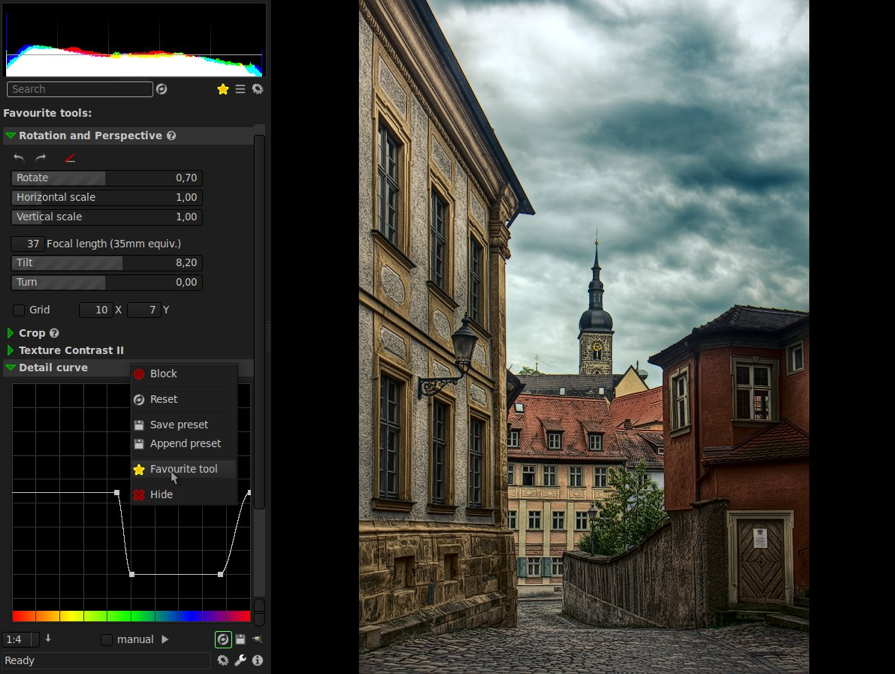
Now that everyone has got over their shock that Apple will be consolidating its image editing and organisation features later this year, with the result that its top-end programme Aperture will be closing up completely, people are probably beginning to think about alternatives. I've pulled together ten Aperture alternatives and sought out their positive and negative features. They're all Raw compatible, but do double-check their non-destructive capability. A standard gripe for the majority of these programmes is that they're tricky to get to learn, or that the interfaces aren't intuitive. While it is entirely possible that some of these programmes do have seriously unfriendly workflows and interfaces, it might also a case of them being different to what you know. I remember opening Lightroom for the first time and wondering if it controlled the International Space Station, too. It's all a learning curve. Still, it's probably worth bearing in mind that the open-source options don't have such pretty interfaces as the paid-for programmes.
And finally, we really don't know what Apple's plans are for its photo management and editing programmes. It's possible that Aperture's features will be integrated into whatever comes next. Or maybe they won't, if Apple is looking for a simpler, more consumer-friendly package. But it remains to be seen.
Lightroom is probably the most obvious option for people looking for an Aperture replacement. It's a comprehensive editing suite that sets the standard in its field. In addition to the expected functions, Lightroom includes advanced features such as brushes, gradient tools and specific lens corrections. It's my editing suite of choice that I feel offers me almost everything I want in an image editor.
However, some photographers—me included—are concerned that the option to purchase Lightroom as a stand-alone editor will be subsumed into the subscription model Creative Cloud and we'll find ourselves beholden to Adobe in perpetuity. If the potential for that bothers you, you might wish to look elsewhere.
Lightroom perpetual licence: £102.57 Adobe Photography CC bundle (Photoshop CC + Lightroom): £8.78 ($9.99)/month
If anyone doubted that Corel were still in business, yes, it is. And if you're wondering what happened to image editing software Bibble, it was bought by Corel... and became AfterShot Pro. The first version met with significant criticism for lack of basic features such as red eye correction and a reset button. This has been corrected for version 2, together with improved batch editing features and new noise reduction features. By all accounts, it's a pretty nippy piece of kit.
Corel has also stated that it is looking to make life as easy as possible for Aperture users who are looking for a alternative programme. It's reasonable price together with its comprehensive feature set makes AfterShot Pro a compelling option. And you can check it out for free before buying, too.

Corel After Shot Pro: £57.99 (usually $79.99, currently $59.99)
PhotoDirector claims itself to be 'a unique application that combines all the features you need for photography in a single workflow – efficient photo management, complete adjustment and creative editing.' It comes with some serious editing firepower—from body-slimming tools to content aware object removal—and some sparkling reviews. You can try before you buy with a 30 day free trial. If the PhotoDirector Suite is a bit too pricey for you, have a look at PhotoDirector Ultra, instead.

Cyberlink PhotoDirector: £114.99 (currently £89.99)
You might think of Capture One as being a medium format image processor, but it's capable of handling dSLR- and EVIL-created files, too. It's history of medium format processing means that many of the features that you're accustomed to seeing in places such as Photoshop as well as Aperture and Lightroom come as standard in Capture One. You might need to take a deep breath when you look at the price, but there is a free trial to test it out first.
Phase One Capture One: €229 (currently €114)
Darktable is a free, open-source image editing suite that does seem to offer the most comprehensive and user-friendly experience without having to pay for anything. While one should never judge a book by its cover, the Darktable website is the most professional looking one in the open-source category.
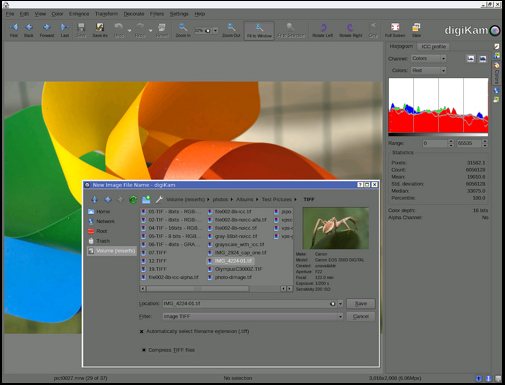
The digiKam website does give me a mild headache, but plenty of people seem to like the software. In particular it includes some features that aren't available in places such as Lightroom yet, for example fuzzy search and facial recognition.
Once upon a time, Lightzone was a commercial enterprise under the aegis of the now-defunct Light Craft company. It went off-line unexpectedly in Sepember 2011, but resurfaced as an open-source initiative tentatively in December 2012 and then more fully in June 2013. Given it was once a commercial product, Lightzone does benefit from better-than-average-for-anope-source-project documentation.

Hasselblad's Phocus might have started out for Hasselblad cameras, but it now supports a wide range of manufacturers' devices.
Most of what I've read about Photivo suggests that it's a powerful piece of kit, but that it isn't necessarily easy to leap into it and get started. It doesn't offer any management features, just development functions, and is open about it not being for beginners.
Raw Therapee seems to offer a peculiar mix of some incredibly advanced editing capability with some serious oversights. While its demosaicing feature is super for low noise images, it's reported that it doesn't cope well with noisier photos. With today's strospheric ISOs, it might be a dciding factor.

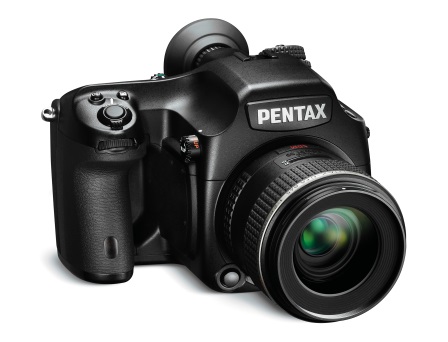
Last month, Ricoh 'repositioned' the prices of four of its Pentax cameras: two dSLRs, one EVIL camera, and its 645D digital medium format camera. From Ricoh's perspective, it's an attempt to make the Pentax brand more attractive to consumers and present them with some competitively priced options that aren't Canon, Fujifilm, Nikon, Olympus, or Sony. What does this mean from the consumer's perspective, however? What sort of value for money can a Pentax purchase offer? I decided to do a bit of digging.
The K-3 is Pentax's flagship dSLR camera, heading its modest line up of current models. It isn't, however, the likes of a Canon, Nikon, or Sony flagship camera, which are all full-frame. This has an APS-C sensor and is much more similar to their high-end smaller-sensored cameras.
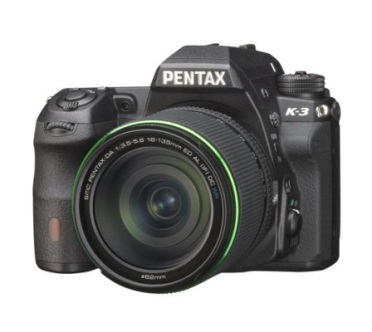
The K-3's key features include a maximum sensitivity of ISO 51,200; top frames-per-second speed of 8.3; a 24 megapixel sensor; a dual SD card slot; and full weather sealing. At its new £950 price point, this leaves the K-3 in an interesting position.
For around £850 you can pick up a Canon 70D or a Nikon D7100. It's not a straight-up comparison against the 70D, though. That has lower resolution (20 megapixels); a slower continuous shooting speed (7 frames-per-second), and its sensitivity tops out at ISO 25,600. Where it does beat the K-3 is on connectivity—it has wi-fi functionality—and on video capability. By all accounts if you're interested in recording video, you're better off with the 70D than the K-3. Finally, Canon has a far broader range of lenses than Pentax, which presents you with much more flexibility as well as purchasing options.
Against the Nikon D7100, you're looking at similar resolution, dual SD card slots, and dust and water resistance (but not water-proofing), but lower sensitivity (ISO 25,600) and slower frames-per-second rate (6). Video on the D7100 is also meant to be good and Nikon has a huge lens selection, too. Unless you're very serious about action photography or need cold-resistance too, the D7100 seems a better option to me.
But if you're prepared to spend a bit more, closer to £1,300, you can pick up a full-frame Canon (6D), Nikon (D610), or Sony. Yes, that is Sony's a7, so it isn't a dSLR, but it's food for thought.
The K-50 isn't Pentax's 'entry-level' offering, that's the K-500, but it does boast weather resistance, a top sensitivity of ISO 51,200, and a maximum frames-per-second rate of 6. It's sensor is a 16 megapixel APS-C one. So at around £500 (although you can pick them up cheaper), how does it compare?
Against the Nikon D5300, it's a day at the races: some you win and some you lose. Where the K-50 loses in the megapixel race (16 versus 24) it wins in the frames-per-second stakes (6 versus 5) and the ISO handicap (51,200 versus an expanded 25,600). The K-50 doesn't have an entry when it comes to wi-fi and GPS, giving the Nikon a walk-over; but the situation is reversed when it comes to weather sealing. With the D5300 selling for around £550 body-only, it'll be a case of careful consideration what you want from a camera. Something that slots into a system with which you can grow significantly (the Nikon), or something that's reliably built but doesn't offer huge scope for progression with lenses or more extensive specs.
Unless you specifically want a dSLR, it's also worth looking at EVIL options; around the £500 mark there are a few choices that can give you plenty of camera for your money. There's the Sony NEX-6 or a6000, or Fujifilm's X-M1. You'll be getting very similar specs, and in the case of the a6000 and X-M1 wi-fi to boot, but not the weather sealing. The question is, what do you want from your camera?
With a 1/1.7" sensor, it's actually a struggle to find a direct EVIL competitor for the Q7. Sony and Canon use APS-C sensors, Panasonic and Olympus use Micro Four Thirds, and Nikon favours CX. There's nothing that small. If you're looking for a camera as handily sized as the Q7, that's reasonably priced, but still has interchangeable lenses, take a look at the Olympus E-PM2. Or you could ignore the interchangeable lens issue—with a camera that small, having interchangeable lenses might overwhelm the benefits of its smaller body anyway—and go for a compact. Something like Canon's S120, Olympus' XZ-2, or if you can stretch the pennies further, Sony's RX100.
This one is the easiest of the lot. If you're looking to dip your feet into medium format waters, there is nothing as affordable as the Pentax 645D. You'll either be sticking with a top-of-the-range Canon or Nikon dSLR, or a Hasselblad or Mamiya medium format.
Having test-driven a few Pentax cameras, there is a lot to like about them. And if you live anywhere that rain or dust might conceivably be an issue, the weather-sealing is a very attractive prospect. But it's a case of considering what your needs are from a camera and whether or not you're looking for heaps of compatible lenses, both native and third party, as well as accessories and add-ons. How far do you think you might want to take your photographic progress? How far do you want to take your camera? How much money do you have to spend?
Getting good value for money isn't just about the pennies in your pocket right now and the current crop's spec sheets. It's also about long-term planning and ensuring that you and your camera—and the system into which you've bought—have a future together.
Whatever you're looking to buy, it's always worth considering all of your options.
Lensbaby has just announced a 5.8mm ƒ/3.5 circular fisheye lens with manual focus for Canon and Nikon mounts. Although it has been optimised for APS-C sensors, you can use it on full-frame cameras. You'll be left with a smaller image circle is all. It should be able to focus as close as ¼", going all the way to infinity, and offers an 185° angle of view. At a smidge under $300, it's an extremely affordable addition to you kitbag, it just relies on you using its focusing ring to get your subject sharp, rather than on your auto-focus. If you're not sure that you can stretch to a Canon or Nikon-made lens, it's an intriguing alternative.
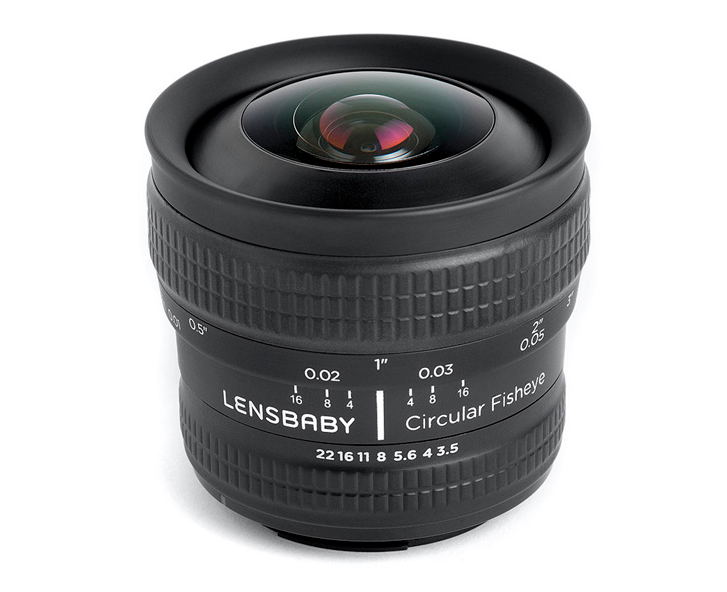
It's not on sale yet, but you can pre-order from Adorama. Canon's here; Nikon's here and both are priced at £299.95!
My grandmother has shoeboxes of old photos and negatives and even Super 8 film reels stashed away in her house. The photos we get out and look at every now and again, the negatives are a useful resource, but the Super 8 films don't get much of an airing anymore. Doubtless we're not the only family like this. But Reflecta has just announced its new Super 8 Scanner, that easily digitises old Super 8 film reels, giving them a chance to see the light of projection again. Although it's meant to be easy to use—you connect the scanner to a (Windows) computer via a USB cable, open the provided Cyberview software, insert the film reel into the scanner, and it then trundles through converting two pictures every five seconds, which you can crop and adjust the brightness and contrast of, too—it's not exactly cheap at £1,710 including VAT. It might be a good add-on for printing businesses, though.
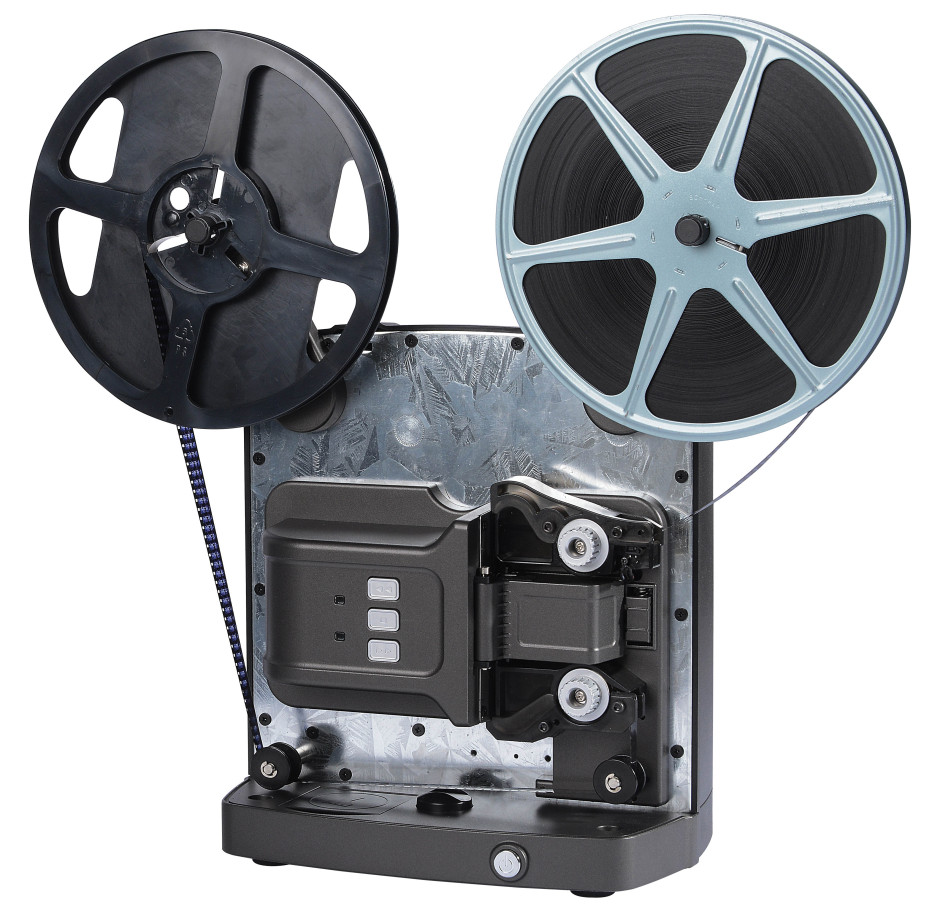
The scanner produces videos with a file size of 190MB per 15m of film in HD quality, and its saved in AVI format.
If you're interested in one, the Reflecta Super 8 Scanner is being distributed by Kenro in the UK and Ireland. You can find out where to pick up one here.
I have a new favourite toy. It's palm-sized, it's battery-powered, and it's a projector for Instagram images. It's called a Projecteo. Projecteo was conceived by the same people who make my favourite image-emblazoned edible snacks, Boomf marshmallows. This time, instead of selecting nine of your Instagram images to have printed onto bite-sized puffs of sugar, you choose nine images to have made into a miniature projection wheel comprising a single frame of 35mm slide film. Or 18 to have made into two wheels. Or 27 for three wheels. You get the picture.
One projector and one wheel of images costs $34.98, including world-wide shipping. Extra wheels cost $8.99 each. Mine arrived within a few days of being ordered.
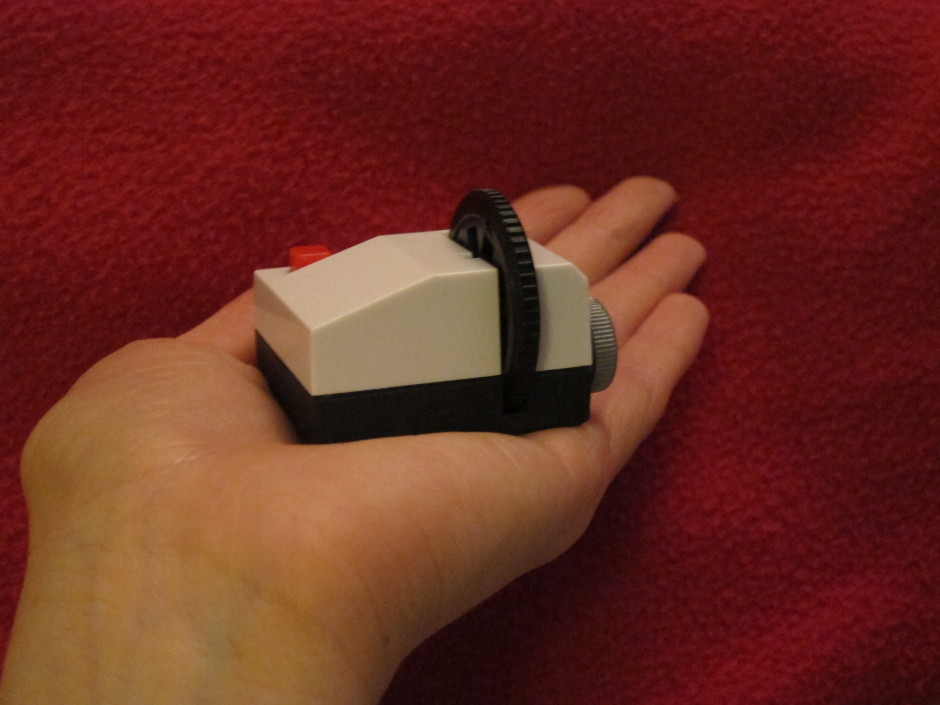
It was rather fiddly to insert the batteries into the projector, in fact I needed to get someone else to remove the battery case, but otherwise it was easy to insert the wheel, turn on the light, and start projecting images onto the walls, ceiling, blinds, doors, or floor, using the focusing ring to render them crisply. I spent most of yesterday evening shining peaches and bees and the Queen Elizabeth II bridge onto any flat surface I could find.
Just as with the marshmallows, dark photos don't come out very well, but bright ones look great. At $35 a go, a Projecteo is too expensive for a wedding favour, but it does make a fantastic little present. I'm off to see where else I can shine my images.
HTC's replacement for its HTC One wasn't exactly a well-guarded secret with most of the speculation centred on what exactly it'd be called. But now that the HTC One (M8) is here, it looks as if it has a very interesting camera function that I'm intrigued to try out. What, then, does it have to offer? First, HTC has stuck to its ultrapixel guns, with the emphasis being on the size of the pixels on the sensor, not how many there are to service the 28mm ƒ/2.0 lens. Gone is the 2013 image stabilisation technology, replaced by a smart stabilisation function that works with the ultrapixels. And added is the rear-facing second sensor that allows for better depth detection and Lytro-like control by taking two shots simultaneously with the UFocus function. But there's also Foregrounder, so that you can add effects and play with the background; Copy & Paste, a compositing feature that lets you copy and paste people appearing in one photo into a different image; and Dimension Plus, which allows you to alter the angle of your image by tilting your screen.
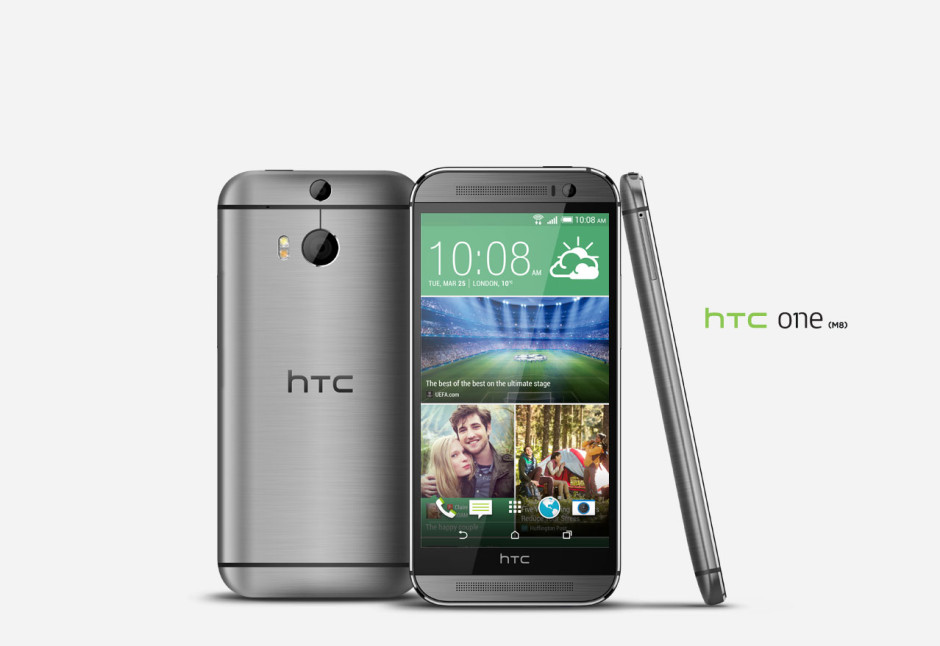
Similar to the flash in the iPhone 5S, the 2014-One has a dual flash that is designed to render better skin tones and a slow-motion video function, as well. And there're manual options for ISO and the like, giving you better control over your exposure.
For all that HTC isn't interested in the megapixel wars, it has bumped up the front-facing camera's megapixellage from 2.1 to 5, though.
The phone's 2.3Ghz Snapdragon 801 processor should be capable of whipping through your edits and if 16GB or 32GB of storage is insufficient for your archive of images, you can always make use of the micro-SD card slot.
The 2014 vintage One has taken cues from Apple, Samsung, and Nokia as well as going its own way when it comes to megapixels and fun and games. But however good the camera is on it, does HTC have the firepower to make it a go-to smartphone?
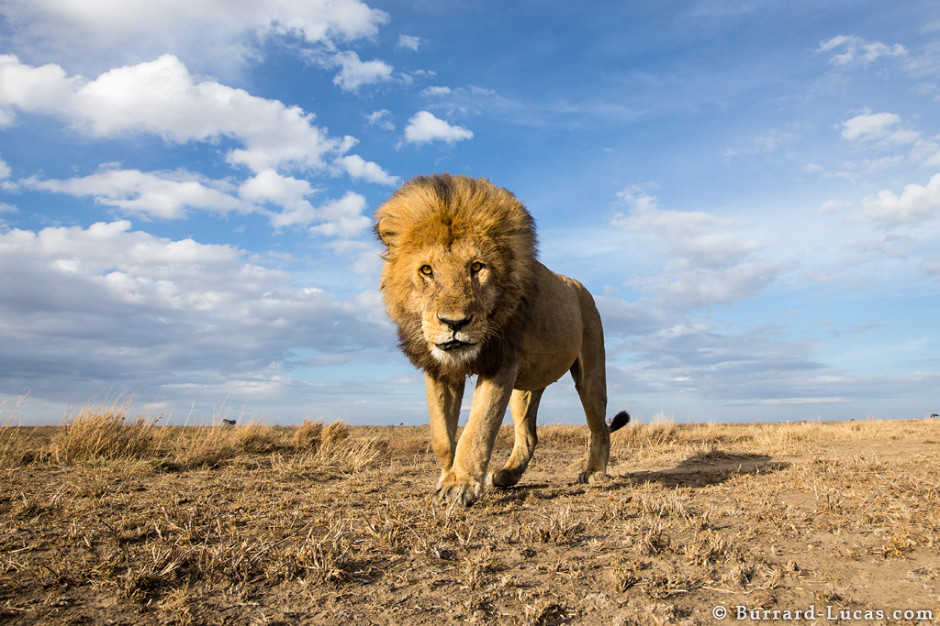
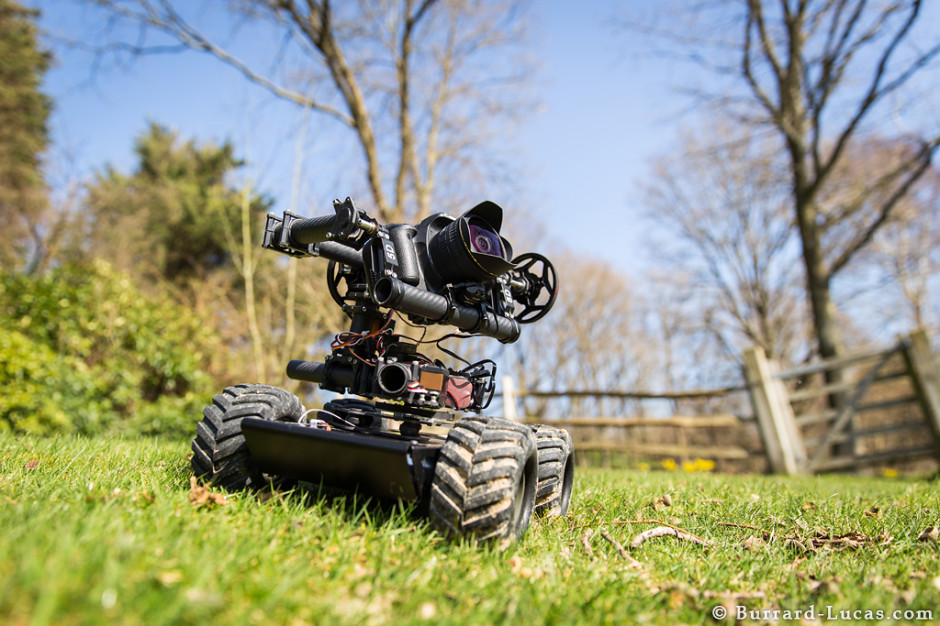
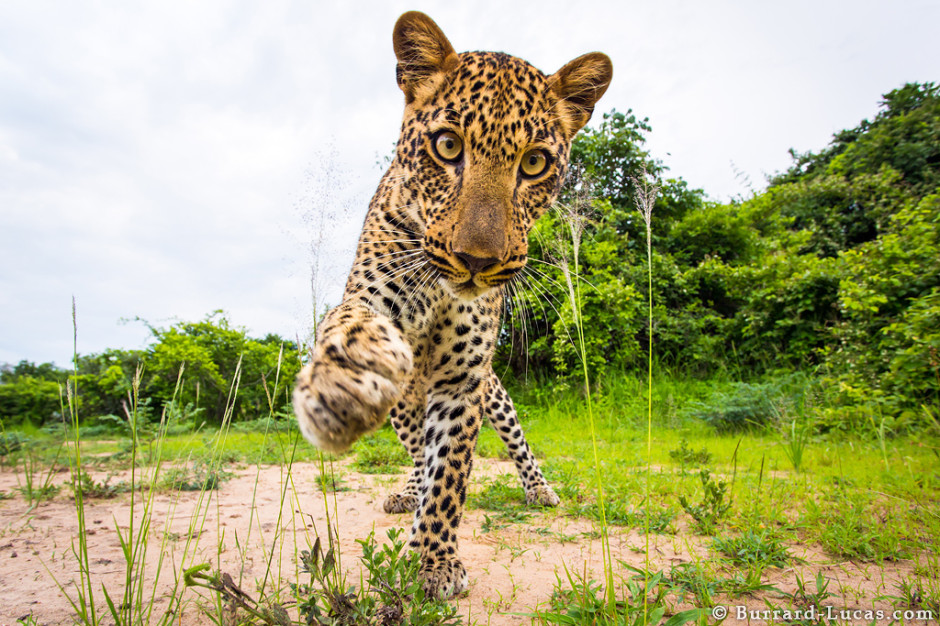
We've been following the evolution of the BeetleCam here on Photocritic since the brothers Burrard-Lucas, tinkerers and wildlife photographers extraordinaire, constructed a camera on a buggy in a case that could be used to get up close with animals that you wouldn't necessarily want to photograph from point blank range. The prototype BeetleCam went on Safari in Tanzania in 2009, an improved version was taken to the Masai Mara in 2011, and in 2012 BeetleCams went on sale to anyone who wanted to try remote wildlife photography. In 2014, Will Burrard-Lucas is back with the BeetleCam Hybrid. The BeetleCam Hybrid combines a traditional BeetleCam base with a stabilised camera gimbal. The gimbal keeps the camera level when the BeetleCam is beetling around over uneven ground. And the operator can pan and tilt the camera without having to move the base. Want to check out the BeetleCam Hybrid in action?
There's also an improved version of the original-style BeetleCam, with a strong but lightweight carapace and the ability to record video and stills simultaneously.
If keeping your camera on the ground is a little too mundane for you, there's also a quiet, remote-controlled copter for aerial photography. Will took this to the Serengeti recently and achieved some stunning footage of wildebeest migrating.
All of these remote-controlled devices are available to purchase from Camtraptions. There's a range of specifications—with ot without a carapace, or copters designed for GoPros, mirror-less cameras, or dSLRS—but if you can't find what you're looking for, a bespoke build is an option.
Now, when will I be able to go to Africa?
Inspired Photo Gear is steadily augmenting its range of photography accessories, adding two new lighting modifiers to its Faith lighting stands and Lollipod multi-use supports. As well as stocking the Lightblaster, which we looked at and loved a few months ago, it's now selling the RoundFlash modifier, too. The RoundFlash is a lightweight (230g) and portable collapsible ring light and soft box that can be used either on- or off-camera. On-camera, you fit it around your lens with your hotshoe-mounted flash feeding into it. Off-camera, you mount your flash on a lighting stand and then attach the RoundFlash to it.

The RoundFlash modifier fits around lenses with diameters upto 10cm and is perfect with lenses designed for portraiture (it is a ring light, after all) for example Canon's 85mm. If you've an especially small lens, try adding a lenshood to create more stability.
There's even a video demonstrating just how fast it is to set up:
The RoundFlash is available from Inspired Photo Gear for a special introductory price of £92.95. If you don't want to spend on a ring light when you already have a set of speedlights, it might be worth a look.
Sometime in September last year I pledged a modest sum of money to Easy-Macro's Kickstarter project. I'd heard about Easy-Macro before then—a magnifying lens set into a rubber band that wraps around your smartphone and sits over its lens—but the new and improved 4× magnication factor in the Kickstarter-funded project made it seem like a great bet. Some 4,106 other people agreed with me and Easy-Macro surpassed its goal with plenty in hand. For me, the appeal of the Easy-Macro wasn't just that it was a fun addition to my smartphone, or that it was cheap, but that it meshed with the ideals of smartphone photography: discreet and easy. It sits my wallet and can be placed around any phone. I don't have to worry about it getting crushed or dropped in a bag and it won't become obsolete if I upgrade my device.
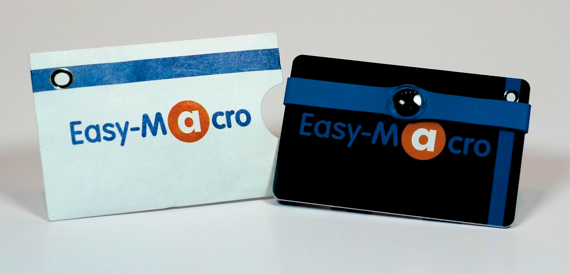
All I needed was for it to be any good. Well, just before Christmas my bright blue band arrived and I'm happy to say that I've been having fun with it ever since.
You use the Easy Macro just as would manually focus a lens set to infinity: by getting as close as you feasibly can to your subject and then moving your smartphone steadily backwards until your subject comes into sharp focus. It does require patience and a steady hand—remember, keep your elbows pushed into your sides to help stabilise yourself—but I've been pleased with the results so far.
Of course it is never going to compete with my 100mm macro on my Canon 6D, but it's not meant to. For a $15 gadget that I can keep in my wallet, what's not to like?

If you missed out on the Kickstarter campaign but are tempted by one, fear not, because you can pick up an Easy-Macro from the Easy-Macro website.
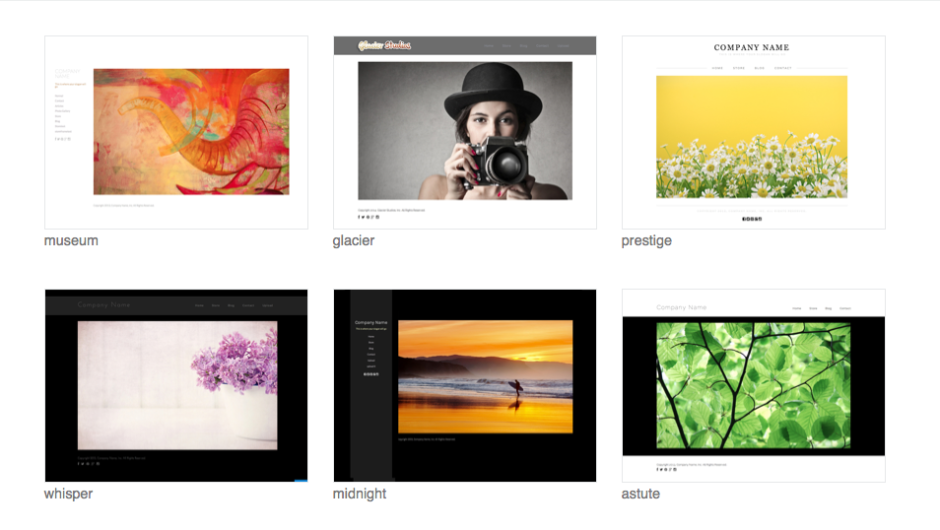
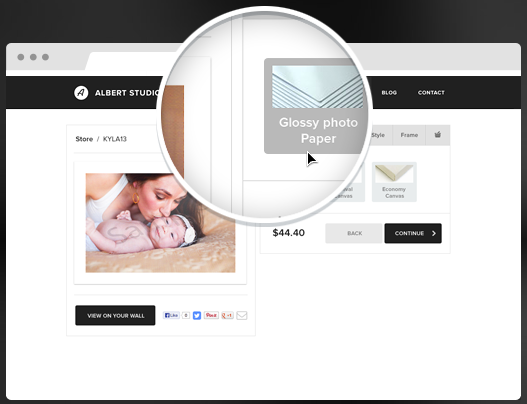
We all know that any photographer worth her or his salt has a website that's handsome, easy to navigate, easy to maintain and customise, and offers potential customers a feel for a photographer's style. As a consequence, there are plenty of companies that provide just these sorts of websites for photographers. They're easy to personalise, they show off photos beautifully, and they provide photographers with a web-presence that doesn't demand too much thought, time, or energy. And to help photographers make more money from their photos, some of them include print and product fulfilment, too. Now there's a new one on the scene that is aiming to take on the likes of SmugMug and Zenfolio, giving photographers print and product ordering facilities in addition to giving them a website that shows off their images and gives them a professional front. This one is called Art Storefronts.
Art Storefronts offers all of the portfolio website features that you would expect: a library of customisable responsive designs, easy social sharing functionality, and access to analytics.
What Art Storefronts believes sets it apart from other sites offering portfolio hosting and product sales is the interactive buying experience it offers your customers. Visitors can 'test drive' a wide variety of different options with dynamic live previews, and complete their purchase with a simple checkout process.
If you don't want Art Storefronts to fulfil your orders, you can take control of that yourself. Should you prefer Art Storefronts to handle print orders, you set the markup on your products and receive 100% of it.
Price-wise, you can expect to pay $19 per month for a basic package; $29 per month for the middle-of-the-road option; or $49 per month for the all-singing, all-dancing variety. It's certainly worth checking out if you're interested in selling prints direct your website.
Reflecta has just announced a new Smartphone Scanner that allows you to easily (and fairly cheaply) digitise your prints and negatives to your smartphone for easy sharing. I quite like the sound of this. Capable of digitising 35mm negatives as well as 6 by 4" and 5 by 3" prints, the Smartphone Scanner holds your phone in a cradle while the iPhotojet app works to capture the print or negative that's been inserted into the holder. Once the image has been scanned, you can adjust its brightness and colour before saving it or sharing it to Facebook or by email.

It's compatible with iPhone 4 / 4S / 5 / 5S and Galaxy S2 / S3 / S4 and is supplied with all appropriate cradles. You can power it by USB or battery and it's supplied with four AA batteries, a USB cable, holders and a Quick Start Guide.
The Smartphone Scanner is being distributed by Kenro in the UK and Ireland, and will cost about £40.
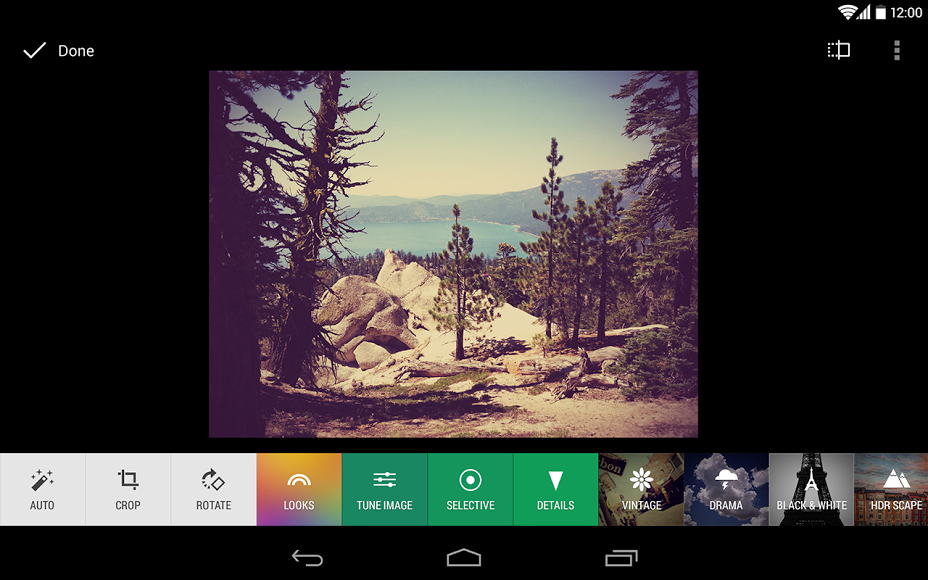
Google has introduced some Snapseed-like editing tools to its Android version of Google+ today, as well as what it calls 'non-destructive editing in the cloud' and new ways to view your images. The updates to the editing tools themselves are fairly basic: crop, rotate, one-touch filters, and enhancements that are familiar to Snapseed users, for example Retrolux and HDR-scape. They're the sorts of tools that you'd expect in a basic editing suite. 'Non-destructive editing in the cloud' is a touch more exciting, however. While it might be a horribly cumbersome term, 'non-destructive editing in the cloud' should make for a far more integrated photo-editing and sharing experience for Google+ users. It is designed to allow users to edit their images across different devices, and being non-destructive, start over if required. This means you can start to edit a photo on your desktop at home, continue your processing on phone on your way to work, and finish it off at your other-half's on their tablet. If you decide you don't like what you've done at any point, you can revert to the original before sharing on Google+.
As for the new ways to view images, the 'All' view allows you to see all of your photo library, whether on the device that you're using or backed up to the cloud, and you can sort them by date. If you've tens of thousands of images, you won't be seeing all of them in the 'All' view yet, but they're on their way.
Whatever you think of Google+ as a social network, it's always worth keeping it in mind as an image storage solution, especially with this integrated approach to editing and filing. You don't have to share your images there if you don't want to.
(Headsup to Engadget, further details from Todd Kennedy at Google)
As most of you are aware by now, I'm a bit of an all-round nerd, and I've been keeping an eye on 3D printing for a while now. Yesterday I took delivery of my printer, and I just wanted to share my first little project with you guys: Creating a rubber stamp. I haven't really been in love with any of the 3D printing tech... Until the Form 1 came along. Instead of using filament, the Form 1 prints using a technology called 'stereo lithography', which means that instead of depositing layers of plastic on top of each other, it uses FRIKKIN' LASERS to cure an UV-sensitive resin.
Anyway, enough about that - what I wanted to show off, was the end-to-end process of creating a rubber stamp.
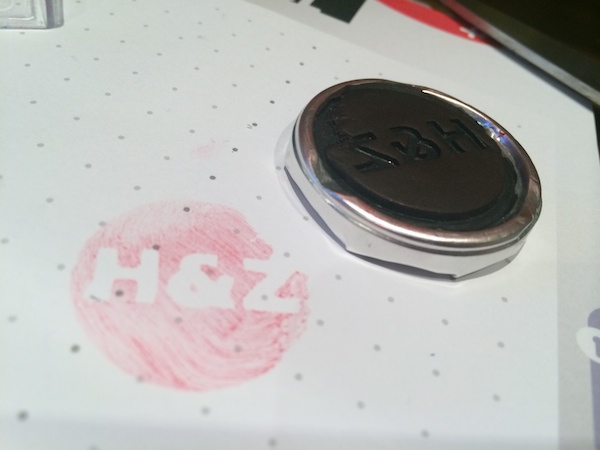
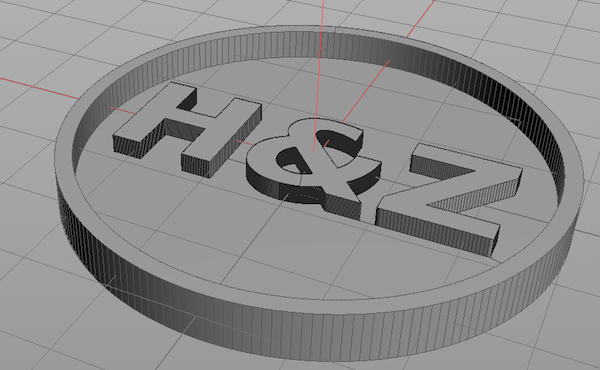 Step 1 was to model the shape I wanted to turn into a stamp. In this case, I wanted to make sort of an signet stamp for my bonnie lass and I. Since our names start with H and Z, I figured it would make sense to use those letters.
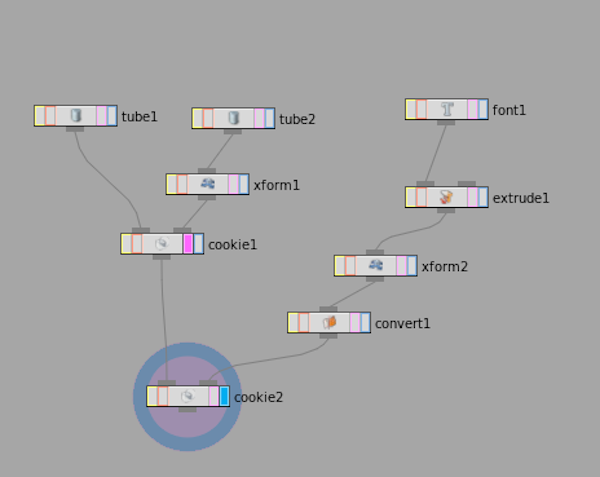 The modelling itself is a little bit outside the scope of this write-up, but above is the node network representing this shape. At the top left, you can see two 'tubes' - these are the outer and inner wall of the stamp. On the right, I'm creating the text, giving it width, then placing it into the circle. The great thing about Houdini, is that if I later want to change the text, I can go into the 'Font' node, and type in something else - everything else just cascades through the node structure, and I can print another stamp easily. The two 'Cookies' you can see are boolean operations, which is combining the various shapes (in effect, adding or subtracting them)
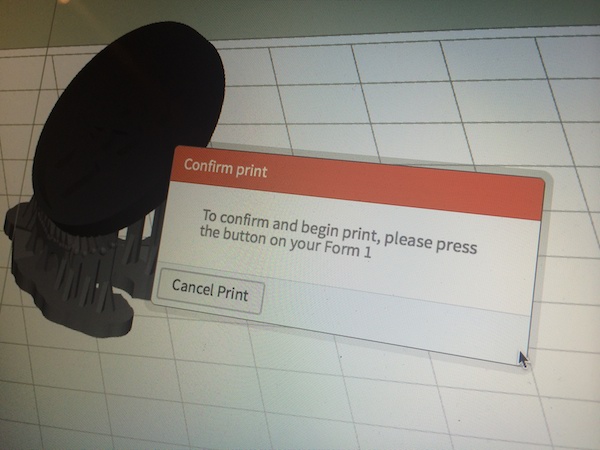 With the model completed, it was time to try to print my very first 3D object! How flippin' exciting. In this photo, you can see the supports the PreForm software adds to the item - and all I had to do next is to press 'print'.
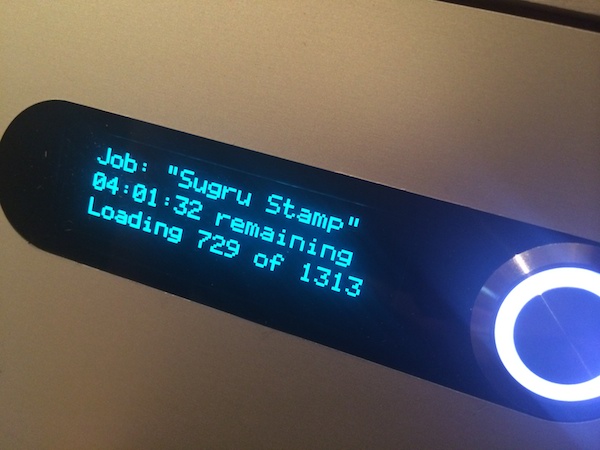 Unbearable excitement would have to be beared for about 4 hours, as I decided to print at the highest resolution. In retrospect, that was completely unnecessary and vastly over-kill (there was no way I'd be able to translate 25 micron layers to a stamp anyway...), but you live you learn!
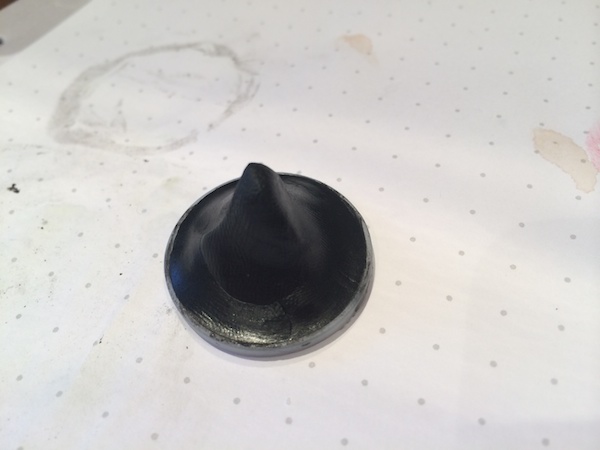
 After a quick bath in acetone (I couldn't find any rubbing alcohol at 18:45 on a Friday night, and I figured 'what's the worst that can happen'? Turns out Acetone works just fine) and a spot of extra curing, I removed the supports, and my mould was ready!
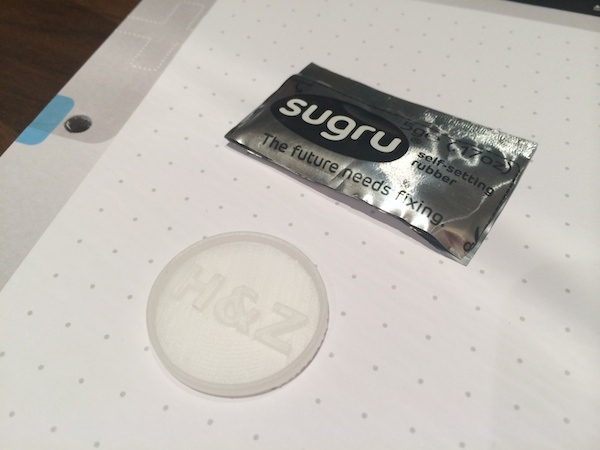 Now, it was time to use the mold to create the stamp itself. I picked Sugru for the job (I am a relentless fanboy - Sugru is awesome, and if you've never tried it: Buy some!)...
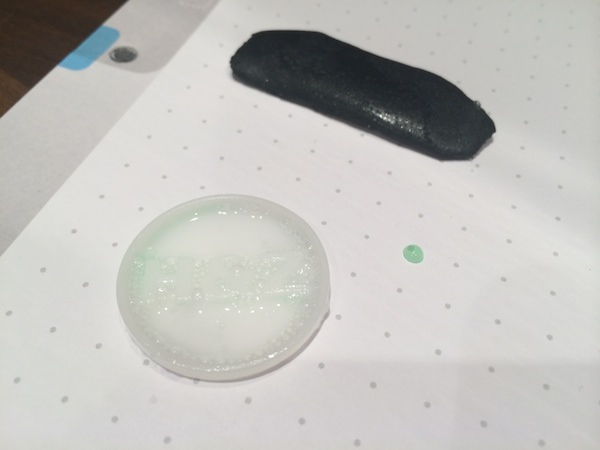 To prevent the Sugru from sticking to the mold, I put some some washing-up liquid on the 3D printed part...
 And then pressed a tea-candle into the back of the Sugru, to use as a handle.
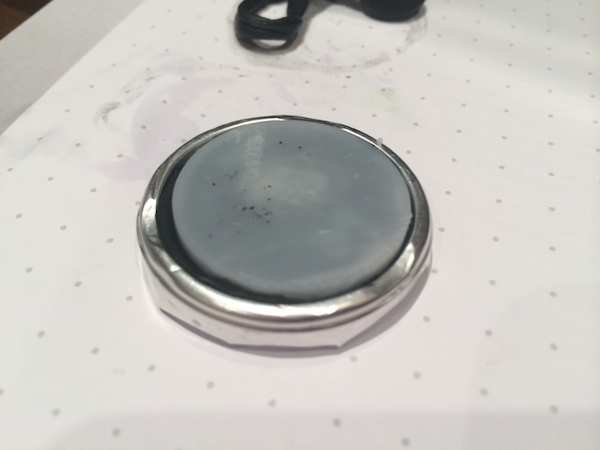
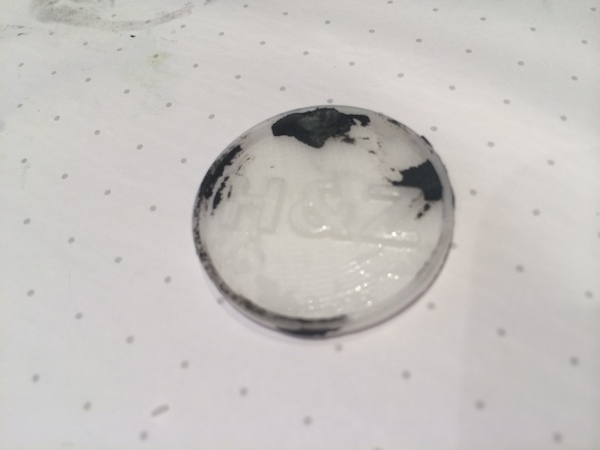 To my dismay, it turns out I hadn't used enough washing up liquid (or rather: I didn't ensure the whole part was covered), and I was also too impatient, leaving the Sugru in the mold for only an hour. When I removed it from the mold, some of the Sugru was left stuck inside.
 It looked OK, but the top bit was missing, which was a bit of a shame... So I decided to try again!
 This time, I just created a handle out of the Sugru instead of using a tea candle, jsut to try something new. I did leave it to cure for 10 hours this time, to make absolutely sure it was fully set.
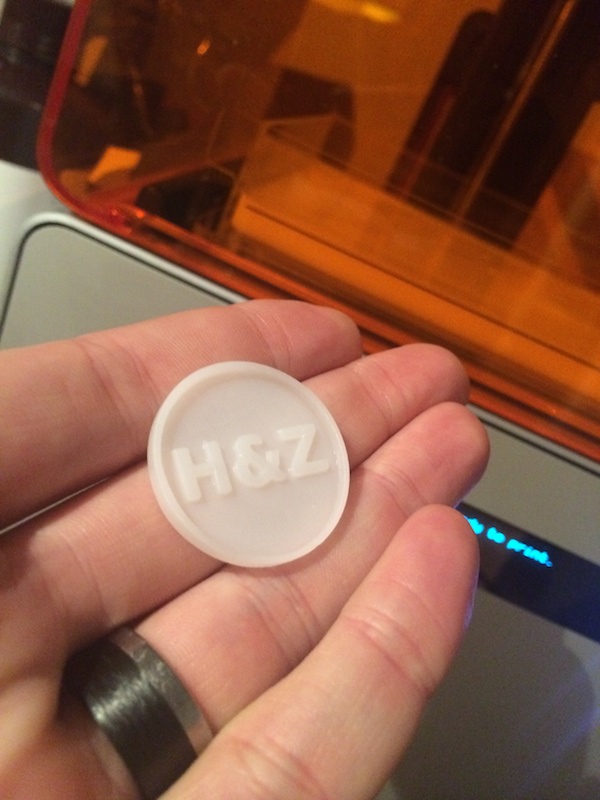
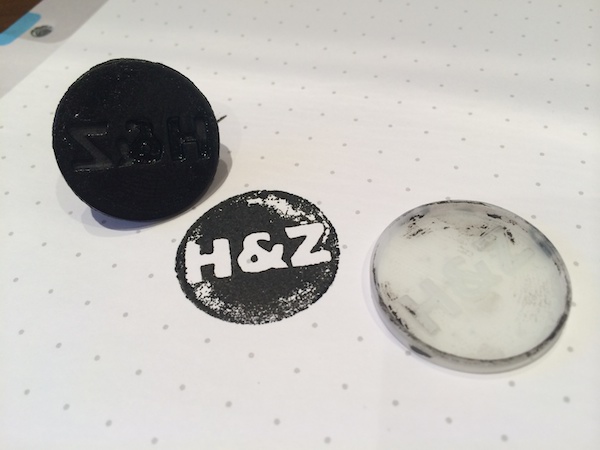 And the final stamp worked well! Hurrah!
Well, it turns out that 3D printing is pretty easy. 3D modelling is harder than you'd think. Sugru is brilliant, of course. Learning new things is fun. And I'm looking forward to experiment more with casting, making, 3D printing, and other nerdy endeavours.
Next stop: Inventing and 3D printing some photography gadgets!
It started as a Pinterest-based fashion catalogue, but Bazaart's users saw a different potential in the app's capabilities and were more likely to be making collages with it, and not-necessarily fashion-related ones either. Like many good entrepreneurs, Bazaart's founders spotted this trend and rolled with it; as a consequence, they started to pivot away from fashion and towards creating a Pinterest collage-maker. Since then, Bazaart has continued its movement away from fashion and away from Pinterest. It's now a fully-fledged photo editor for iOS. Bazaart is now an editing programme designed to compile composite images from those on your mobile device's camera roll, together with a social sharing element. Once you've turned your brother's head into a beer bottle or given your girlfriend a bed of butterflies, you can share your composite with other Bazaart users, diverting it into searchable channels, for example 'funny' or 'art'.
Tap on any photo and it breaks it down into its component images; you can follow people whose work you particularly like; and you can engage with other users. There are other mobile compositing apps out there, but they don't come with the social features of Bazaart, and that's what its founders are aiming for. They want people to think of Bazaart as a social Photoshop for the masses.
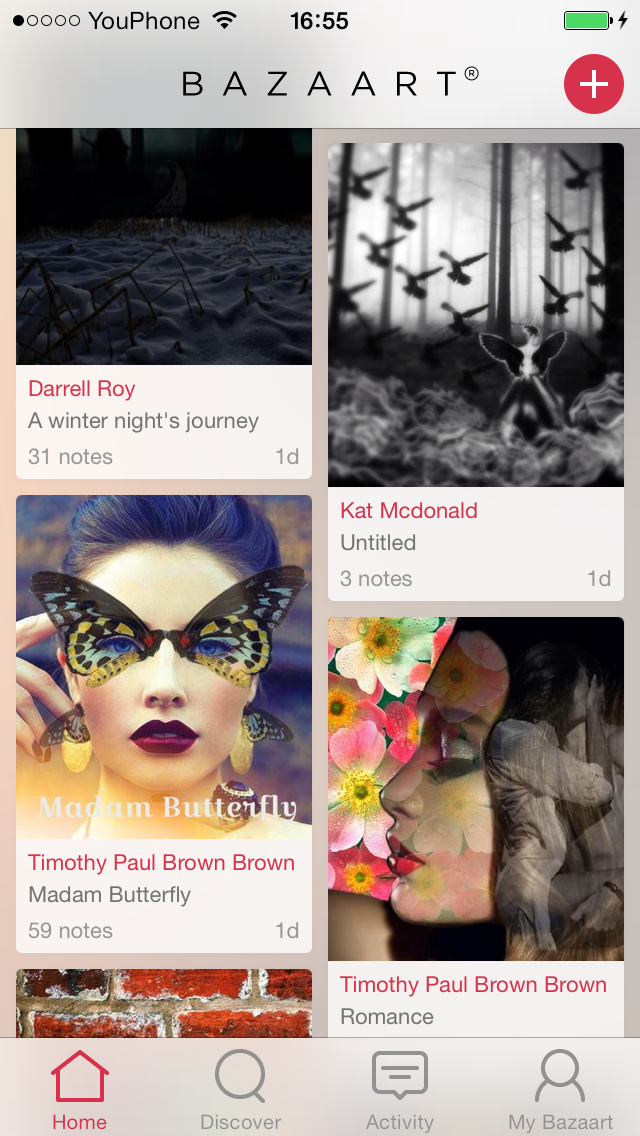
Since it completed its pivot to social photography in June last year, Bazaart has enjoyed 250,000 mobile downloads, and has 100,000 monthly active users who have created over 350,000 composite images using more than 2 million photos. It's free to download, but only available for iPhone and iPad running iOS 7, or at least until the end of 2014, when the developers hope to have an Android version up-and-running.