


The Consumer Electronics Show in Las Vegas is one of the biggest platforms in the world for announcing new photography kit. So what went down in 2015?
The great Photokina 2014 round-up
Keeping track of everything new that's announced at Photokina can feel like something of a labour of Sisyphus. So rather than cover every new product with an individual article and drive everyone to distraction, we've opted to summarise as many as we can in one place. This is Photokina 2014. Enjoy!
Canon
After what amounts to years of speculation, Canon has finally announced the EOS 7D mark II. The basic spec: APS-C, 20 megapixel sensor; ISO 100 to 16,000 but expandable to 51,200; dual DIGIC 6 processors; 65-point auto-focus; top shooting speed of 10 frames-per-second; and built-in GPS. All for $1,800, body-only.

Three new lenses have joined the line-up, too: an EF-S 24mm ƒ/2.8 STM for $149.00; an EF 24-105mm ƒ/4.0L IS STM for $599; and the EF 400mm ƒ/4.0L DO-IS II (USM) at $6,899.
There are also three new compact cameras. The premium G7X with its 1", 20 megapixel sensor and DIGIC 6 processor; top sensitivity of ISO 12,800; and a 24 to 100mm lens with a maximum aperture of ƒ/1.8 at its widest and ƒ/2.8 at the telephoto end, for $700. The SX60 superzoom with its 65× optical zoom for $550. And the N2, which, like the Powershot N, leaves me baffled.

Fujifilm
Fujifilm announced an update to its much-loved X100-series; the X100T. This one comes with an improved hybrid viewfinder, enhanced controls, and faster shuttre speeds. All for $1,300, in either black or silver.

The X20 has been upgraded to the X30. The improvements to Fuji's point-and-shoot focus on a new viewfinder and a tilting 3" high-res LCD. You can order one for £600.

There were also two new lenses: the X-F 56mm ƒ/1.2 R APD (85mm quivalent in 35mm format) for $1,500. (APD is apodisation. It is designed to give even smoother bokeh than the normal XF56. Great for portrait work.) And the weather resistant 50-140mm ƒ/2.8 R LM OIS WR at £1,600.
And don't forget the graphite-look X-T1 for $1,500 body-only.
Joby
Roll-up, roll-up, get your suction cups from Joby! Adding to its range of twisty, bendy, go-anywhere camera support devices, Joby has unveiled two suction cups, designed to provide industrial-strength hold on all types of smooth, clean, and non-porous surfaces. One has a locking arm, that's best for use in vibration-prone situations, such as in cars or on board boats (£33). The other has a Gorilla-pod arm, a quick-twist, flexible option that's better for windows, walls, and inside cars (£25).
[gallery columns="2" ids="6976,6975"]
There's also the Pro Sling Strap, designed for dSLRs, to keep your camera close to your body but easy to pull up to your eye (£57); the GorillaPod Focus + Ballhead X is the strongest and largest GorillaPod to date (£140); and the Flash Clamp and Locking Arm, which helps to transform everyday objects into lighting assistants with the two articulating ball joints that let you position your flash at any angle (£35).
[gallery ids="6979,6978,6977"]
Leica
Leica announced a laundry list of new cameras at Photokina:
- Leica M 60 Edition - an LCD-less camera, limited to 600 units, and costing $18,500 with a 35 Summilux stainless steel lens
- M-A
- X - Type 113; and X-E
- S - Type 007; and S-E
- V-Lux - Type 114
- D-Lux - Type 109, basically a Panasonic LX100
And a goodly selection of lenses, too. Leica enthusiasts couldn't have known which way to look first!
Nikon
Nikon's big announcement was the D750: an FX-format camera with 24 megapixel sensor and EXPEED 4 processor, 51-point autofocus system, sensitivity ranging from ISO 100 to 12,800, a tilting LCD, built-in wi-fi, all crammed into a smaller-than-expected body. For $2,300, body-only.

There was also the new Nikkor AF-S 20mm ƒ/1.8G ED and the SB-500 Speedlight.
Olympus
[gallery ids="6969,6968,6967"]
As well as announcing the E-PL7, Olympus brought out its E-M1 in silver (body-only for $1,400) and a new 40-150mm ƒ/2.8 lens for $1,500.
Panasonic
Panasonic came up with two new cameras and a new lens, together with the re-branded Leica cameras under the V-Lux and D-Lux badges.
[gallery ids="6966,6965,6964"]
The new LX100 camera is available for $900. It has a Micro Four Thirds sensor, a 4-75mm Leica DC lens (ƒ/1.7-2.8), and comes with an external flash. The GM5 mirror-less camera comes in black or red, with a 12-32mm lens, for $900.
And there's also the Panasonic G Vario 35-100mm ƒ/4.0-5.6 ASPH lens for G-series cameras, costing about $400.
Samsung
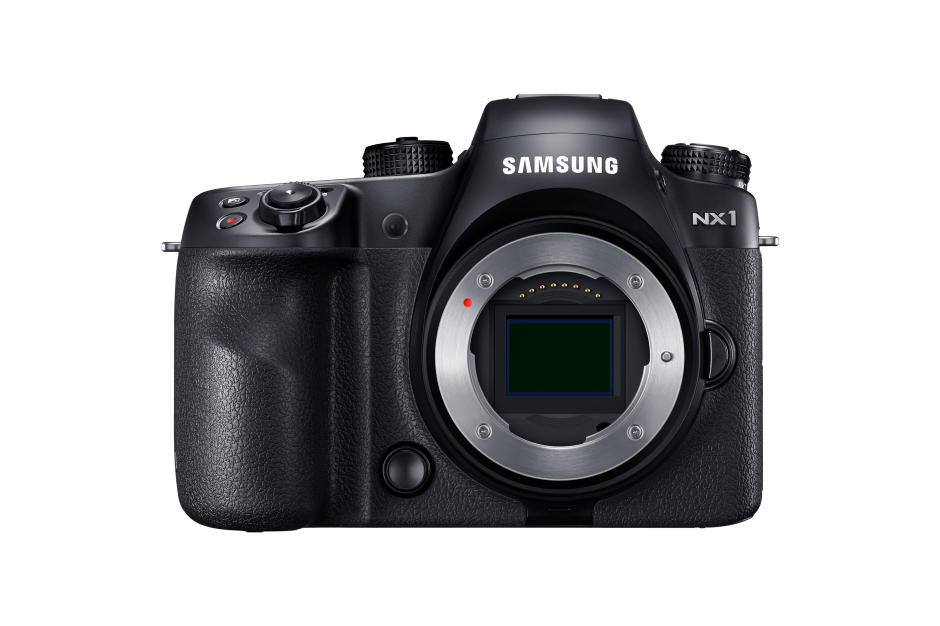
Samsung let loose a new camera, lens, grip, battery, and charger on the public in Köln. The camera is the 4K-video-enabled 28 megapixel NX1 for $1,500 body-only and the lens the 50-150mm S.
Samyang
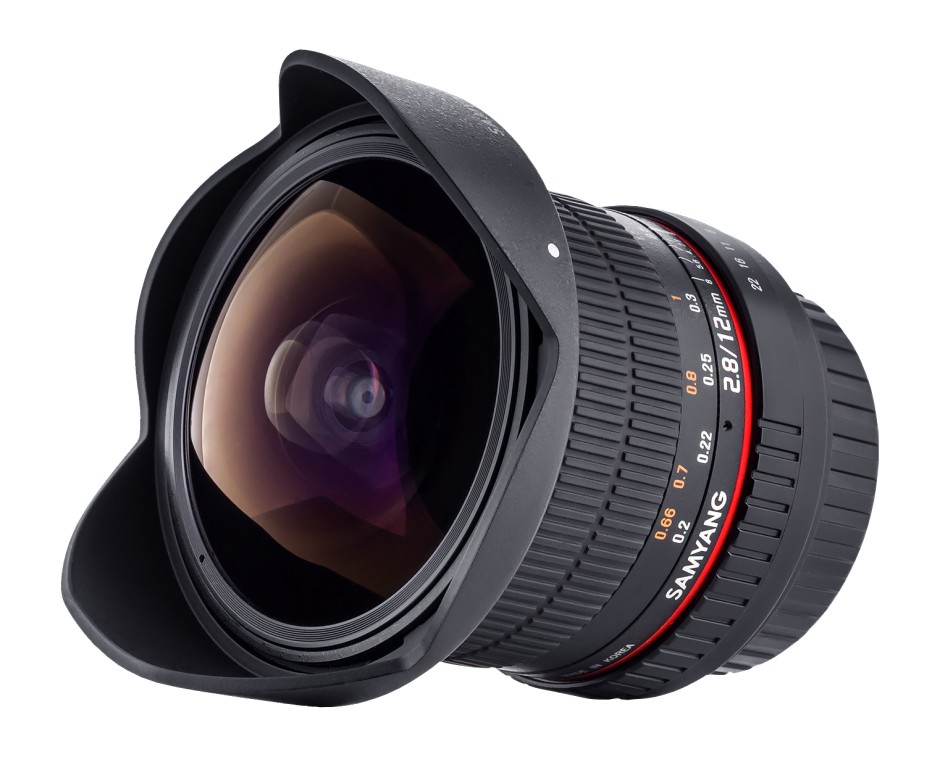
As well as the 50 mm T1.5 AS UMC cine lens, Samyang also announced its 12 mm ƒ/2.8 ED AS NCS fish-eye lens, which has been designed for full-frame cameras. We don't have a price or release date yet for it, but I am looking forward to seeing it.
Sigma
Sigma announced its dp1 Quattro camera, with a Foveon direct image sensor that is similar to traditional colour film in that its multiple layers capture all of the information that visible light transmits. It also announced two different versions of the same lens: the 150-600mm F/5-6.3 DG OS HSM Sports and the 150-600mm F/5-6.3 DG OS HSM Contemporary. The sports version is, probably quite obviously aimed at sports and wildlife photographers. The contemporary label is more compact and portable.

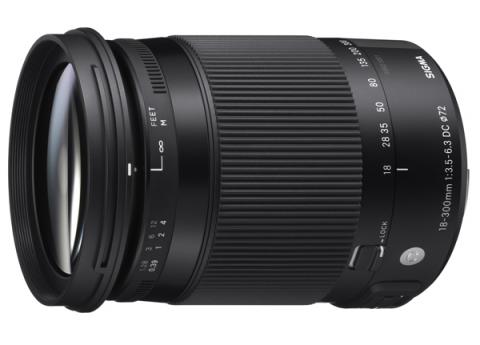
There was also the 18-300mm F/3.5-6.3 DC Macro OS HSM Contemporary lens.
Sony
Just before Photokina, Sony announced two new lens units, to attach to smartphones. These were the QX1 and QX30. During Photokina, a slew of camcorders, video cameras, and accessories were unveiled, too. The things that caught my eye was the flash unit, the HVL-F32M for $300.
From light to dark: the Photocritic guide to vignettes
For literary types, a vignette can be either an anecdote or short story, or a illustration—often foliage-inspired—found on chapter headers. For photography types, a vignette is the gradual fall-off of light from the centre towards the edges of the frame of an image. If you enjoy Instagram or play around with Snapseed, you might know a vignette as a cool effect that you can add at will. They are, however, far more than just an effect. Thus we present to you the self-contained, but not necessarily short, Photocritic guide to vignettes, without any vines.
Types of vignette
Photographic vignettes occur because of natural, optical, mechanical, and technical reasons and can appear whether you prefer analogue or digital technology. While we might associate vignetting with vintage, it's hardly stuck in the past. Digital sensors managed to introduce their own form of vignetting, and a great deal of it is down to lenses. What are we looking at, then?
Natural vignetting
You are most likely to see natural vignetting when you use a wide-angle lens. It's a gradual darkening of the image that happens because light reaches the sensor (or film) at different angles. As the photons need to travel further to reach the edges of the sensor, they lose their strength, hence the darkening.
Optical vignetting
Lens design is primarily responsible for optical vignetting; the lens' barrel prevents light reaching the sensor evenly, and the lens elements stacked up on top of each other can have an impact, too. Optical vignetting is more pronounced when shooting at wider apertures; stop-down a bit and you can reduce its prevalence.
Mechanical vignetting
If anything physical blocks the passage of light to the sensor, for example a lens hood or a filter, it can cause a vignette. This is the easiest vignette to correct: check all of your accessories are properly attached.
Pixel vignetting
The pixels towards the edges of a sensor aren't always able to record light at the same intensity as those closer to its centre, mostly because of the angle at which the light hits them. This can lead to a darkening of the image towards its edges. Sensor manufacturers have caught onto this phenomenon, however, and have introduced compensations to rectify it.
Why add a vignette?
If a vignette is regarded as an aberration, why would you want to add one deliberately to an image? When used reservedly, they can bring focus to your subject and draw your eye into the frame, particularly in portraits. First because they allow for fewer distractions at the edges of the frame, but also because they mimic the natural effect of the eye. We don't see sharply all the way to the edges of our vision, and a vignette's fall-off has a similar impact on our photos. They reproduce a degree of 'normality' that we can find pleasing. The essential factor in applying them is to be subtle, therefore.
Adding a vignette
Lightroom allows you both to add artificial vignettes and to correct those produced as the result of optical or mechanical aberrations. If you need to correct a vignette, reveal the Lens Corrections panel, where you can also adjust various types of lens distortion, and nudge the Lens Vignetting sliders until your photo looks 'right'. (They sit beneath the Manual tab.) Easy!
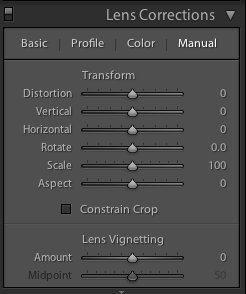
This is also an easy means of adding a subtle vignette to a largely uncropped photo, too. It doesn't let you over-do it, which is the cardinal sin of adding vignettes, and there aren't too many factors to consider. It's sneaky, but if you're working with a cropped photo, not helpful. For a cropped photo, you need to head to the Post-Crop Vignetting options in the Effects panel.
Here, you have far more control over the vignette that you add to your image.
With three drop-down options and five sliders, it might appear as if adding a vignette is more trouble than it's worth, but it's relatively straightforward. We'll deal with those drop-down options first.
Highlight Priority, Colour Priority, or Paint Overlay?
Highlight Priority, Colour Priority, or Paint Overlay? Highlight Priority allows for highlight corrections and recovery, so is good with images that have specular highlights, but it might have an adverse impact on the colours in the darker areas of your image. If you're working in black and white, colour shifts won't be an issue, so it's an easy choice.
Colour Priority won't produce such a pronounced shift the colours in the darker areas, but it won't let you recover highlights, either. Julieanne Kost, who works for Adobe, reckons it's a more subtle effect. You might want to consider this if your photo is in colour.
As for Paint Overlay, it is supposed to mimic the effects of overlaying your photo with either black or white paint.
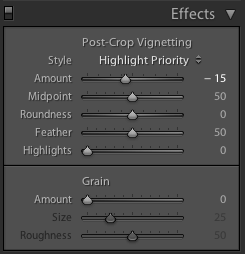
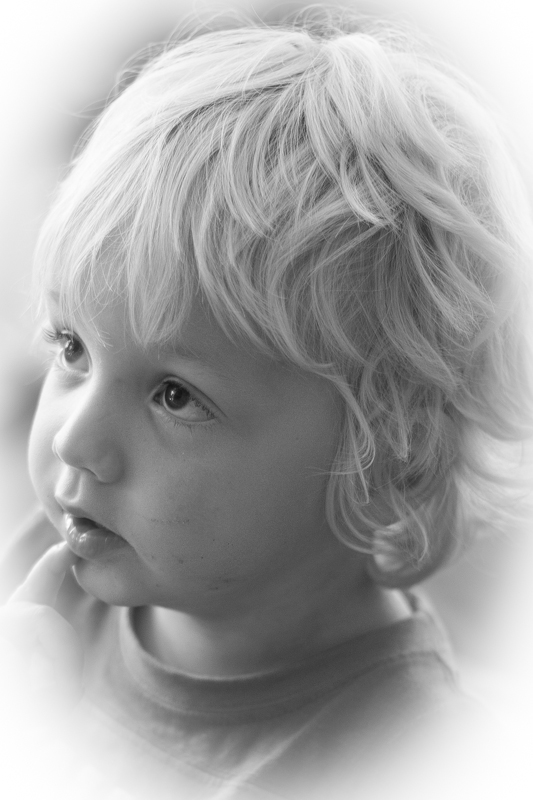
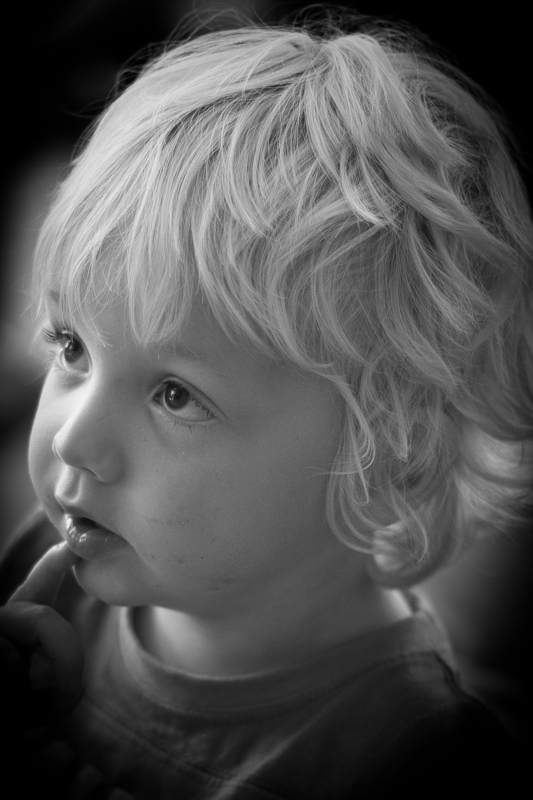
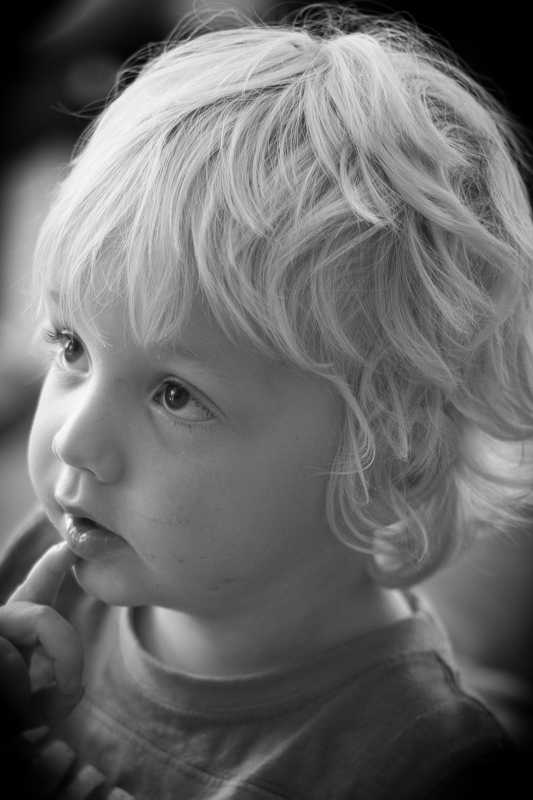
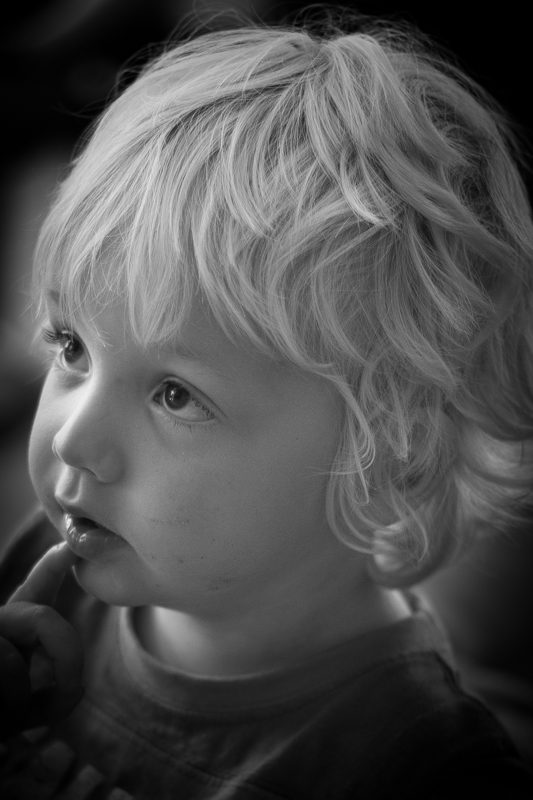
To walk through the sliders, I'm using a photo of my nephew Wil for demonstration purposes. It's been cropped, converted to black and white, and had all of its other adjustments made. The last thing on the list is the vignette. That's how you should apply one, too.

Amount
The Amount slider is the crucial slider when adding a vignette. It determines how strong the darkening or lightening of the edges of the frame will be. Set it at -100 and you'll have deep black edges; conversely, +100 will leave you with bright white edges. Without adjusting this slider, none of the other Post-Crop Vignetting sliders will have any impact on your image.
From now on, we'll look at all the other sliders having an effect with the Amount set to -100. It offers the clearest demonstration of their impact.
Mid-point
The Mid-point slider controls the size of the vignette from the centre of the frame. It naturally sits at 50 points; reduce it to 0 and you'll produce a vignette that encroaches far into the frame.
Set it at 100 points and it'll sit closer to the edges of the frame.
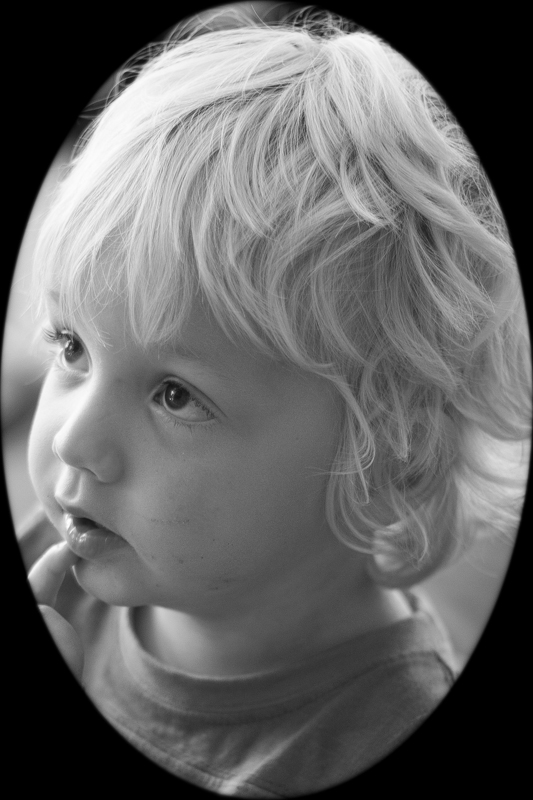
Roundness
The Roundness slider controls the shape of the vignette. At 50 points, it's elliptical in shape. Push it to 100 points and you'll have a circular vignette. At 0, it's a rectangle with rounded corners. (By pushing all of the Post-crop Vignetting sliders completely to the left, you'll create a rounded-corner rectangular frame effect for your photo.)
Feather
To control the strength of the transition between the vignette and the centre of the image, adjust the Feather slider. 100 points ensures a very subtle transition; 0 points is a sharp transition with a hard edge. Its native position is 50 points; I don't often vary far from there.
Highlights
Finally, we're left with the Highlights slider that starts at 0. Why might you want to increase the highlights slider? It prevents the vignette being applied too heavily to highlights in the image and helps to keep them bright. There's no hard-and-fast rule for this slider; it needs to be adjusted on the merits of each image.
It's important to note that the Post-crop Vignetting panel applies the vignette centred according to the crop. If you want to introduce a vignette that works around an off-centred subject, you'll need to do that using Radial Blur. That's a whole different article, however.
Other vignette options
If you don't use Lightroom, you can add a vignette using plenty of other editing suites. Photoshop, of course. And Pixelmator. Or Pixlr. Under the 'Centre Focus' tab if you're in Google+. In Apple's Aperture.
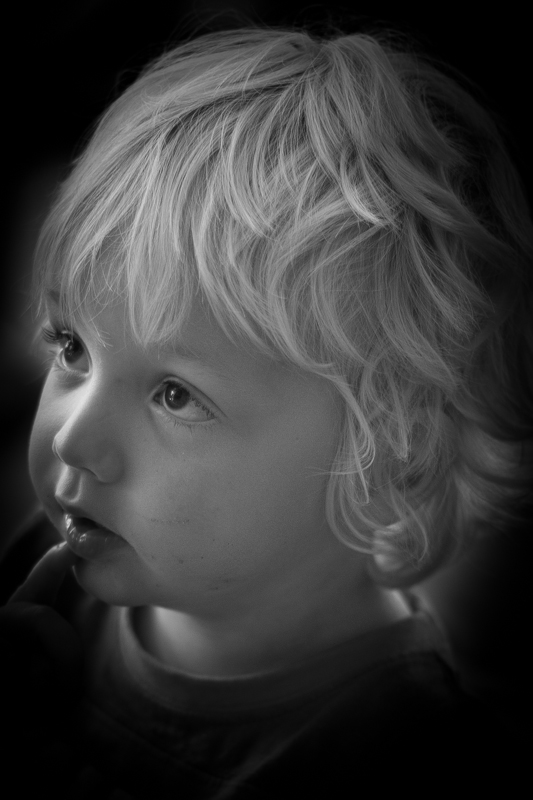
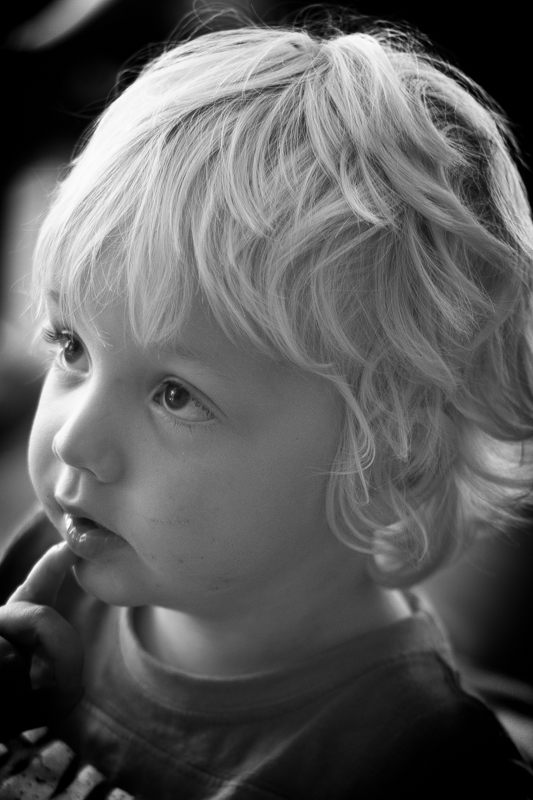
The end product
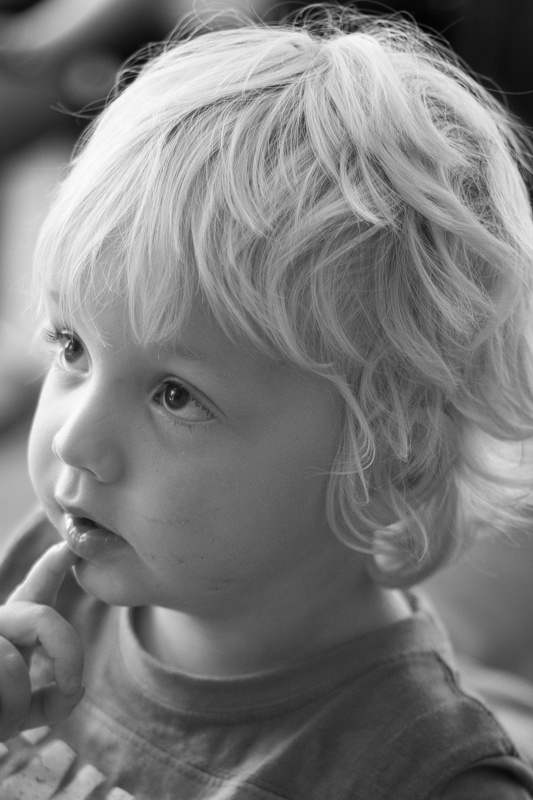
This is my final version of Wil, with a vignette Amount of -15 and a Mid-point of 75. That was it. Remember: subtle is better!
Lensbaby launches a fisheye lens
Lensbaby has just announced a 5.8mm ƒ/3.5 circular fisheye lens with manual focus for Canon and Nikon mounts. Although it has been optimised for APS-C sensors, you can use it on full-frame cameras. You'll be left with a smaller image circle is all. It should be able to focus as close as ¼", going all the way to infinity, and offers an 185° angle of view. At a smidge under $300, it's an extremely affordable addition to you kitbag, it just relies on you using its focusing ring to get your subject sharp, rather than on your auto-focus. If you're not sure that you can stretch to a Canon or Nikon-made lens, it's an intriguing alternative.
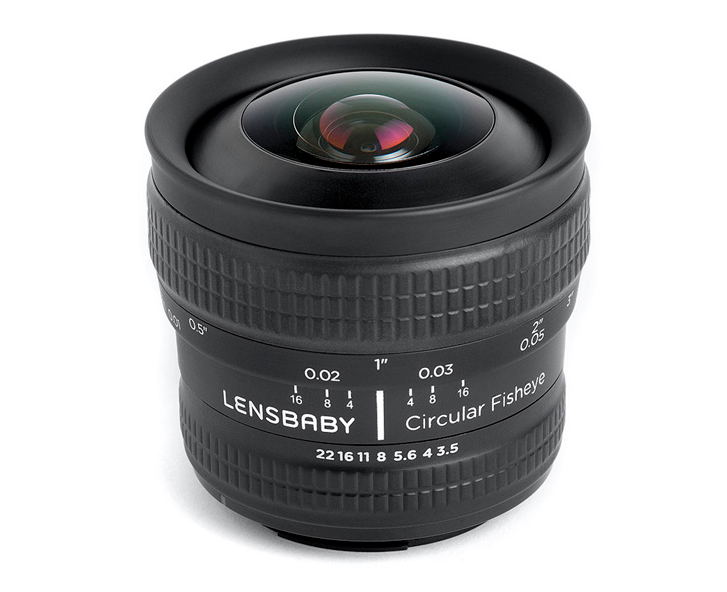
It's not on sale yet, but you can pre-order from Adorama. Canon's here; Nikon's here and both are priced at £299.95!
Lensbaby turns to Kickstarter to fund a selective focus iPhone lens
There's already an array of additional lenses to augment our mobile phones, and quite a few of them have their origins in Kickstarter, too. There are telephoto and fisheye lenses that screw on or clip on as well as macro lenses on elastic bands, but now Lensbaby, known for its creative optics for dSLRs, is joining the fray with a campaign to fund a selective focus lens for iPhones 4s, 5, 5s, and 5c. It's called the Sweet Spot, and it will render images with a sweet spot of focus surrounded by blur. By pledging $50 to the campaign, you can pick up a Sweet Spot and start composing dreamy, selectively-focused shots. The Lensbaby attaches to an iPhone using both adhesive and magnets. One stainless steel ring sticks to your phone, around its lens, and the Lensbaby is mounted to that using magnets. The Lensbaby lens has magnets on both ends, meaning that it can be combined with other magnetic iPhone-compatible lenses, such as fisheyes and telephotos, for even greater control over your photos.
As well as the lens, there's an accompanying app. It's been developed to provide an optimal shooting experience with a Lensbaby lens. Primarily, it ensures that the image you see on your screen is the right way up, because the optical design of the lens means that it renders upside-down with the iPhone's native camera.
The catch is, of course, that these are only some-iPhone-models-friendly. If you're an Android user, or an iPhone 4 user, you're out of luck.
The question quite a few people might be asking is why has Lensbaby, a well-established company with a significant turn-over, opted to seek Kickstarter funding for a mobile-oriented version of its product? The answer's in the question: this is a departure from Lensbaby's dSLR stomping ground and it wants to be sure that this is a product consumers want. An iPhone-only offering with a modest $20,000 goal suggests that Lensbaby is using Kickstarter to dip its mobile toes in the water. With 199 backers and over half of its goal achieved within roughly 24 hours, I'd say that people are interested in a selective focus iPhone lens. Android users might even be interested in a version for their phones, too.
If you'd like a Lensbaby Sweet Spot for your iPhone, you can pledge over on Kickstarter.
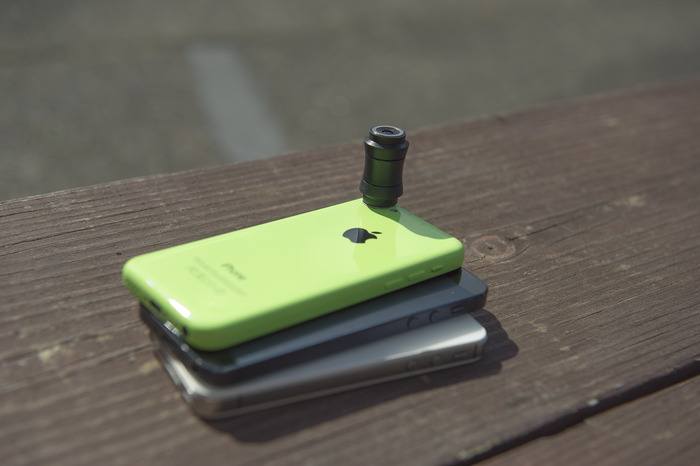
Easy macro smartphone photography with Easy-Macro
Sometime in September last year I pledged a modest sum of money to Easy-Macro's Kickstarter project. I'd heard about Easy-Macro before then—a magnifying lens set into a rubber band that wraps around your smartphone and sits over its lens—but the new and improved 4× magnication factor in the Kickstarter-funded project made it seem like a great bet. Some 4,106 other people agreed with me and Easy-Macro surpassed its goal with plenty in hand. For me, the appeal of the Easy-Macro wasn't just that it was a fun addition to my smartphone, or that it was cheap, but that it meshed with the ideals of smartphone photography: discreet and easy. It sits my wallet and can be placed around any phone. I don't have to worry about it getting crushed or dropped in a bag and it won't become obsolete if I upgrade my device.
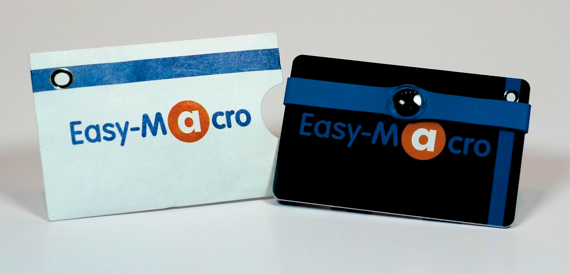
All I needed was for it to be any good. Well, just before Christmas my bright blue band arrived and I'm happy to say that I've been having fun with it ever since.
You use the Easy Macro just as would manually focus a lens set to infinity: by getting as close as you feasibly can to your subject and then moving your smartphone steadily backwards until your subject comes into sharp focus. It does require patience and a steady hand—remember, keep your elbows pushed into your sides to help stabilise yourself—but I've been pleased with the results so far.

Of course it is never going to compete with my 100mm macro on my Canon 6D, but it's not meant to. For a $15 gadget that I can keep in my wallet, what's not to like?

If you missed out on the Kickstarter campaign but are tempted by one, fear not, because you can pick up an Easy-Macro from the Easy-Macro website.
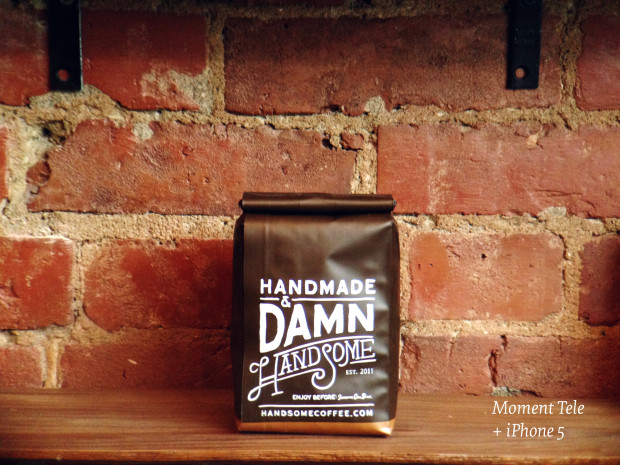
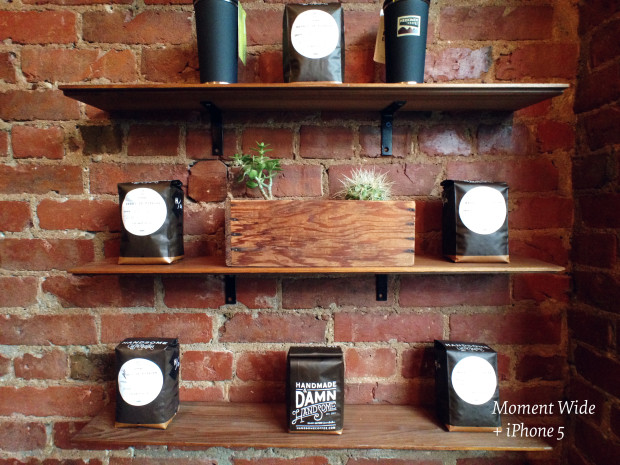
Moment wants to bring more variety to smartphone additional lenses via Kickstarter
How many different lens manufacturers can you name in the next ten or fifteen seconds? Quite a few, I bet. We're accustomed to being able to choose between our camera manufacturers' lenses as well as third party lenses manufactured by the likes of Sigma, Tamron, Tokina, Samyang et alios. Now that smartphones are the snapshot-camera-du-jour, and a vertaible feast of apps and accessories are springing up to help people make the most from them, why not a selection of additional lens manufacturers? Moment is aiming to bring some diversity to the smartphone lens accessory marketplace with its Kickstarter project that launches today. If it successfully raises $50,000, it should be shipping wide-angle and telephoto lenses, suitable for iPhones (4s, 5, 5c, and 5s), iPads (third and fourth generation iPad 2), and Samsung Galaxy smartphones (S2, S3, and S4), to its backers around June 2014.
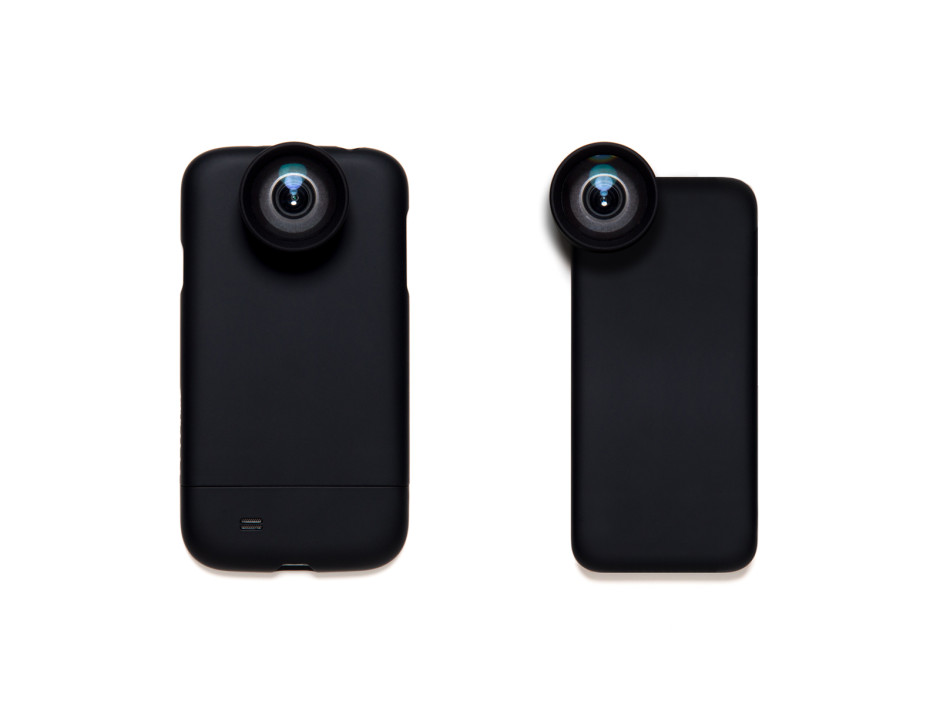
The wide-angle lens offers a 35mm equivalent focal length of around 18mm (it varies slightly according to phone model); the telephoto lens' focal length equates to approximately 60mm, again depending on the smartphone model, in 35mm equivalent. Pledge $49 and you put yourself in line for one lens; $99 will secure you a pair.
The mounting mechanism attaches a metal plate to your phone—either with or without a case—and to this you secure the lens with a bayonet fitting. The Moment team thinks, after lots of prototype testing, that this is the easiest, quickest, and most secure mount around.
Moment is convinced that it offers the best quality lens you can attach to a smartphone. Some of its developers have worked in the manufacture of cinema lenses, and they've applied that knowledge to Moment's smartphone attachments to minimise distortion and chromatic aberration and maximise sharpness. Without a model to test, you have to take the manufacturers' word for it; but that's the gamble of Kickstarter.
You can check out the Moment video down below, or wander over to its Kickstarter page for a closer look!
Update! Moment reached its Kickstarter funding goal in under 24 hours. But that shouldn't stop you from taking a look!
What is zoom?
Z is for zoom. We couldn't finish off our alphabetical meander through photography's fundamentals anywhere else, could we? I've had a few people ask me, over the years, what's the difference between zoom and telephoto, and indeed is there one. Yes, yes there is a difference.
The simple explanation
Simply put, a zoom lens is one that benefits from variable focal lengths. For example, the 18-55mm kit lens that comes with an entry level dSLR is a zoom lens. At its widest point it has an 18mm focal length; at its narrowest, it has a 55mm focal length, and you can shift it to any focal length between the two. This means it spans from wide-angle to 'normal' focal lengths, giving it a fair degree of flexibility and making it useful as a first lens.
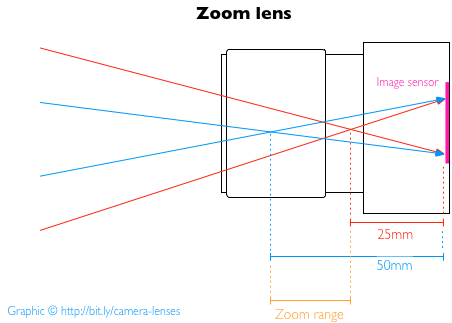
Telephoto lenses can be zoom lenses, too, for example a 70-200mm lens. Or you can have wide-angle zoom lens, for example a 17-35mm lens. Then there are zoom lenses with focal length ranges that stretch from wide-angle to telephoto, for example 24-105mm.
Whether the focal length range is wide-angle, telephoto, or spans the two is irrelevant; it's the fact that the lens covers a range of focal lengths that makes it a zoom. If you want to put it another way: a zoom lens is the opposite of a prime lens, which has a fixed focal length.
Advantages and disadvantages
The obvious advantage of a zoom lens is that it offers you flexibility. Being able to zip from 70mm right in to 200mm with the twist of the wrist is very handy, so is having wide-angle and telephoto capability in one place. And of course they let you mess around with zoom-bursting, which is always good fun.
However, that flexibility comes at a cost. The moving parts required to give zoom lenses their zoom can compromise their sharpness, give them more noticable aberrations, and limit their apertures. Whereas you'll readily find prime lenses with fast apertures, zoom lenses tend to be a bit slower and they often have variable maximum apertures.
The 18-55mm kit lens that we spoke earlier won't have a fixed maximum aperture across its focal range. Instead, it will have a maximum aperture of ƒ/3.5 at 18mm and at 55mm its maximum aperture will be ƒ/5.6. That's a bit of a difference to a 50mm prime lens that has a maximum aperture of ƒ1.4, isn't it? (There are zoom lenses with constant maximum apertures, a 70-200mm ƒ/2.8, for example, but they're much more costly than variable aperture zooms.)
Finally, the more moving parts that you have, the higher the chances of something breaking. That's not limited to photographic lenses, but just about anything that you can build. In this case, however, zoom lenses are more susceptible to damage or failure than prime lenses are.
And what about digital zoom?
So far, we've talked about optical zoom, or a change in focal length that is achieved by moving parts and adjustments to lens elements within the lens body. Some cameras, however, don't have optical zoom capability and instead rely on digital zoom to bring you closer to your subject. Digital zoom is standard in smartphone cameras, but you'll often find it in compact cameras as an augmentation to their optical zoom capabilities.
Digital zoom isn't really anything other than cropping: the centre of the frame is enlarged and the edges are trimmed away. As a consequence, images that are digitally zoomed are of lower quality than full resolution photos. If at all possible, avoid using digital zoom; it won't do your photos many favours.
TL;DR
- A zoom lens is a lens with a variable focal length
- Zoom lenses can be wide-angle, telephoto, or span the range
- The advantage of a zoom lens is its flexibility, but disadvantages can include lower image quality and slower apertures
- Digital zoom isn't really zoom at all, but a form of cropping. It's best avoided.
White balance << Photography Fundamentals >> Aperture
If you want to read a much more detailed explanation of lenses, do have a look at Haje's extensive Everything about camera lenses article.
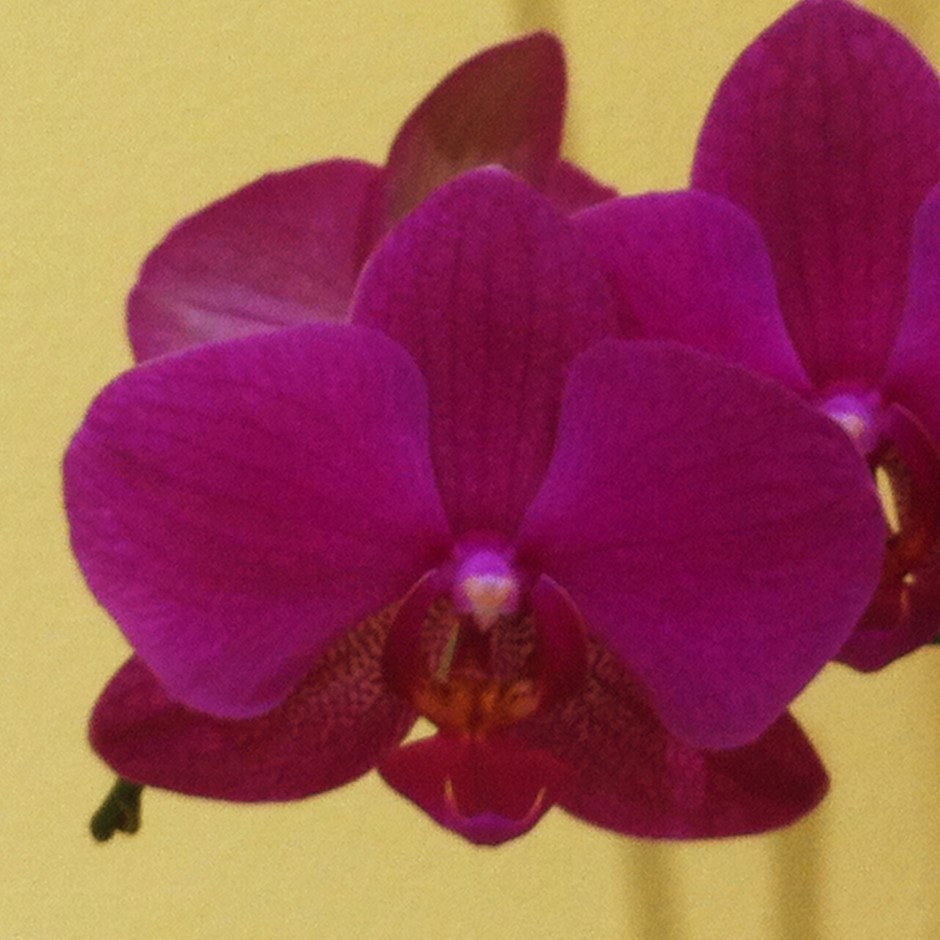
Getting up close with your iPhone and Olloclip's 3-in-1 macro lens
Last week Olloclip unveiled its 4-in-1 lens in Holidays-special gold and space grey options to match iPhone 5s models. This week it has announced a brand new 3-in-1 macro lens attachment for iPhone 5 and 5s phones. One reversible attachment and one adapter brings 7×, 14×, and 21× magnification to your iPhone photos.
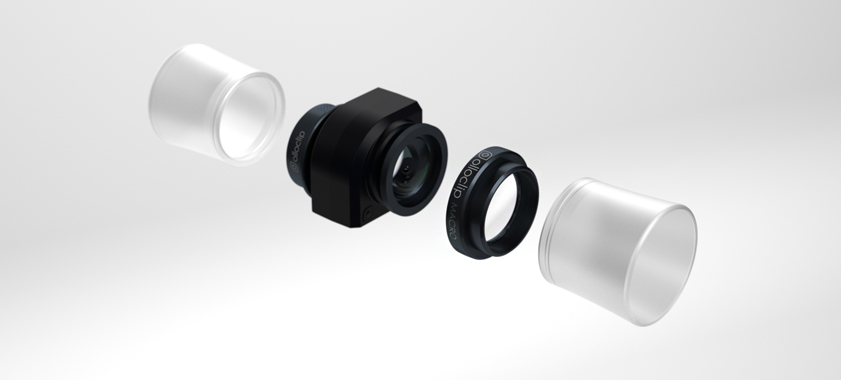
Just like other Olloclip attachments, it works by slotting over your iPhone camera. The 7× and 14× factor magnification options are on one side of the attachment—you switch from 14× to 7× by removing the adapter—the 21× lens on the other. You get two diffuser heads to help soften the light, too.
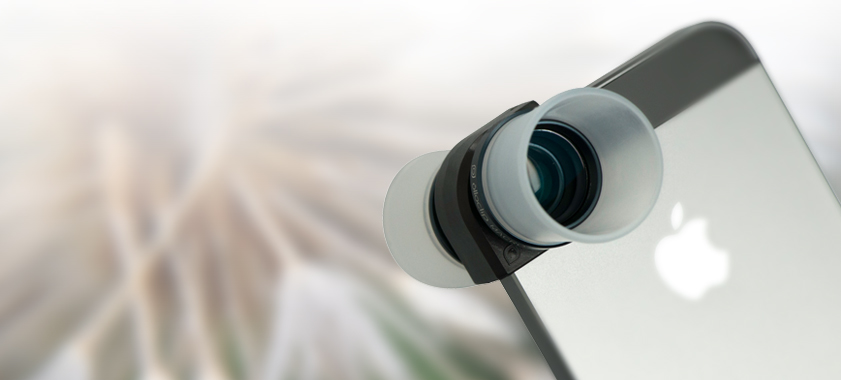
The 3-in-1 macro lens is available from Olloclip for $70. This one doesn't come in spangly colours, just black. But it does look rather smart.
(Headsup to Engadget)
What is focal length?
Having made it through a, c, d, and e (we skipped b), the photography fundamentals cruise ship's next port-of-call is f, where we'll be exploring focal length. There's a lot to take in here, so I hope that you're wearing comfortable walking boots.
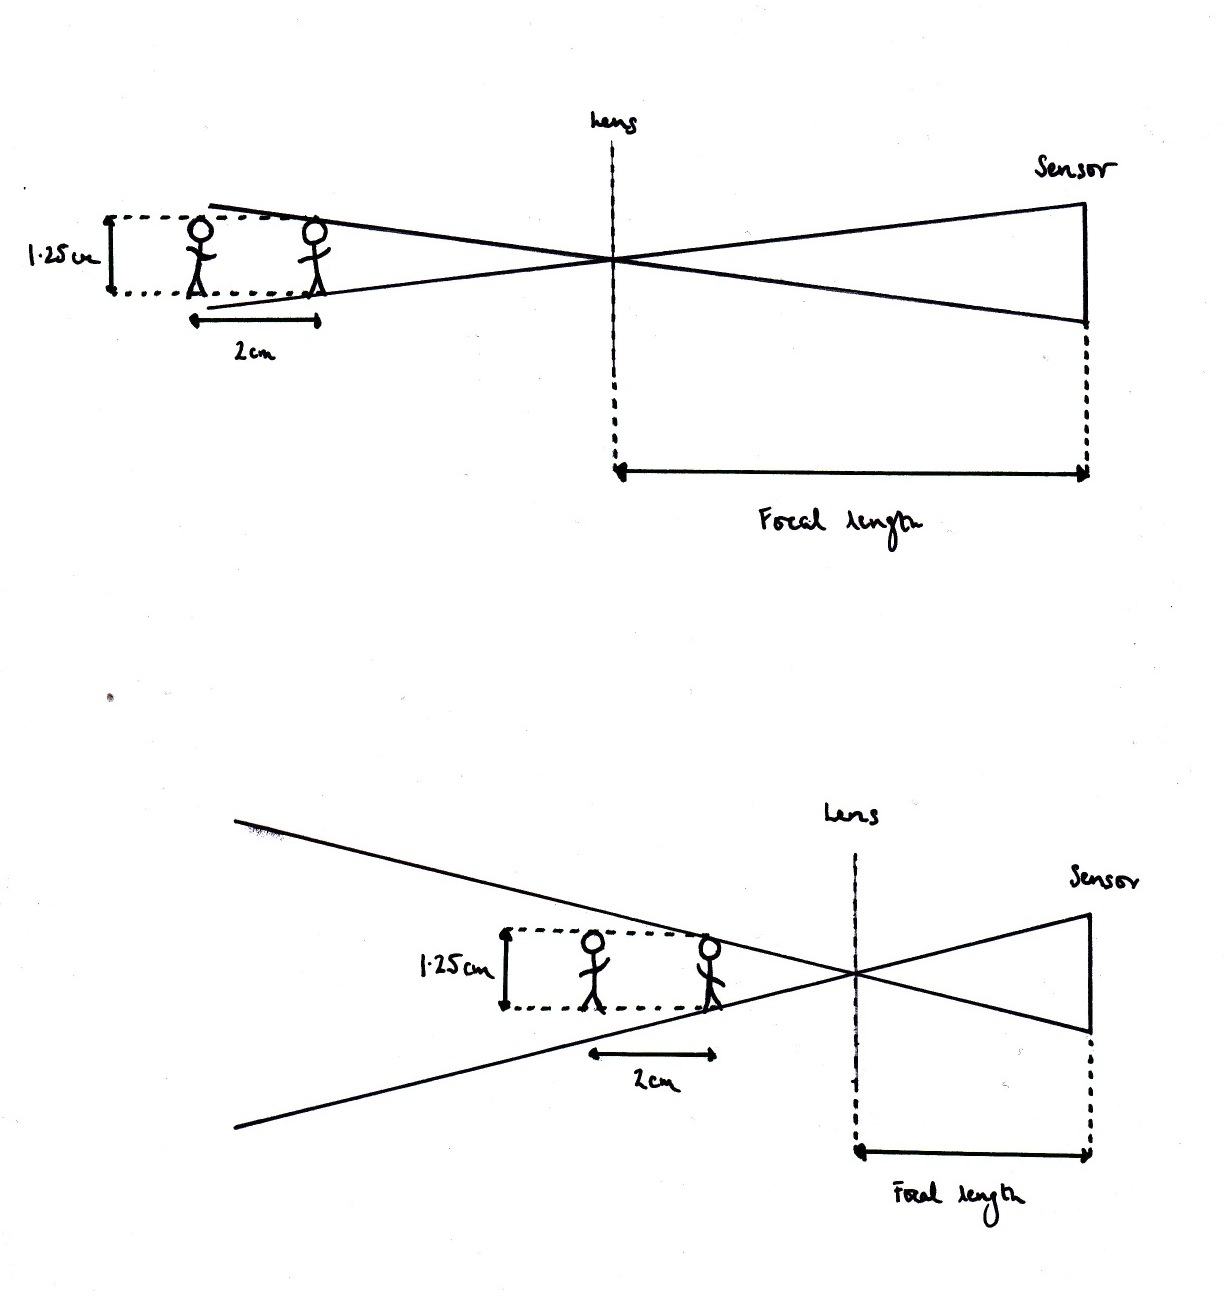
Your camera's lens works by refracting the light from what it can 'see' and converging it at a single point, the focal point, to create an image. Just how much the lens is able to 'see' depends on its focal length.
The distance between the lens and the imaging sensor (or film, if you're old school) is what determines focal length. It's measured in millimetres.* A shorter focal length means a wider angle of view, so the lens 'sees' more. These are called, somewhat unoriginally, wide-angle lenses. By the same token, increase the focal length and the angle of view decreases and pulls you closer to your subject. Lenses with larger focal lengths, roughly over 135mm, are known as telephoto lenses. Those in between, around the 50mm mark, are 'normal' lenses.

Here you have a wider angle of view that takes in more of the scene.

A narrower angle of view draws you closer to your subject.
* Long lenses don't really measure 20, 30, or 40cm; they create the telephoto effect by a complex series of elements thatwork together to create that same effect.
The crop factor
When we talk about focal length, we're usually doing it with reference to a 35mm, or full-frame, sensor camera. If you're using a camera that has a sensor smaller than full-frame, for example a Nikon D5100 with an APS-C sensor or an Olympus PEN with a Four Thirds sensor, it will have a magnifying impact on the focal length of your lenses. The smaller sensor is only able to detect a portion of the entire field of view, making it appear as if you're closer to your subject.
This is known as the crop factor. Multiply the sensor's crop factor (for example 1.5 for a Nikon APS-C sensor) by the lens' given focal length and you'll have the effective focal length. (It doesn't actually change the focal length, but it looks that way.)
This can be very useful when you use a telephoto lens, because your 200mm lens on your Nikon D5100 suddenly becomes the equivalent of 300mm; but it can be a bit of a pain when you're using wide-angle lenses as they will lose some of the impact of their increased angle of view.
So that we're all straight, I'm going to be referring to focal lengths as if they apply to a full-frame sensor.
Rough-and-ready guide to focal lengths
- 22-35mm - Wide-angle - Landscapes
- 35-70mm - Standard or normal - Street, documentary, some portraiture
- 70-135mm - Medium telephoto - Portraiture
- >135mm - Telephoto - Sports and wildlife
Wide-angle lenses are good for...
Wide-angle lenses might be the go-to lens for landscapes, but there's more to them than that!

Emphasising the foreground
You’ve probably noticed that if you take a portrait with a wide-angle lens, the subject’s nose looks comically large and her or his chin juts out further than Brighton pier. Why? Well, the lens' wide angle of view means that in order to get in close enough to fill the frame with your subject, you have to get in very close. The closer that you get, the larger whatever is in the foreground will appear. As those objects are likely to be a nose and a chin, in a portrait, they are going to look huge compared to the rest of the face.

If you were to photograph a building close-to and from below, this same foreground-emphasising effect would make the base of the building look stupidly large and the entire structure ridiculously tall. Being close, the foreground is emphasised and the lens' wide angle of view gives the entire scene the illusion of somehow being stretched or exaggerated.
Enclosed spaces
When you're taking photos in an enclosed space, using a wide-angle lens will ensure that you can include everything in your scene that you want to be there. This is why estate agents use wide-angle lenses to photograph inside properties, so that the rooms can be shown in their entirety.
Converging verticals
Whatever lens you use, including your own eye, perspective means that parallel lines will appear to converge eventually. Just think of train tracks coming to a point as they streak away into the distance. When you use a wide-angle lens, this convergence happens faster than it would with a normal or telephoto lens.
You can use this convergence effect creatively, to envelop people in trees or give buildings an odd look. But of course, you might not always want your buildings to tip backwards or their parallel walls to converge. Standing further back from your subject and not tilting your camera upwards can help to overcome the problem, but sometimes this isn't always possible. I don't know about you, but I find that standing in the middle of a busy road to take a photo doesn't do me many favours. Thankfully, there are lens correction effects available in most editing suites!
Telephoto lenses are good for...
You might associate telephoto lenses with hardened sports photographers and weather-beaten wildlife photographers, but they're good for a whole lot more.

Normalising
Having a narrower angle of view means that the subjects fill the frame more; giving the impression of being closer together and closer in size.
Instead of objects in the foreground looking larger, as would happen with a wide-angle lens, telephoto lenses make their background objects appear comparatively larger. It's because of the narrow angle of view: things in the background take up proportionally more of the frame, which makes them look closer in size to things in the foreground. It's called the normalising effect.
This then is why portrait photographers prefer longer lenses, often around 85mm.
Density
By giving the impression of compressing scenes and bringing subjects closer together, you can use a telephoto lens to make it look as if more is happening in your image, and that it is somehow more dense. For example, a moderately busy street scene could become bustling when shot through a telephoto lens.
Layering
Classically, it's a wide-angle lens that is used for landscape shots, so that everything in a sweeping vista gets in the frame. However, I've taken some of my favourite landscape photos with a telephoto lens. They have this beautiful stacked look that can emphasise the different layers in the environment.
Depth-of-field
You often hear it said that telephoto lenses have a shallower depth-of-field. This isn't strictly true. It would be more accurate to say that because telephoto lenses are mostly used to magnify subjects, and the subject will then fill more of the frame, the depth-of-field appears to be shallower. Not that there's anything wrong with that; it allows you pick out your subject from a beautifully blurred background.

TL;DR
- Focal length is the distance between the lens and the sensor
- It is measured in millimetres
- Shorter focal lengths produce wider angles of view, that capture large scenes
- Longer focal lengths bring you closer to your subject and have a magnifying effect
Exposure << Photography Fundamentals >> Golden hour