filter

EyeEm brings new editing and learning tools to its app

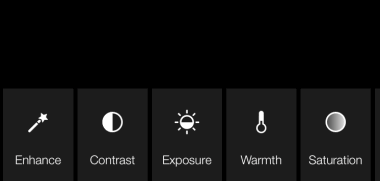
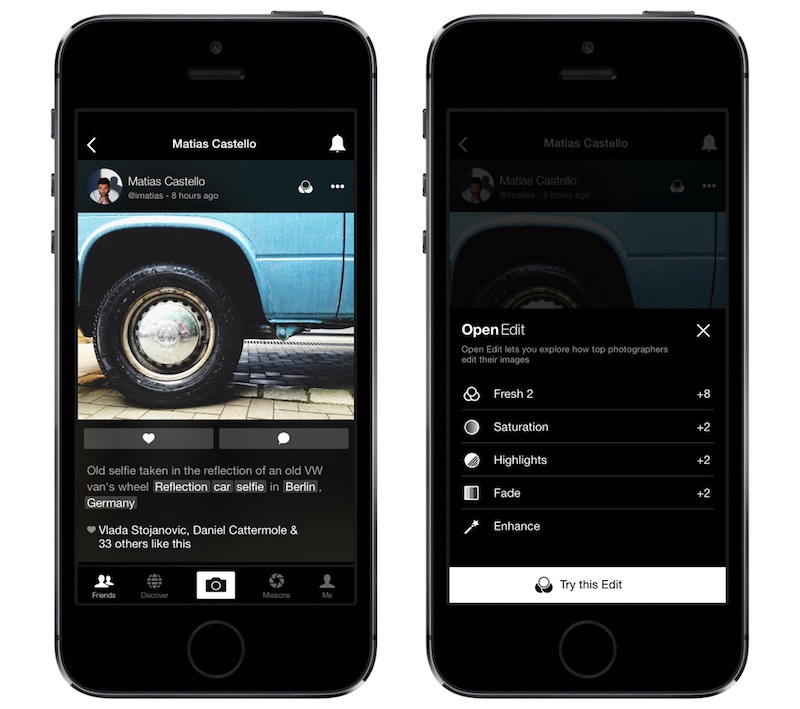
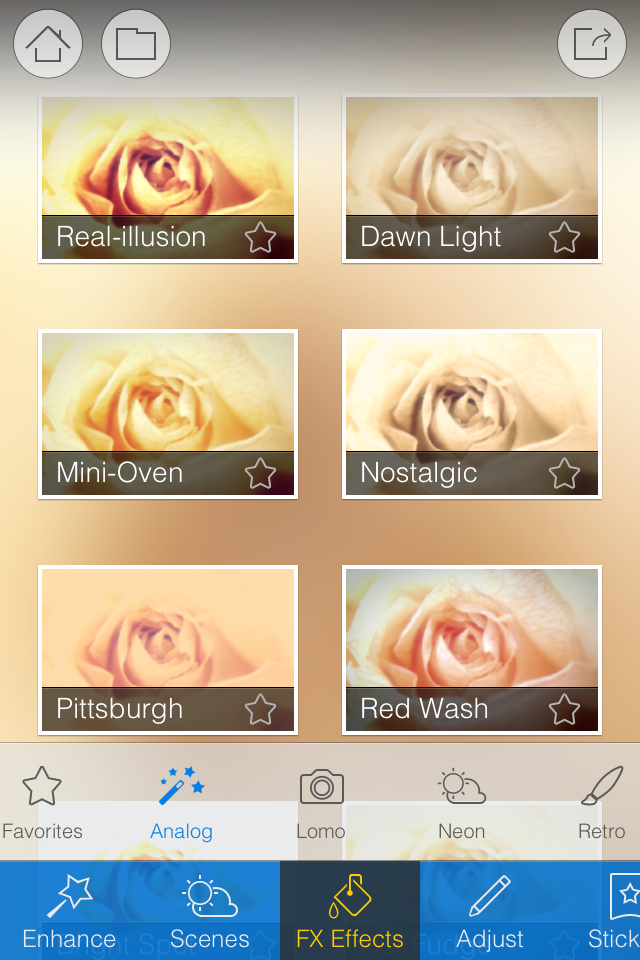
It's been a week of updates to our image-sharing programmes on social media. First Facebook introduced an auto-enhance feature, which will apply the filters that its algorithms calculate are most appropriate for your photos. Then Instagram unveiled five new filters, its first in two years. Now it's the turn of EyeEm, which brings a gaggle of new filters, fine-grained control over their application, and a new feature called Open Edit. The theory behind Open Edit is that it lays bare the post-processing path that a photographer followed to create an image, from the original to the final version. Each crop, tweak, and nudge is set out in a timeline that's made visible to the rest of the EyeEm community. If you see something that you like, you can apply the same edits to your own photos with one tap.

New filters for EyeEm

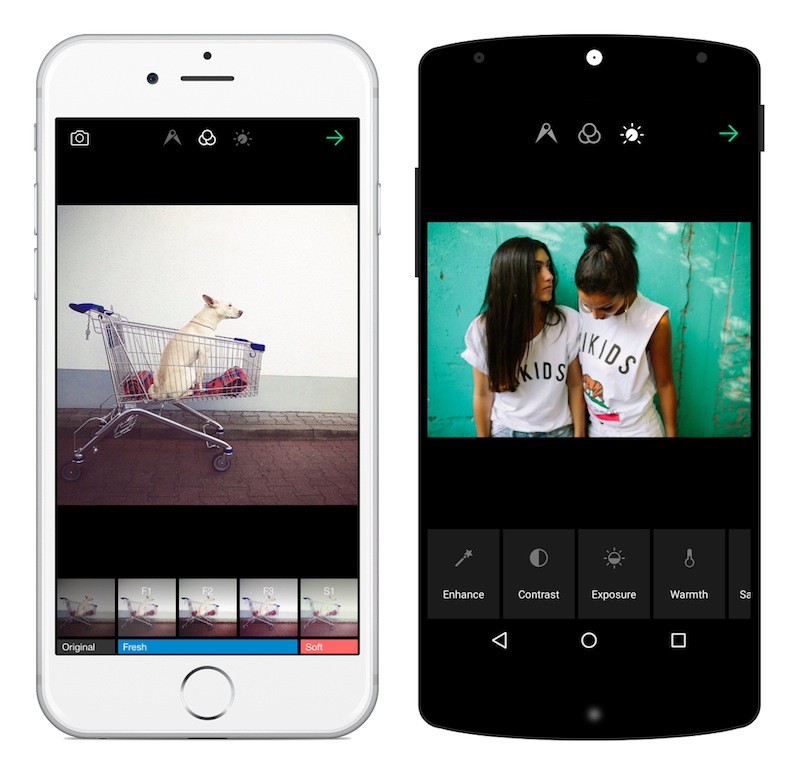
Right now, only certain photographers have the ability to open up their edits to the community, but it's something that will be rolled out to all members in time. The EyeEm team hopes that this open deconstruction of people's photos will lead to a more collaboratively minded community and one that can learn from each other and share their skills.

Fine-grained adjustments are a winner

Can I see what EyeEm is trying to accomplish with Open Edit? Yes, definitely. Sometimes I do look at a photo and wonder precisely what sort of magic the photographer wove in order to create that particular effect. But at the same time, I'm not completely sold on it. The mystery and the secret behind someone else's photos are part of their appeal. Having the edits revealed to you can feel a little like the illusion of a magic trick being shattered when you know how it works. My curiosity means that I want to know, but the romantic in me appreciates the mystique.

From a teaching and learning perspective; I love EyeEm's enthusiasm to allow its users to share their knowledge. But I think that by going one step further, they could make this a much more valuable learning tool. How much people will actually learn from being able to see and apply other people's edits to their own photos will depend hugely on how much they're prepared to engage with the editing process and observe the kinds of impact each adjustment makes. Experimentation is such a valuable part of learning that just being able to apply someone else's workflow to your photos feels as if there's an important step in the process that's being skipped. It's not just about the what that you do to your photos, it's also about the why.

Like what a photographer's done to their photo? Now you can see exactly what with EyeEm's Open Edit.

Bring a bit more dialogue to the experience—underpin the action with some explanation—and I think it could really work. Still, lots of people seem to be very excited by EyeEm 5.0, so perhaps I'm the one who's missing the trick here.

Let me know what you think.

You can download EyeEm 5.0 here.

So near yet so far for Fotor

When I was conducting my recent app spring clean, one of the apps that wasn't sent packing was Fotor, an editing package that I was asked to review by its makers. I've been trying it out for a few days, but the images I've edited specifically for this review I shot today, in glorious sunshine with the help of an Easy Macro band. As an editing package, Fotor offers a lot, but I think it falls short of replacing one of my current favourites. Fotor gives you the option to import photos from your camera roll or take a photo in-app. If you opt for in-app, you get a choice of three subject placement overlays: grid, golden spiral, golden triangle. Or none at all, if you prefer. Whether you take a photo in-app, import it for editing, or save it after editing, it will be stored in Fotor's photo folder, according to date.

In-camera shooting options

When it comes to editing functions, features, and filters, Fotor is well endowed. You can adjust contrast and brightness and saturation and white balance and shadows and highlights, add text and stickers, apply a tilt-shift effect or a vignette, and compile a collage. There's a gamut of free filters—nine folders, ranging from 'Lomo' to 'Scratch', each with nine options—as well as some paid-for additions and 12 paid-for scenes.

A good range of basic edits

Fotor includes some neat touches. Being able to assign your favourite filters to a specific folder, making them easier and faster to apply, for example. Having each photo's details (time and date, exposure, and geo-location) at a tap is great. And I appreciate having plenty of sharing options, too.

More than enough filters to go around

However, there are some frustrating oversights. The omission of a straighten function being top of my list. And not being able to crop a vertical image using a 4:3 aspect ratio without first rotating it to a horizontal aspect, and indeed various other aspect ratios, is a bit... odd.

A very odd crop function and no obvious straighten feature

I didn't find the slider that is used to control the intensity of the adjustments especially accurate: if I tried to set it to 12 points, it would easily wind up at seven or 16. Without a reset button, returning the slider to 0 was sometimes tricky. And I have to confess that I'm fond of being able to compare my adjustments with the original image, which I can't do with Fotor.

But when all was said and done, I did like the final edit

Fotor, I'm afraid, won't be making its way to the 'Photography A' folder on my phone. It doesn't offer me enough of what I need and there's too much of what I don't. But that isn't to say it won't be for you. It's free to download and available for Android and iOS, so worth a look.

All the love for Litely?

There's been quite a bit of love for Litely over the past few days, following its release as an iOS app earlier this month. Developed by Cole Rise, one of the engineers behind Instagram filters Amaro, Hudson, Sierra, Sutro, Mayfair, Willow, and Rise, it's a photo editing app that offers a range of subtle filters and simple tools. When Sarah Perez of TechCrunch declared that Litely is the best new photo-filtering application for iOS, I decided that I needed to commandeer my parents' iPad, download it, and give it a whirl. The best new photo-filtering app for iOS is high praise and with my expectations set to stratospheric, I was anticipating something revolutionary. To give Litely its dues, it does have a lovely interface, the filters are subtle, and being able to adjust their intensity is much appreciated. But I think that it requires a little more fine-tuning before it can justify the unmitigated praise that's being heaped upon it.

I love the attention to detail, for example the marker beside each filter indicating the colour influence it has.

My most fervent criticism concerns the crop function. Given my dislike for the Flickr app's crop utility, I must be a stickler for them. I don't mind only having the choice between the original and a square aspect ratio, but I'd quite like to be able to actually crop an image and get closer to my subject. Litely lets you do this on-screen using the pinch function, but it doesn't seem to apply the crop after you've selected the 'Tick' icon. Please don't tempt me and then deny me. It's cruel. And if I can't crop, at least let me straighten.

Are these editing functions enough?

The editing functions comprise exposure, sharpen, vibrancy, and vignette. All of these are useful and easy to apply, but I'd still appreciate a white balance correction (even if I am meant to be adding a filter), a contrast slider, and maybe a tilt-shift option too. Does this make me greedy? Maybe, but I think this is Litely's biggest stumbling block.

Having started out as a collection of pre-sets for Lightroom, Photoshop, Aperture, and Camera Raw, Litely wasn't about actual editing. Those programmes offered all of that functionality with spades. In its transference to an iOS app, it has lost that purity. It's neither a one-stop-editing-shop nor an app devoted to filtering, and neither is there an inherent photo-sharing community, like Instagram or EyeEm.

Using the Heather Faded filter

By offering a few editing tools and nine filters for free, with a further 36 filters available at a price, it is falling between two stools. If it gave me all of the editing tools I want and need, it could possibly tempt me to augment the filters and stick with it. But I'm just not that bothered by a half-baked editing app with a few filters on the side. Equally, would I care to download just a bunch of filters? I'm not likely to, but I know people who are. Without a community to keep me coming back, it doesn't do enough to justify my interest, however delightful the interface or subtle the filters.

In conclusion, I've not fallen in love with Litely the same way that others have, but I do feel that it has potential. Now it must decide what it wants to be.

Litely is available to download for free from the App Store (nine filters plus basic editing fnctions), with three further sets of filters available for $1.99 each.

Flickr 3.0 for iOS and Android is unveiled

At the end of March I noticed that Flickr 3.0 for iOS and Android seemed to be in the works. Today, it has been unleashed on the world. Well, I say 'unleashed on the world' but it's more like a steady trickle out to users. I've not an update for my phone yet. The updated app offers 14 live preview filters, so that you see what a photo will look like under their influence before you take it, and record 30 seconds of HD video using one of them, too. There's also a suite of editing tools that ranges from click-to-select filters, vignettes, and auto-enhance to more sophisticated tools like colour balance, levels, and exposure.

Apply filters as you shoot

Auto-sync, which automatically backed-up photos from iOS phones to Flickr, is now available across the board, letting you make easier use of that 1TB of storage space and keep images safe.

There's also meant to be a new and improved search function that lets you sift through images faster and easier that can define images based on when and where they were taken and what features in them and an enhanced information screen that lets you find out more about where a photo was taken as well as which camera and lens were used to create it.

Easier image organisation

Finally, sharing photos to other networks such as Tumblr, Twitter, and Facebook just got easier.

Colour me intrigued to know what it'll look like.

Update: You'll need to be running iOS 7 for the update to reach your iPhone.

Giving your pictures a toy camera makeover

In the interests of knowing how it was done and not wishing to rely on filters or presets (or on dodgy film development practices) I had a go at converting one of my self-portraits into a toy-camera looky-likey. I doubt that it's a process I'll do too often, but for the record and because I'm sure other people might be intrigued, here's how I went about it. Before you start playing with the tonal curves and adding vignettes to your photos to make them look as if they stepped out of 1976 and were bathed in the wrong chemicals, it’s useful to know what to look for in a toy camera-esque image.

  1. Exposure: the light meters in toy cameras tend to be on the inaccurate side of calibrated, leading to badly exposed images
  2. Light leaks: sealing on toy cameras is virtually non-existent, presenting you with huge streaks of light smeared across your photos
  3. Aberrations: Cheap plastic-y lenses mean distortions and vignetting
  4. Cross-processed look: processing film in the wrong chemicals will give images odd colour casts

This is my recipe for a toy-camera flavoured photo. It's fairly subtle because I'd rather not feel as if my eyes are being assaulted by a sweet shop, but you can of course ramp up the numbers to get the effect that you want. We'll start with a studio shot of me. It was part of a series I took when I was getting accustomed to wearing glasses.

1. Exposure

Go over the top with the exposure 
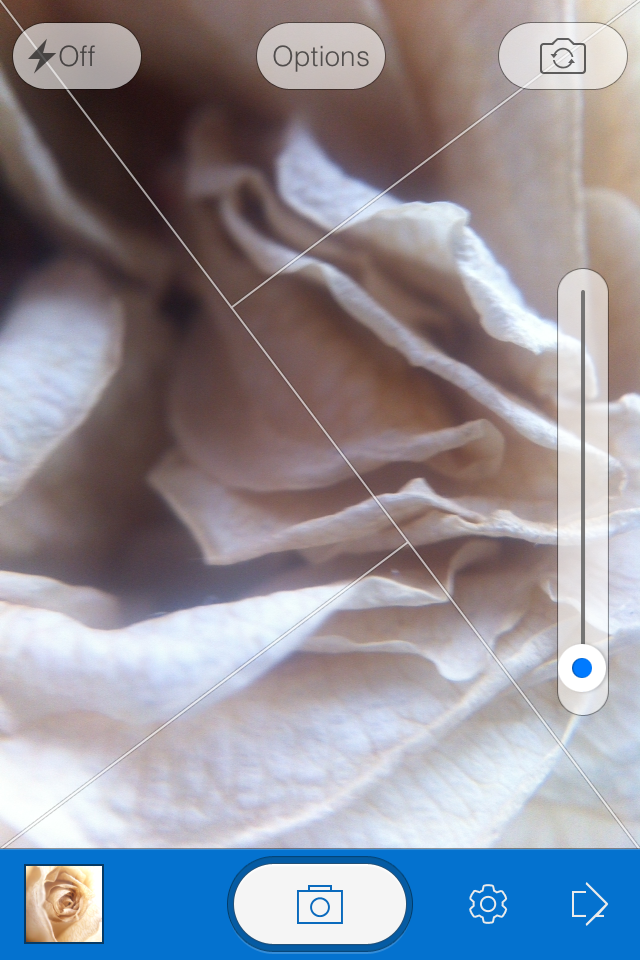
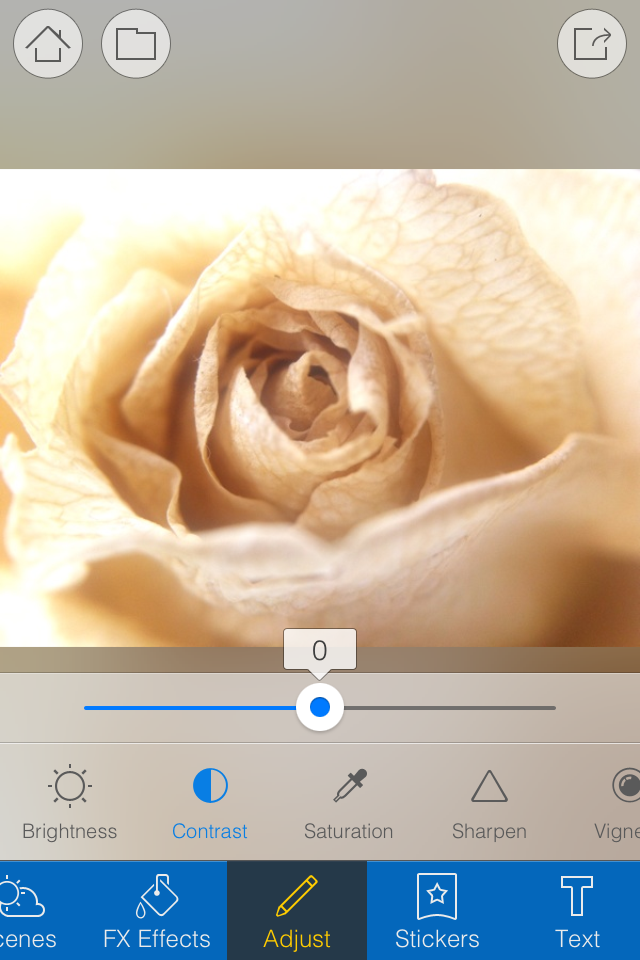
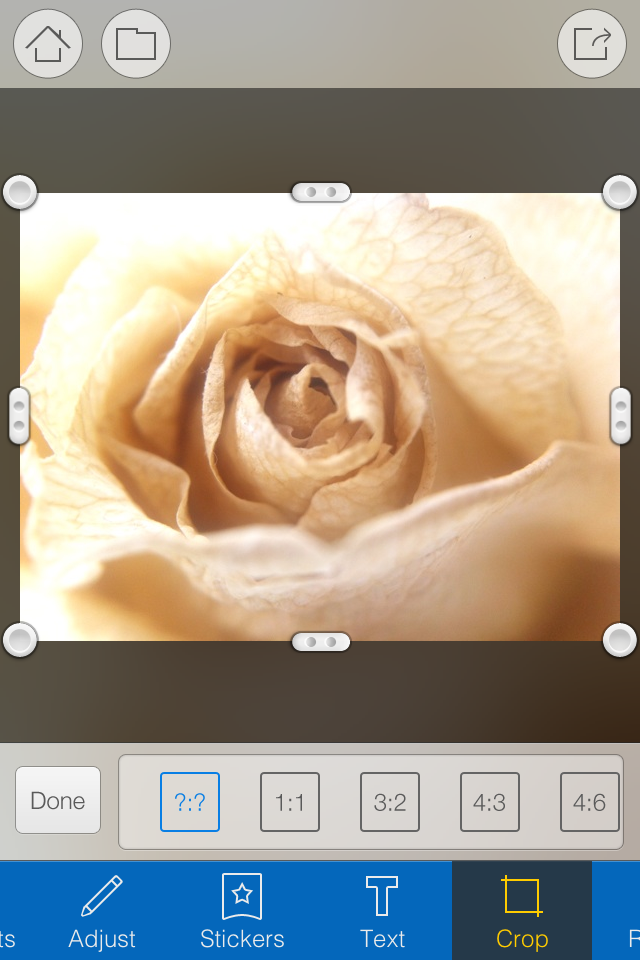
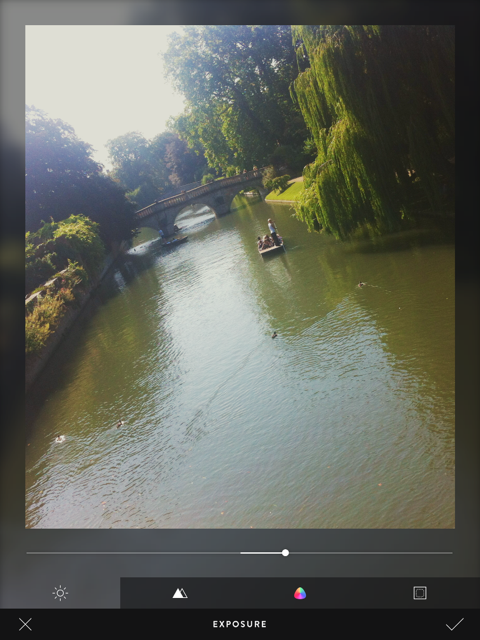
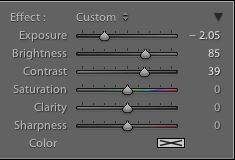
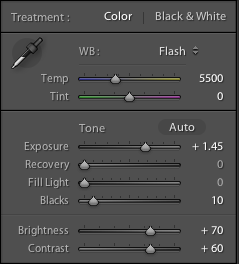
My first move is to increase the exposure, add some depth to the blacks, and then go overboard with the brightness and contrast. It'll look like a cartoon at this stage, but it's a base on which to build. My exact settings, for the record

2. Clarity

I pushed the clarity slider to -45 
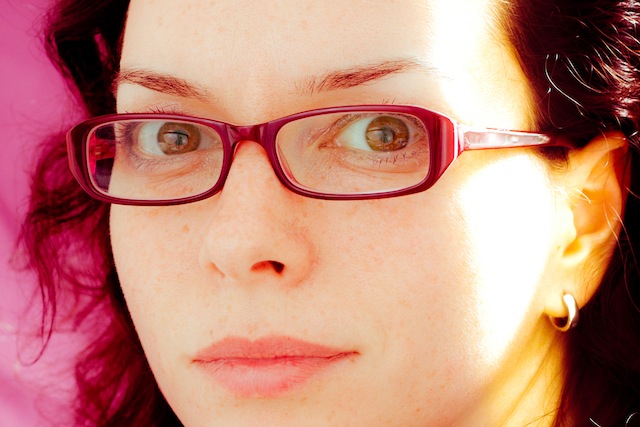
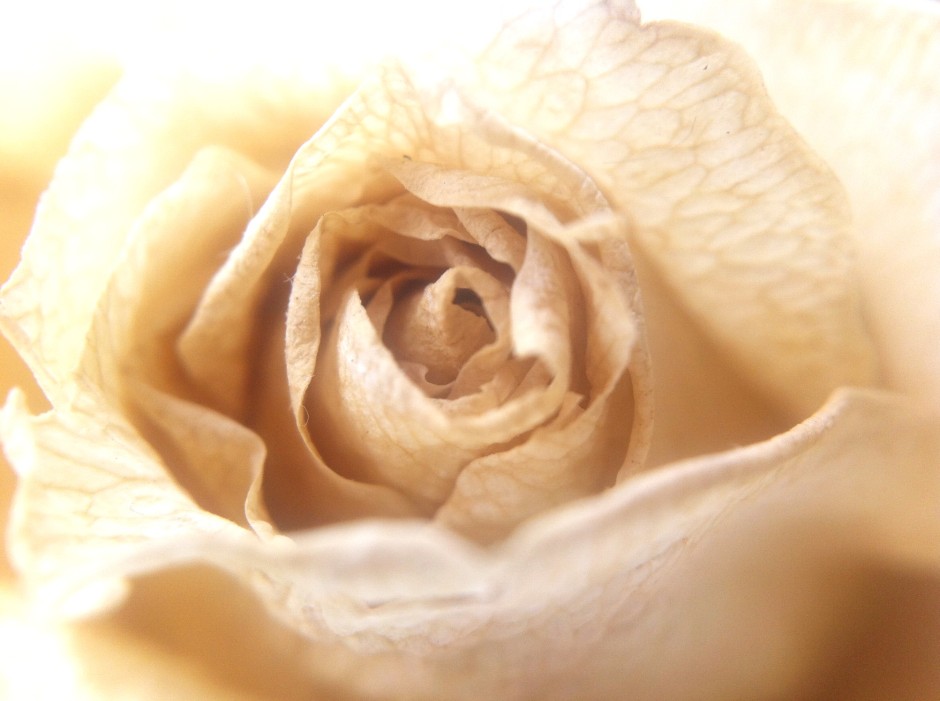
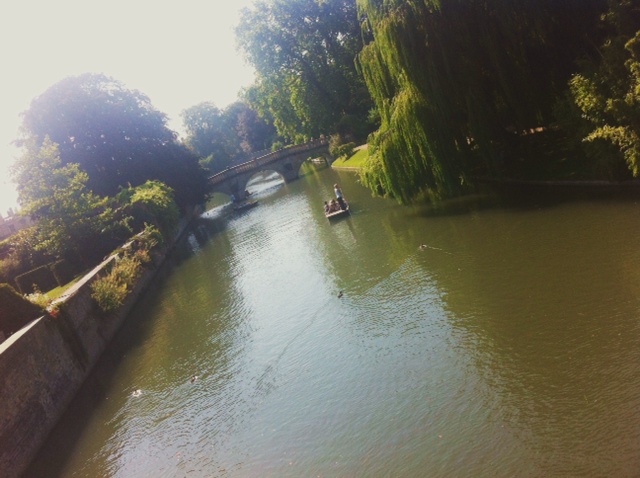
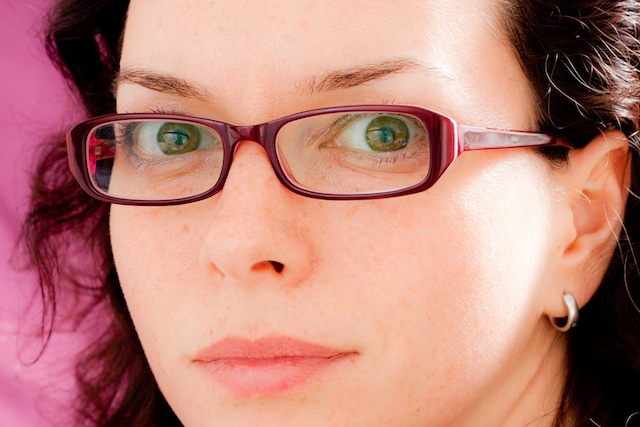
By nudging the clarity slider to the left it helps to recreate the soft mushiness of a cheap plastic lens.

3. Light leak

One light leak. Feel free to choose your own position. 
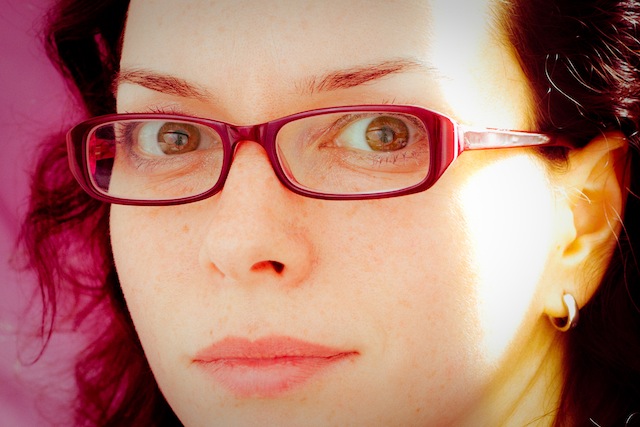
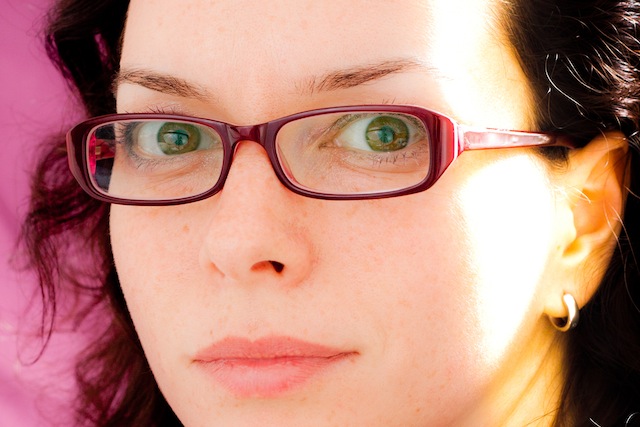
Use a pair of graduated filters to add a light leak. I placed one to the left of my ear and another right with roughly opposite settings. This produced a yellow-y smear. Settings for one graduated filter

4. Split toning

If you want, you can spend hours messing with the split toning sliders to achieve wildly varying looks that could all pass for cross-processing. It'll be a case of finding what you prefer, and placing more emphasis on the reds and purples or the greens and yellows.

My chosen split tone look

I tried this image with a yellow-y green look initially, but swapped it for a more pinky-red version. You can play around a great deal with split toning

5. Vignette

Without knocking myself over the head with a plastic picture-taking-device, I add a touch of vignette, too.

6. Grain

Finally, add a hint of grain to help recreate the film feel of a toy camera. Tah-dah!

Et voila – from studious studio self-portrait to tricksy toy camera creation.

Review: Photoristic HD iPad editing app

When I first downloaded Photoristic HD to have a go at some editing on an iPad, I was expecting an all-round editing package that would be great for my parents to use to make adjustments to their photos on their iPad. They use a point-and-shoot, record everything in JPEG, my mother has a proclivity to take wonky photos, and my father doesn't understand the concept of 'getting closer' no matter how much I try to impress it upon him. They need a simple but comprehensive editing app. Photoristic HD combines general editing functions (white balance, exposure, contrast, highlights, shadows, vibrance, saturation) with advanced colour adjustments and a barrel of filters. It can process images of upto 20 megapixel resolution, and saving and sharing is easy. It sounded promising. So much for my expectations. This was not an app that felt I could present to my parents to help them make their photos look better. It wouldn't meet their needs. But when I got past this disappointment, I realised that Photoristic HD offers something different for iPad editing and it might not be all that bad.

photo

Photoristic is easy to use: you swipe left or right to adjust the values of whichever function you've selected, be it the like of contrast, shadows, or highlights underneath the balance tab, or one of the eight colours sitting beneath the hue, saturation, or luminance tabs. You can convert to black and white with the toggle of a button and you can apply one of a huge selection of filters—black and white options, selective colour choices, and colour filters—with two taps.

I'm not a frequent filter-fyer and I actually found many of Photoristic's too harsh or intense for my tastes. I wouldn't want to let my parents loose with these. All their photos would come out too brash, too sharp, too in-your-face. Photoristic does, however, let you save your own presets, which is moving well beyond the realm of my parents' use, but does present it in a different light.

The Polar Sun preset doesn't do it for me

This gives you the chance to combine its split tone function, colour controls, and the adjustments in the balance tab to create your own effects. Now that I've taken a step back, I wouldn't hesitate to name Photoristic's fine colour control and ability to save presets as its most valuable feature. No, it isn't an all-round editing package; it's something else. I was able to create my own cross-processed effects or add a bit of golden hour magic to a photo taken nowhen near sunset or sunrise. And I was able to save these as presets to apply to any photo I process through the app.


Having fun with split toning

There are buttons that allow you to sequentially undo your previous edits or compare your current version to your original image. When you're content with your handiwork you can save your image to your photo library or Dropbox, email it onwards, send it to print, or share it to Facebook or Twitter.

Should you get a bit stuck, the help button is towards the top left corner.

The most critical omission that prevents Photoristic from being a comprehensive editing package is a crop and rotate feature. With every photo that I put through the app I felt frustrated that I was unable to straighten it or slice off a few extraneous pixels. And my parents, with their skewed horizons and distant subjects, definitely need it. It's all very well being able to bring out the blue of a sky, tone down the red of someone's nail polish, or help negate a green cast, but crop and rotate is one of the basic functions that we rely on in an editing suite.

Standard edits are fine, but oh for the love of a crop function

I was so surprised by the omission that I emailed the developers to check that I hadn't missed it anywhere. They confirmed that there isn't a crop and rotate function yet, but it is expected in a future iteration.

When you realise that Photoristic isn't a basic editing app but instead offers more sophiscated controls to adjust colour and create your own filters for your photos, it takes on a different complexion. If you're looking for an iPad app to let you take control of your photos' colour effects and filters, then do consider downloading Photoristic. It's £2.99 in the UK and $4.99 in the US.

I shan't be showing my parents how to use it.

(All photos courtesy of my parents.)