triangle

Trying the golden triangle

One of the first compositional rules that we learn is the rule of thirds. It's relatively simple but definitely effective: divide the frame into three, horizontally and vertically, and use the divisions to place your subject. But rules are made to be broken—once you understand them properly, that is—or at least adapted and challenged. If you're looking to leave behind the rule of thirds but still want place your faith in geometrically validated subject-placement, try the golden triangle. Look closely...

Determining the golden triangle

Draw an imaginary diagonal line across your frame. Now draw imaginary lines from the other two corners, which each meet the long line at right angles. It should look something like this:

Where the lines meet: your points-of-interest

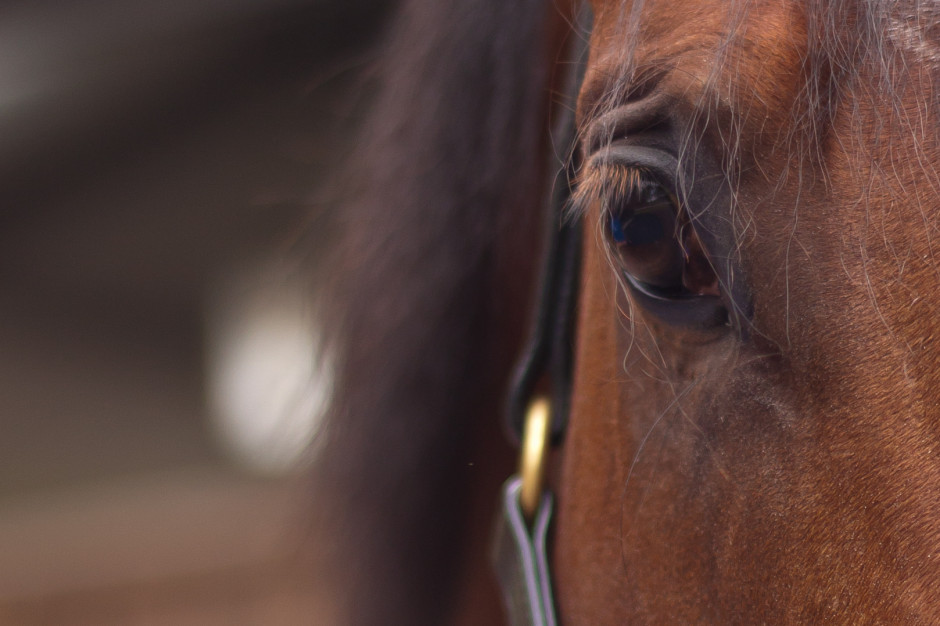
Your points-of-interest are where the lines meet. Use them to place your focal point, for example the eyes in portraits, and use the lines to divide your frame and draw the eye to the focal point to help create dynamic images.

Why use the golden triangle?

On a mundane and practical level, it's easier for some people to visualise the triangle than it is the rule of thirds. Moving towards a more creative purpose, by using triangles to compose your frame you're introducing a strong compositional shape to it with a great sense of balance pitted against a precarious point. And triangles have a nifty way of retaining the attention of the eye within the frame: the eye moves from one point to another in a continuous loop.

[gallery ids="6953,6954,6955"]

Quite specifically with the golden triangle, you give yourself a means of dividing the frame in a way that is frequently more pleasing to the eye than a horizontal or vertical split. As well as using the lines to draw the eye to focal points, the use of triangles in the frame brings balance to the image. Think of one half as blue and the other as yellow. Or shadow versus light.

White against stripe

By counter-poising the two points-of-interest against each other, you can enhance the sense of balance in the frame. You get dynamism and balance in one go: brilliant.

Cards balanced against foot

Putting it into practice

It's all very well knowing the theory - what about the practice? Try portraits with your subject leaning into the frame and the eyes on a point-of-interest. Use the rule to place bridges in your frame, and have the eye travel along them to a focal point. Just give it a try - you never know!

Triangles galore!

Struggling to understand the exposure triangle? Try thinking of it as a glass of water

ExposureTriangle.gif

There are three things that affect an exposure: speed, aperture, and ISO. They work in a triangle to achieve an exposure.

When you give with one you take with another to ensure that you don't over- or under-expose your shot. In your early days of setting your exposure manually, it can be a bit tricky to remember how they fit together. But if you think of exposure as a glass being filled by water from a tap, it might help. Here's how it works.

Aperture

Think of aperture as how much you open the tap. The wider you open it, the more water flows into the glass. Open the aperture wider and you let more light into the camera.

Shutter speed

If aperture is how far you open the tap, shutter speed is how long you open the tap for. If you open it for a long time, a lot of water comes out. If you open it only briefly, just a little water comes out.

ISO

The final control in the exposure triangle is ISO. From the perspective of our water-glass analogy, ISO could be described as the size of the glass. At a low ISO, the glass is a large one. At a higher ISO, the glass is smaller. In effect, if you are shooting with a high ISO, you need less water to fill the glass.

Equivalent exposures

Much like filling a glass with water, getting an exposure can be achieved quickly or slowly, but you'll get there in the end. You can use a trickle of water—so that would be a small aperture—for a very long time, and the glass will eventually be filled. Alternatively, you can open the tap all the way—the equivalent of a large aperture—very briefly, and the glass will be filled.

The same is true in photography. Two different exposure settings can result in the same amount of light being recorded inside the camera.

Sunset beer

Okay, it's a glass of beer. But that's much more fun than water.

How, then, do you put this into practice? It depends on what you want to achieve with your photo. If you're looking to secure a particular depth-of-field you'll set your aperture accordingly and then adjust the shutter speed and ISO to complete the exposure. For a long exposure shot you'll need to think about whether it needs a small or a large aperture and a low or a high sensitivity.

Drink up!


More unusual ways of looking at things and remembering rules are in my lovely book, The Rules of Photography and When to Break Them. Available in print from Amazon UK and US.