


Try these five tips to ensure you take sharp, blur-free images every time!

When you hear the term 'high-res' thrown about with such abandon when it comes to images for web use, have you ever stopped to think just how big or how high quality and image meant for the web needs to be?
There's an assumption that high-contrast images are more dynamic, more compelling, more inviting. Have a go at some low-contrast photography. You might surprise yourself with the results.
Balance doesn't mean symmetry; it means an internal consistency and tension within your photos. And it's a vital element of composition.
Great photos might be down to a little bit of luck, but most of that 'luck' you make yourself. Don't believe us? Read on...
As a photographer one of the first things that you need to understand is exposure, or how to control light to create an image. If you're new to photography or have just picked up a camera with manual control for the first time, we suggest that you start here. Learning how to manipulate light to achieve the shots that you want is a life-long project, but these are the foundations.
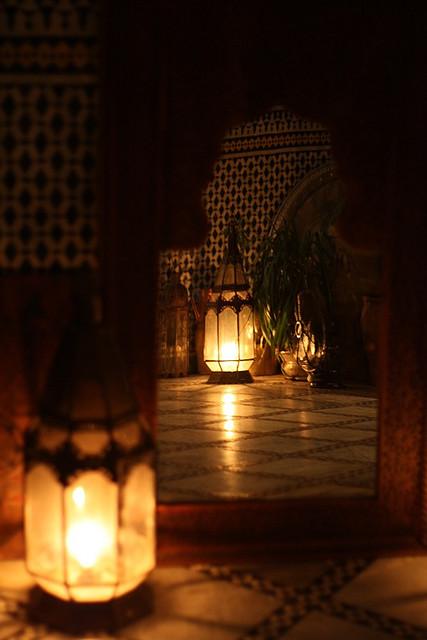
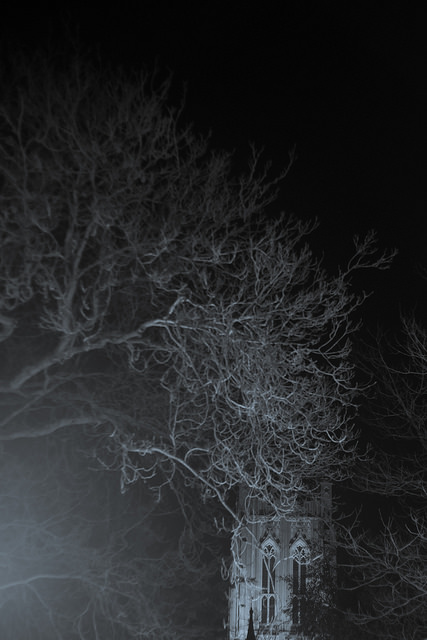
Here in the northern hemisphere, the shortest day is fast approaching and whether we like it or not, much of our photography will be of the low-light variety. We've put together some suggestions for coping as best you can when things are a little dim and the light with wish you wish to draw is a scarce commodity.
This might sound terribly obvious, but it's a fundamental of photography: look for the light in your scene and use it to your advantage. Use the light from streetlamps, from candles, from the moon to illuminate your subject—even be the subject—and create interesting shadows in your photos.

While a too-high ISO can be responsible for noisy, grainy photos, advancements in sensor technology mean that it's possible to push ISO much higher than was previously acceptable to get the shot you want. Remember: a little grain can be better than motion blur; if you shoot in Raw, images can be cleaned up; a black and white conversion can produce noise-negating miracles.
The wider the aperture you select, the more light you'll let onto the sensor and the faster shutter speed and lower ISO you'll be able to use. This will of course come with the caveat of a shallower depth-of-field, but that can be applied creatively.
A slower shutter speed will permit more light to reach the sensor, but it also has the potential to introduce motion blur if it isn't sufficiently fast to freeze the action in your scene, as well as camera shake if you're hand-holding your camera. Sometimes, however, motion blur contributes to the story that you wish to tell, so don't dismiss it entirely.
The general rule for hand-holding a camera is that you shouldn't do it if your shutter speed dips below the inverse of the focal length of the lens you're using. Thus, for a 50mm lens, you shouldn't attempt to hand-hold your camera using a shutter speed slower than about 1/60 second. If you find that you need to go slower, you might wish to bring out your tripod. Think about a remote shutter release, too.
If you adhere to matrix or multi-segment metering, your camera will attempt to adequately expose the entire scene. That might not be what you want if you're looking to play with light and shadow. For dramatically lit shots, switch to spot metering and meter from the illuminated area that you wish to be in focus. This will maintain dark shadows while correctly exposing the point-of-focus.
Spot-metering might not be appropriate for your scene, but at the same time, matrix or multi-segmented could render it over-exposed. If that's the case, try dialling in a stop or two of negative exposure compensation.
Auto-focus can struggle to hit its mark in low-light situations, in which case manual focus might render better results if you're both confident enough using it and the scene isn't changing so fast that you miss the photo opportunity. Should auto-focus be the better option, ensure that you're using one-shot auto-focus. Try, too, shining a light where you wish your camera to focus. The illumination will assist it in locking-on to the point-of-focus.
Whether it's reflection off of pale clothing, off of glass, polished metal, or liquid, or from a reflector, keep an eye out for reflected light and put it to use in your shots. That might be making reflections on water the focus of your photo, but it can also be bouncing back reflected light to illuminate shadows.
If you're not already shooting in Raw, switch now. Not only will help you to tidy up any noise in your shots, or even to adjust the exposure a little if necessary, but it will allow you to adjust the white balance of your photos more effectively. Accurately white balancing low-light shots can be tricky; the more flexibility that you have, the better.
How warm or cool is your light source? Or are you working with mixed light sources? If you're shooting by candle light, you can set the light temperature on your camera to more accurately render colours in your photos. For mixed-light sources, remember to white balance according to the light falling on your subject. If you're shooting in Raw, you might find that adjusting the white balance in post-processing will give you the most accurate result.

Finally, have fun with the darkness and put it to creative use. Let reflections dance or shadows draw you in to moody scenes. Low-light might force you to think for a moment, but remember that you often have longer than you think you do, and experimenting is half the fun.
British Summer Time ends this weekend&Mdash;at 02:00 on Sunday, to be exact—which means that time is running out for you to submit your long exposure photos to our competition. We won't be accepting any more entries after the clocks move back, so if you want to be in with a chance of winning a £40 gift card for the Triggertrap shop, you'd better get your skates on.
All of the competition's rules and regulations, not that there are many of them, can be found on the Flickr pool page, the same place to which you need to submit your entries. There've been some cracking shots submitted so far, but we'd really love to see more in the pool!
Good luck!
Halley's Comet made its last swoop past earth in February 1986. I remember it well because I was in primary school at the time, learning about the Norman Conquest. In addition to the boos, hisses, and cheers elicited by the key players and the confusion surrounding Harold Godwinson's death, Halley's Comet plays a starring role in the Bayeux Tapestry, which documents the invasion of a loosely termed 'England' by William of Normandy and his cronies. That we had the opportunity to experience the same celestial phenomenon as the people we were learning about, all of whom lived 900 years before us, was rather special. The timing could not have been better for a memorable series of lessons.

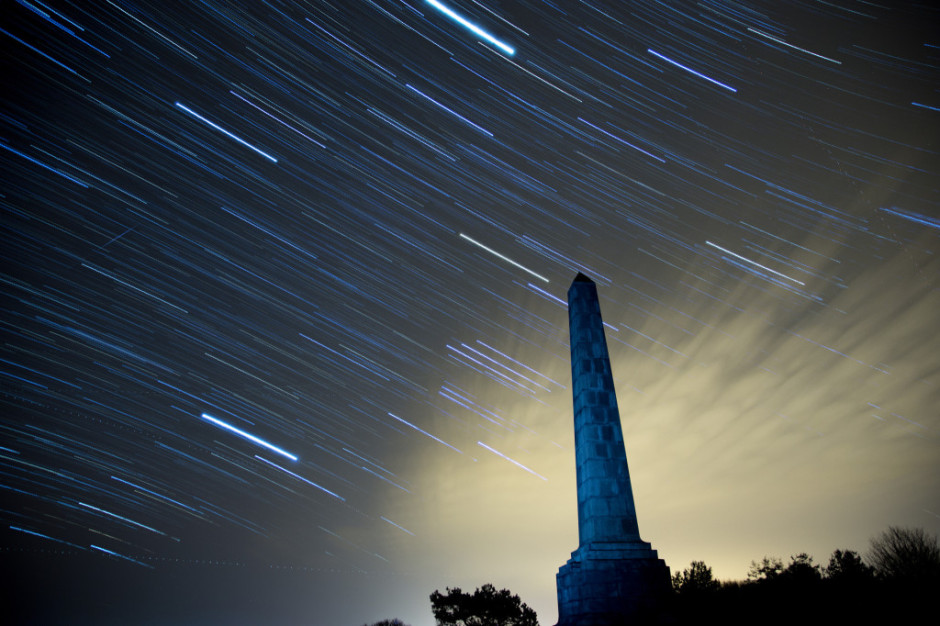
Seeing as Halley's Comet is on a 76 year schedule, it isn't expected again in all its glory until July 2061; however, we are being treated to an impromptu meteor shower in the next few days. The comet is likely to deposit a trail of cosmic dust into our atmosphere on 21 and 22 October 2014, giving us a shooting star display visible to the naked eye.
If that isn't an excuse for trying a little night photography, I don't know what is. So apart from the hoping for clear skies, what else can you do to maximise your chances of capturing the tail lights of Halley's Comet?
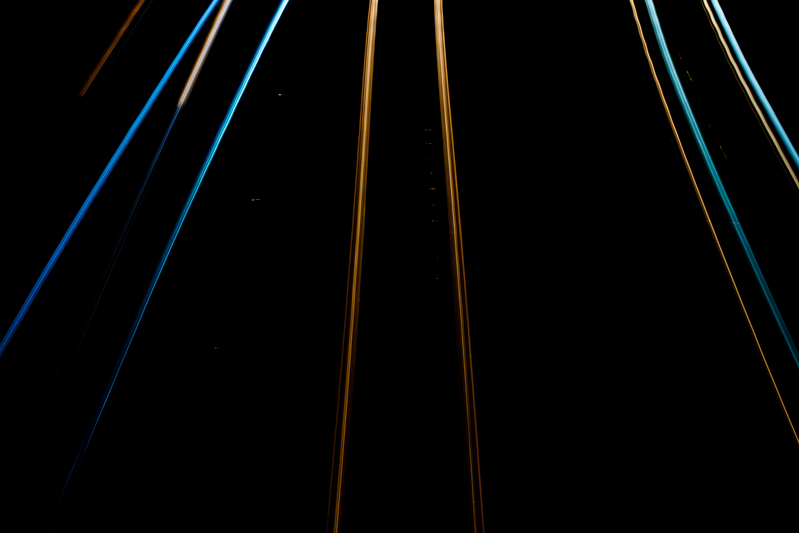
Whatever means you use to take your photos, capturing a meteor shower is fundamentally the same process: shooting a series of long exposures. There are a few options for how you go about it, but once you know that bit, it's fairly simple.
The darker the sky, the better the chance you will have of being able to see the streaks of light as the comet's dust burns through the atmosphere. Ideally, then, you need to be somewhere that doesn't suffer from too much light pollution and has an uninhibited view of the sky. Open and accessible heath- or park-land that's relatively far from city lights is ideal; just be certain you're not venturing somewhere you shouldn't, either because the land is privately owned or you're disturbing a sleeping bull! I'd advise not going alone, either. Shooting in secluded or isolated locations is not necessarily a solitary activity.
Shooting the night sky means long exposures, so you're going to need a tripod, and an intervalometer will ensure the best results, although you can get by without one. Naturally we recommend Triggertrap, especially because its star trail mode makes life easy, but your mileage may vary. For your lens, a fast, wide-angle lens is advisable. You're never quite certain where they'll start or where they'll end, so the wide-angle provides you with sufficient flexibilty, and it gives you the option to introduce an interesting foreground to the shot, too. The darkness of the sky means that you need fast glass to let in enough light. And an empty memory card is a good idea: you'll be taking a lot of images.
While shooting stars can turn up anywhere, they are most likely to cluster around a single point called the radiant. Don't aim your camera directly at the radiant, when you've worked out where it is, but about 45° to one side of it. You also want to compose the frame so that it is visually interesting beyond just the shooting stars. Think about including something intriguing in the foreground. Turn off the auto-focus, use as wide an aperture as you dare—you might not want it all the way open for sharpness—and focus to infinity.
The best option to photograph a meteor shower is very similar to capturing a star trail image, when you compile a series of long exposures shot over a significant period of time into a single image, but with a few key differences. You can read our star trail tutorial here, and if you'd like to shoot a star trail image that hopefully captures some shooting stars, go right ahead. Otherwise, you can tweak the process and use it as the basis to capture a series of photos from which you'll select the ones that show shooting stars streaking across them.
What are these tweaks you'll need to make, then? First and most obviously, you'll not compile all of your frames into a single image that charts the movement of the celestial bodies across the heavens. Instead, you'll pluck out the indvidual images displaying shooting stars, or maybe composite several images showing shooting stars.
Second, you might need to use a slightly shorter shutter speed than you would with a star trails sequence, to ensure that you don't capture the turn of the earth. With a star trails shot, the movement of the earth is exactly what you want, but with single meteor images, not so much. Between 10 and 25 seconds is recommended, but a few test shots should help you to decide what you need to use. This slightly shorter shutter speed will require you to adjust the ISO to get a good exposure, too.
Finally, you can chance not taking your series of images with very short intervals between them, as you would with a star trails sequence, but leave the gaps a little longer. That means you might miss a few opportunities, but the law of averages suggests that if you shoot over a period of a few hours, the odd photo will have a shooting star zooming across it.
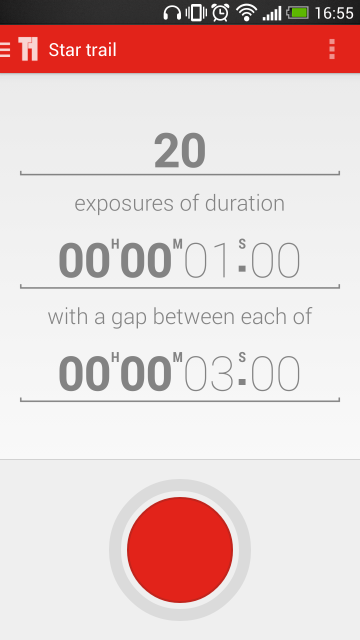
When you have set the focus and established your shutter speed and ISO, you will need to set your intervalometer as you would for a recording a time-lapse sequence, using the exposure time that worked best in your test shots. If you're using Triggertrap's star trail mode, set the exposure time that you established in testing with your chosen interval between frames, and select the number of frames you want to take. With a slightly longer interval between frames, say five or ten seconds, you could shoot for hours!
If you don't have an intervalometer, there's no reason why you can't try your hand at meteor shower photography. Instead of relying on a remote triggering device to release your camera's shutter, you'll be doing it yourself, which might get tiresome. Just as you would with a star trail-based sequence, aim your camera in the right spot and focus to infinity. With your camera in manual mode, use the widest aperture you can, select a shutter speed between 10 and 25 seconds, adjust the ISO accordingly, and press that trigger. Over, and over, and over, again!
Remember to keep warm, and here's hoping for clear skies.
You've just under a week left to submit a maximum of five of your favourite long exposure photos to our competition, and be in with the chance of winning one of five £40 gift cards for the Triggertrap shop. We've already had some terrific entries over in our Flickr pool, but we'd love it if you made the judging even more difficult for us!

To enter, upload your image to Flickr and share it in our competition pool. There are some rules and regulations, you can find them on Flickr pool page or here on Photocritic.
We can't wait to see your photos!
Good things come to those who wait, or at least good things come to those with the requisite degree of patience required to capture a scintillating long exposure shot. Not only do you land yourself with a fabulous photo, but for this competition, rewards also come in the form of five gift cards valued at £40 to spend in the Triggertrap shop! We're on the look-out for the five best long exposure shots produced by you lovely lot. That's not the royal or editorial 'we', by the way, but Haje, Tom, who's Triggertrap's Head of Photography, and me. We don't mind what kind of long exposure shot you try: from urban scenes to light painting to smoothed waterfalls. What we want to see is a longer-than-expected shutter speed being used to creative effect to tell a story. We want to see images that leave us giddy with admiration.

Flickr is providing the image-hosting power for the competition; all you need to do is share your photos—up to five per entrant—in the Patience is a virtue Flickr pool before British Summer Time ends. So that's 01:59 (BST) on 26 October 2014. Consider it preparation for longer nights if you're in the northern hemisphere. We'll do the rest, and hope to have the results by Guy Fawkes Night. (Or 5 November 2014.)
(Un)Usual rules apply: you need to own the copyright to the images you submit; you shouldn't have done anything icky to achieve them (like sell your granny); you keep the copyright but we (that being Photocritic and Triggertrap) will want to be able to display it in conjunction with the competition; the prizes are non-transferable and can't be redeemed for cash; you can't be associated with Photocritic or Triggertrap to enter; the judges' decision is final; entry is at your own risk (quite what might happen to you because you enter I'm not sure, it's not like we're cannibals threatening to eat you, but we can't be held responsible all the same); photos have to be submitted to the Flickr pool before the closing date of 01:59 (BST) on 26 October 2014; and it's our competition so if we need to change the way it operates or the rules or heaven forfend chuck you out, we can.
That's about that. But if you need any advice on long exposures, you might want to check out our articles on shutter speed, bulb mode, zoom bursting, and light painting. Good luck: we can't wait to see what you produce!
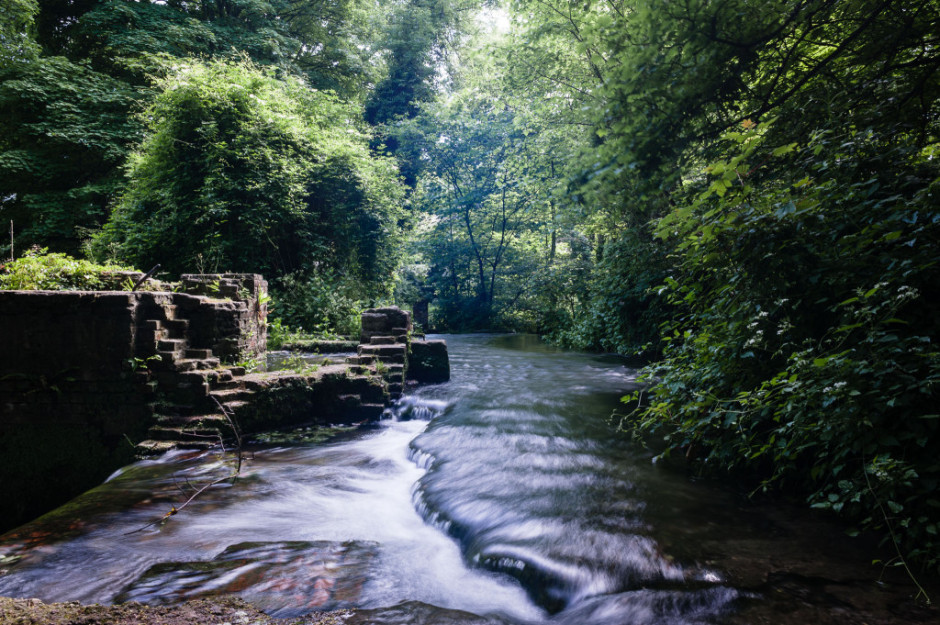
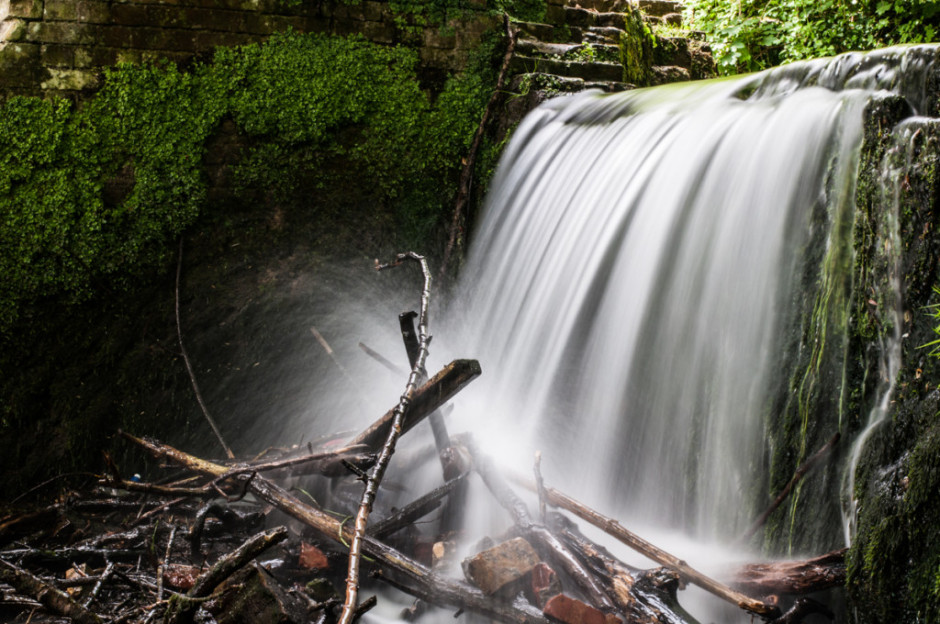
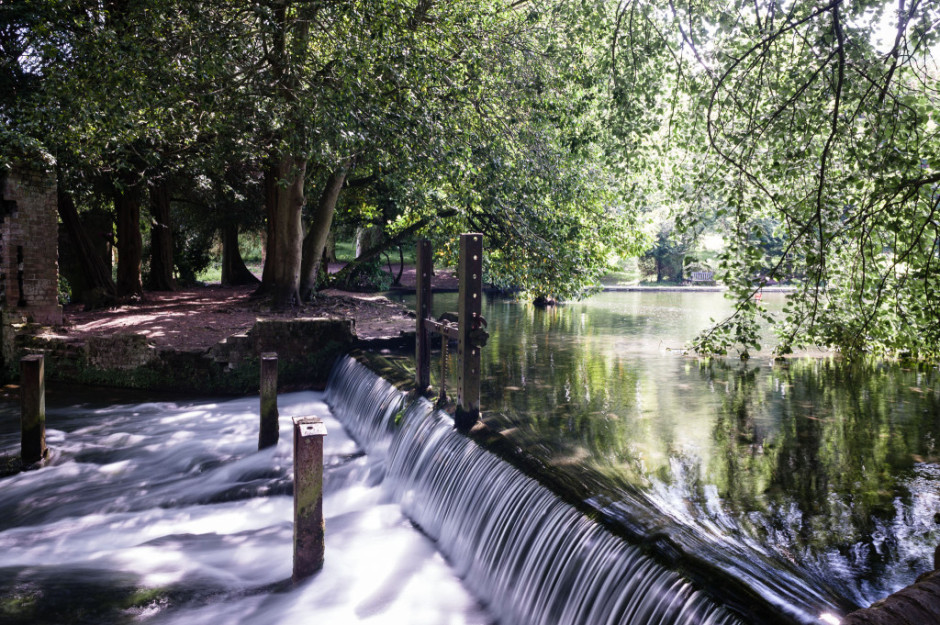
Photos that feature milky-smooth flowing water seem to have a Marmite effect on people: they're either loved or hated. I'm often rather ambivalent towards them, but it doesn't mean that it isn't a useful technique to have up your sleeve if you're faced with a weir or waterfall and you want to capture an image with smooth-looking water that has a sense of flow to it.

There's no great secret to shooting a photo that has water flowing through it that looks smooth: it's done using a long exposure. The slow shutter speed captures the the water as it moves, making it blurred. The blur, in this instance, gives the water a smooth appearance.
Shooting long exposures in daylight hours comes with an inherent problem, however. Over-exposure. Our cameras' sensors are capable of detecting far more light than we think they are, and even using the lowest possible ISO and smallest available aperture, a long exposure can result in an over-exposed photo when taking during the day. To get around this irritation, you might want to try a neutral density (ND) filter over your lens.
ND filters are grey filters that cut down the amount of light that enters your lens without affecting the colour of your images. They come in different grades, or densities, blocking out between one stop and 12 stops of light. Screw one over your lens and you'll give yourself a great deal more flexibility when it comes to shooting daytime long exposures.
Then of course you'll need a tripod. You might want to capture the motion blur of the water, but you'll want to avoid camera-shake and the rest of the scene getting the wobbles. Even though you'll be using a very small aperture with an enormous depth-of-field, still think carefully about your framing of the shot and its point-of-focus. Make sure it's telling a story.
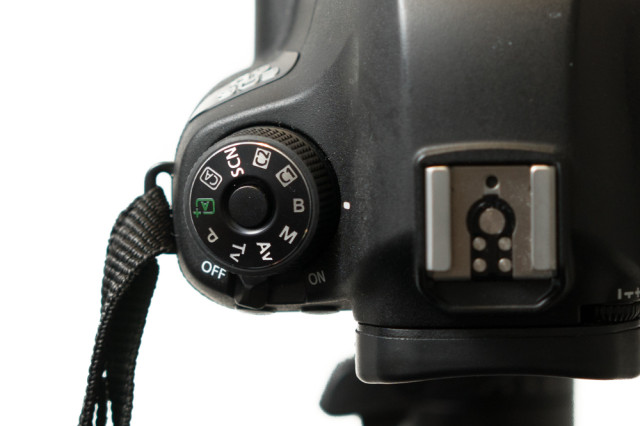
Obviously you'll need to have your camera in manual mode to ensure that you can adjust the shutter speed, ISO, and aperture to get the photo that you want. Almost certainly you will need to use the lowest ISO and smallest aperture avalable. When it comes to shutter speed, you might find that you need to venture into bulb mode to get the shutter speed you need. And we recommend that you use a remote shutter release to prevent jolting your camera on its tripod and shifting its focus, too.
Then it's a case of hitting the cable release and leaving the camera to do its thing.
All images are courtesy of Triggertrap. You can learn more about using remote releases on the awesome Triggertrap How-to site!
When setting your shutter speed, have you ever wound the adjustment wheel so far into long exposure that you've gone past seconds and found 'B' or 'Bulb' on your screen? Or maybe you've noticed that you have a 'B' option on your mode wheel, somewhere between Manual and Custom settings? This is bulb mode, and it allows you to control the duration of the exposure for precisely as long as you would like. It's perfect for exposures in excess of the 30 seconds that most cameras have as their longest shutter speed, or for when you need to be in control, for example if you're practising high-speed photography. First, a quick word on why it's known as 'bulb' mode. Haje has a much more thorough explanation here, but it doesn't have anything to do with light bulbs. It's from back in the day when you could control your shutter speed using an air bulb connected to your camera.
When your camera is in bulb mode, you open the shutter by depressing the shutter release button; as soon as you raise your finger off of the button, the shutter will close. Seeing as it isn't terribly convenient to stand with your finger on your shutter release button for minutes or even hours on end—and it's not fabulous for camera-shake, either—most people use bulb mode in conjunction with a remote shutter release. And a tripod, but that's probably quite obvious.
Plenty of remote shutter releases come with a locking mechanism, so that you don't need to hold your finger down there, either. However, if you go for something such as our much-beloved Triggertrap, you can select from a variety of different modes to control your super-long exposure, including a timed release that lets you set the duration of your exposure down to fractions of a second, a star-trails setting, and even a bulb-ramping option to fine-tune exposure during very long time-lapse recordings.
Even if you're shooting at night, your camera's sensor will be able to detect far more light than you think it can, especially with a very long exposure. Consequently, using a small aperture is recommended. If you're photographing during the day, you might benefit from a neutral density filter to prevent unavoidably over-exposing your images, too.
It is worth bearing in mind that using bulb mode can drain your battery enormously. Don't set off to capture star trails with a less-than-fully-charged battery. Take a spare if you have one, too. It's a complete waste to maroon yourself in the middle of nowhere with limited light pollution only for your camera to keel over halfway into the exposure.
Now that you know what bulb is, what can you do with it? Perhaps you'd like to try some long exposures of landscapes? Or maybe capture some smooth, milky-looking water tumbling from a fall. You might want to try your hand at a star trail, or have a go at light painting. You could even grab a flash adapter and have a crack at some high-speed photography and burst some water balloons. So many options presented to you with so much time from bulb mode!
This week's Photography Fundamentals column answers a question that came to me as an anguished plea in my Twitter feed from a relative newcomer to photography. In short: How can a lens have a speed? Whilst he knew that speed equated to aperture and that a 'fast' lens was one with a large aperture, the terminology felt far from intuitive. How could an opening behind a lens be described in terms of 'fast' or 'slow'?
I'm guessing that if he were perplexed by the use of the the word 'speed' in conjunction with 'lens', there are a few other people out there who find the concept that lenses can be 'fast' puzzling, too. Or illogical. Or something that's accepted terminology. Or something that made sense many years ago but has since become obsolete. This might help.
It's not actually as illogical as it sounds to refer to lens speed. It's more a case of joining the dots.
We know that large apertures are referred to as 'fast'. A lens with a large maximum aperture, let's say ƒ/1.8 for the sake of an example, is described as a 'fast' lens. We know that the larger the aperture, the more light is able to reach the sensor (or film, if you're old school). We know that by the virtue of the exposure triangle, the more light that is able to hit the sensor, the shorter the time the sensor needs to be exposed to capture the image and the faster the shutter speed we can use. The shorter exposure time is a direct result of the larger aperture. The larger aperture allowed for a faster image capture, hence a large aperture is a fast aperture.
If you were wondering, yes, it's for this reason that higher ISOs are referred to as fast ISOs: increased sensitivity allows for faster capture.
A lens can have a 'speed' then, because it refers to how fast it can allow you to capture your images, which I hope isn't nearly as illogical as it first seemed.
Rule of thirds << Photography Fundamentals >> Time-lapse
Photography Fundamentals has reached part 'N', for 'noise'. Digital noise is instantly recognisable in a photo, and we know that keeping your ISO low is the best way to avoid it, but why exactly does it happen? Why does your image quality go down the pan as soon as you touch that ISO dial? What's with all the digital noise?

In 2006, this was the reality of digital noise in photos ...
Whether you use a CCD or a CMOS chip in your camera, the basic functioning of an imaging chip is pretty much the same: Imagine millions of tiny little light meters squashed into a tiny little chip the size of a postage stamp. How many million? Well that depends on the resolution of your camera, of course, but if you’ve bought yourself a Canon EOS 700D, you’ve got a 18.5 or so million pixels (of which 18 million are used). All of these pixels are somehow fitted on roughly 22mm by 16mm sized space – yes, that’s about the same area as the button on your average door-bell.
When you take a photograph, there are a set of shutter curtains which move aside – exposing the imaging chip for as little as one eight thousandth of a second – giving the sensor time to measure the light that falls on it. Then, the shutters close again, and the sensor sends the measurements to the camera’s cpu, which does some calculations, and then stores the whole thing as a digital file.
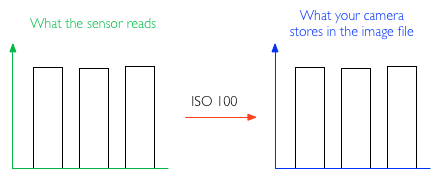
Now you know pretty much how an imaging chip works – but where does ISO come into it? Well, all imaging chips operate at the lowest ISO your camera supports – usually ISO 100. In this mode, your camera takes its light measurements from its millions of tiny little light sensors, passes it directly to the brain of the camera, which then stores it.
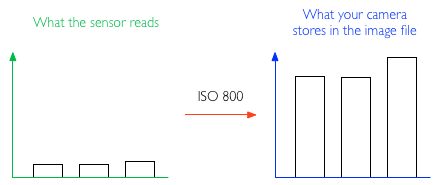
When you crank up the ISO value to, say ISO 400, another step is added to the mix: Your camera still takes the same measurement, but in the CPU of the camera, the measured values are multiplied by 4, to get ISO 400. Or by 8 to get ISO 800. Or by 32 to get ISO 3200. Pretty straight-forward stuff, right?
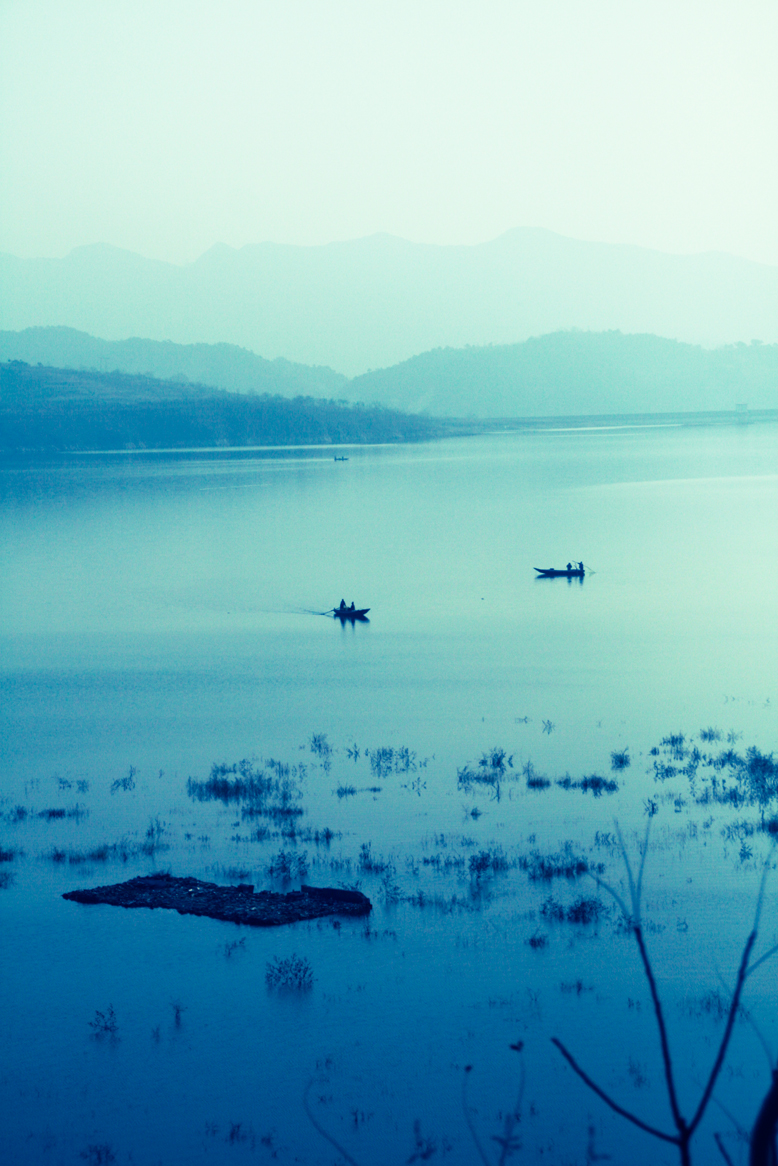
Silhouette in Concert by yours truly – Also see the full-resolution image for an excellent example of digital noise in photography
Well, think about it: while chips have gotten much, much better in recent years, it’s still a case of 18 million tiny little sensors doing their thing in a space the size of your thumb nail.
The problem is that – as with all precision measuring instruments – they can only be so precise: all of them introduce a degree of measuring inaccuracy. The problem with imaging chips is that they are internally inconsistent, and they are unpredictable.
The inconsistency is a problem which can largely be resolved: The camera can take a photograph, and realises that if one particular pixel always reads a little bit higher than its immediate brethren, it can calibrate so that one pixel is adjusted down to fit better. This calibration is done before the camera leaves the factory, and it’s trivial for camera manufacturers to built-in calibration checks on an ongoing basis – it’s relatively trivial to detect a dead pixel, for example, and then interpolate what its likely value would have been from its surrounding neighbours; and because there are 18 million of them, and we rarely check each individual pixel of a photograph, you’d never know.
The unpredictability issue is different, however; imaging chips are sensitive to temperature, and the act of taking a photograph actually causes the chips to warm up a tiny little bit (there’s a lot of electronics in a camera, after all, including the battery, the CPU, and all the circuitry to tie it all together – all of which generates various amounts of heat). Some cameras have a ‘noise reduction’ feature where they take another photograph immediately after you take a long-shutter-time photograph – but with the shutters closed. The theory is that it should be recording perfect darkness, but in practice it records a variety of readings from all the sensors. By subtracting these readings from the original image, you reduce (some of) the digital noise in an image.
Imaging chips are precise enough that at ISO 100, the differences in readings introduced by digital noise are practically unnoticeable. The problem comes from the multiplication process.
Imagine you take a photograph of a perfectly grey wall at ISO 100, ƒ/8.0 and 1/30 second exposure time. Three randomly selected pixels now read 100.5, 100 and 102. No problem; it looks great, and the stored values are within 2% of each other – the wall looks like a perfectly even, gorgeous grey wall.
Now, switch the camera settings ISO to 800, ƒ/8.0 and 1/240 second. The final result — in a perfect world — should be precisely the same: We’ve reduced the shutter speed to 1/8 of the original exposure, but the camera will multiply the exposure by 8 because we’ve changed the ISO. The same pixels now read 12.6, 12.5 and 15.5: The margins of error are the same as above. The camera multiplies it all by 8, and stores 101, 100 and 120 to the memory card. Suddenly, there’s a 20% discrepancy between the three values, which becomes very clear in the final image: What you’re seeing here is digital noise.
Now, imagine the same effect at ISO 3200: the pixels read 3.5406, 3.1250 and 5.1875, which the camera multiplies back up to 113, 100 and 166 – a far shot off from the 100, 100, 100 you’d get with a perfect imaging chip.
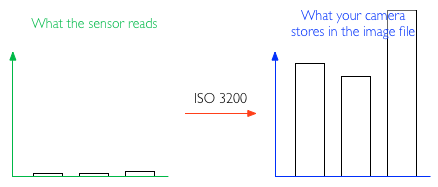
In reality, the metering tolerances in an imaging chip aren’t that pronounced; but the point is that if you multiply any meter reading by 32 (or much more, depending on how your ISO settings on your camera will take you), you’re talking about pretty serious discrepancies, and some pretty serious noise in your final image.
Use as low ISO as you can get away with; Often, it’s better to use a tripod and a remote release cable combined with a longer shutter speed and lower ISO, than trying to shoot free-hand at shorter shutter speeds and higher ISO.
Use shorter shutter speeds; If you can, use shorter shutter speeds – the metering discrepancies will still be there, but less pronounced.
Keep your camera’s insides cool; when you take a lot of photos, you’re introducing more camera noise. Also, if your camera has a ‘Live View’ mode, it sucks battery, and means that the camera’s electronics are constantly working hard – which causes heat, and introduces more noise.
Use noise-reduction software; There’s a few options out there by now, but I've been consistently impressed by the RAW processor built into Lightroom - the before-and-after pics at the top of this article, for example, were processed with Adobe Lightroom. Personally, I quite like a bit of noise in my photos – it makes them look more accessible and ‘real’, I feel – but that might just be me.

A super-brief summary of all of the above, courtesy of Redditor IAmSparticles:
When you increase the ISO setting on a digital camera, you're increasing the gain and magnifying any faults in the data from the sensor. It's like turning up the volume on a radio station with really bad reception. You can hear the faint signal better, but the static gets louder, too.
The problem is worse on smaller sensor chips (pocket cameras and phone cameras) because all the pixel sensors are packed together in a tighter space, causing more heat buildup and interference between them, and therefore more errors in the output.
Macro << Photography Fundamentals >> Prime lens
It started with Olympus at the end of May, and now Fujifilm has followed suit: it has announced that it will be axing about 20 cameras from its compact range, mostly at the bottom end of the scale.
Huzzah!
Scaling back compact camera production, and in particular slashing the cameras that once-upon-a-time would have fulfilled the needs of the smartphone picture-takers, is a business move I've advocated for quite a while. The smartphone crowd have gone and won't be coming back until their iPhones or Galaxys no longer meet their photographic needs, if at all. Should they reach the point when a fixed aperture, bad zoom, and no control over shutter speed is frustrating them, they certainly won't be looking for a cheap, plasticy, garishingly coloured camera with a slow lens and horrible auto-focus.
The margins on these lower-end cameras are minimal and why would a serious camera company want to put their name to a camera like that, anyway? It hardly inspires confidence in their manufacturing abilities, nor in the benefits of having a stand-alone camera.
Instead, these manufacturers should be concentrating on the compact camera market that does still exist and needs fulfilling. The premium compacts are the obvious focus, but there's a bigger market out there than just those. People like my parents want a reasonable camera, but not one that's all-singing and all-dancing. People like my cousin and his wife want a camera that they can safely take sailing or snowboarding, but won't drown, freeze, or smash.
It seems to have taken a while, but it looks as if some manufacturers are beginning to re-focus their efforts. (Pentax doesn't appear to be subscribing to this new model, seeing as it announced the £80 Ephina yesterday, but that's okay.) Discerning who needs what from a camera, and providing these consumers with the products that they need can only be a good thing for photography.
Since we launched the Triggertrap Mobile, we've added lots of awesome extra functionality to the iPhone camera - and given our customers the world's most powerful application for triggering their SLR cameras. One question that keeps coming up again time and time again, however, is if there's a way of using the iPhone's built-in camera with an external strobe.

To answer this question, we need to understand a few things about how cameras work. The iPhone - and especially the iPhone 4S - is an extremely capable camera. But it is not perfect: The biggest problem with it is that it uses a rolling shutter.
What this means is that instead of reading the whole photo at the same time (as you would do with a film-based SLR camera, for example), the camera effectively 'scans' the photo from top to bottom, one row at the time. This process is very fast, but it's not instantaneous.
The other problem with the camera on the iPhone, is that there's no way of influencing its settings; you can focus and take a light metering from a particular point, but that's it: You cannot chose a shutter speed or ISO, and the aperture is fixed at f/2.8. It can't be changed even if Apple gave you a software slider to adjust it: This is a physical limitation of the iPhone's camera.
There are other phones that get around this by implementing much better photo cameras, complete with shutters, apertures, focus mechanisms, and even built-in xenon flashes - but not the iPhone.
A flash, however, is a very different piece of kit; to ensure the correct amount of power output, the flash charges its capacitors, and then dumps a high voltage through a flash tube. The amount of light coming out of the flash tube is directly proportional to the amount of power it dumps through the flash tube - a lot of power means a lot of light.
Advanced flashes even have light-meters built in, where they are able to 'turn off' the flash after microseconds worth of light, for precise light level control. This is a small part of how E-TTL flash metering works with the flash power output to get perfect exposure.
All flashes have the 'one flash only' approach, except so-called 'high sync speed' flashes. Instead of using a single flash, these flashes can synchronise with shutters at speeds of up to 1/16,000th of a second (that's not a typo- but it is absolutely incredible, from a technology point of view). I've written a separate article about high-speed flash sync, if you're curious.
In a word, no.
In many words: There are several problems with getting the flash to sync with your iPhone:
The first problem we would have to overcome is to find a way of syncing the flash with the iPhone. The challenge there is that we don't actually have any way of doing that. Remember that a 'normal' shutter speed for the iPhone will be in the region of 1/15th of a second to 1/30,000th of a second (or, at least, that is what the EXIF data of your files reports when you take a photo directly into the sun) or so.
The only indications the iPhone gives that it is taking a photo is the flash (which goes on for about 300 milliseconds - that's about 160 times longer than the duration of a flash). The other indication we can access is the sound the recorded "cah-chunk" sound the iPhone plays when you are taking a photo. Whilst slightly shorter than the LED flash built into the iPhone, it is still way too long to be able to derive an exact shutter duration from - especially if you are planning to use an electronic flash. It goes without saying that trying to synchronise a 1/30,000 second shutter duration (on an iPhone) to a 1/50,000 flash pulse (on a high-end, high-speed flash gun) based exclusively on a light flash that lasts 1/3 seconds is an exercise in utter futility.
However, if we somehow found a way of getting the iPhone to report exactly when it is taking a photo, we have a secondary problem: Since the iPhone uses a rolling shutter, you cannot use the single flash approach. Even if you were able to somehow fire the flash at exactly the right time, it would only affect a very small 'sliver' of the exposure. The problem is obvious, and would look a little bit like this:

So, the first hurdle is finding out when the iPhone camera is triggering. The second hurdle is the rolling shutter. But if you shomehow managed to overcome both of those; we're facing a third problem: Since the iPhone doesn't support any manual settings, and since flashes are too fast for the iPhone once the exposure has started, your photos will almost certainly come out over-exposed.
From the iPhone's point of view, a flash of light (or, more likely, a rapid series of flashes of light, to counteract the rolling shutter issue), is far, far more light than it expects. In the studio, you would 'expose for the backgrounds, and stop down for the flash' - which, in practice, means that if you shoot with a fast shutter speed, you kill off the ambient light (as described in my Darkening a room by adding light article). You would regulate how much of the strobe light you want to have an effect on your photos by choosing a smaller aperture.
Unfortunately, with the iPhone, you only get one aperture (f/2.8), and you have no influence over the shutter speed or ISO. So: When you take an image, your photos would be exposed for the pre-flash lighting situation. Once the flash goes off, the image would be grossly over-exposed and utterly useless for anything.
In summary; there are three reasons for why you cannot use an external flash with an iPhone: There's no way of knowing exactly when your iPhone is exposing the photo, and even if you did, you would need to ensure the photo is exposed not with a flash, but for the whole duration of the exposure. The iPhone will not report how long an exposure is (it can vary between 1/15th of a second to 1/30,000th of a second...). Even if you managed to overcome these two problems, your iPhone wouldn't be expecting the light, and you'd dramatically over-expose your images.
The obvious work-around for improving your lighting quality for iPhone photos, is to not rely on flash synchronisation at all, but to instead use continuous light. This photo, for example, was taken with a desk lamp and the light from an iPad's backlight (!) - for near studio quality lighting:

We all know that the triumvirate of exposure are shutter speeds, aperture, and ISO. It's this dastardly trio that operates like security guards to photons, standing there, ear-piece in their ears, saying "Oi, if you're name's not down, you ain't coming in". The head security guard, Mr Aperture is restricting the flow of how many photons can come in at the same time. Dr Shutter Speed is opening and closing the doors to the club for various amounts of times - if he opens the door for a long time, lots of people get in. If he throws the door open and kicks it shut again, only a few people get in. Professor ISO is the allegory-wrecker who just stands there, scratching his head, wondering how the hell he fits into this whole 'club' scenario.
The point I was going to make, however, is that something has changed over the past ten years, and ISO has taken over power impressively quickly...
Shutter speed has remained stable; typical shutter speeds on a SLR camera range from 30 seconds to 1/4000th of a second. That's 17 stops of difference.
Apertures remain unchanged; typical aperture ranges for a standard prime lens go from f/1.8 to around f/19 or thereabouts. That's about 7 stops of difference.
However, the biggest change comes from ISO-land. Only 10 years ago, you'd be nuts to use films slower than 3200 or so (don't get me wrong, I loved my ISO 3200 T-Max... But that bad boy was grainy.). On digital cameras, ISO 1,000 was merely 'manageable' in 2002... That's only ~4.5 stops - a lot less than the range of light adjustments you get out of your ISO settings.
Compare that with the shots that are coming out of the current generation cameras. The Sony NEX-7, for example, was determined to have "quite useable results"at ISO's up to 6400, and the same verdict fell for the Nikon D3 camera:

That, ladies and gentlemen, is huge. It means that whilst the aperture and shutter speed range has essentially stood still for ten years, useful ISO ranges have increased from 1000 to 6400 - or from about 4.5 stops to 7 stops of useable range, which means that ISO now matches your aperture control when it comes to being able to control the brightness of your photos.
It might sound pretty subtle, but if you think about it, it's quite the revolution: It means that ISO, which used to be merely a fine-adjustment tool only 10 years ago, can now be used as a major component in your exposure decisions...

When you read the specs for the Pentax Q, you know intellectually that it's small, but it doesn't really hit home until you see it for yourself. It really is tiny. In fact, it's so dinky you'd be forgiven for thinking that it's a toy… before you hold it in your hand (just the one).
It definitely doesn't feel like a toy. There's a decent heft to it and nothing about its build feels tinny or plasticy. It's a camera that's been made to do business, despite its diminutive size. Fitted with the standard 8.5mm (47mm equivalent in 35mm format) f/1.9 lens, it slipped into my handbag or coat pocket, but not my jeans pocket.
So it came with me everywhere for almost a week, including a visit to my brother over the weekend, a walk in the park to photograph some wildlife, and a Christmas party where it generated plenty of oohs and aahs. It's these experiences on which I've based my review, so there aren't any painstakingly photographed charts to test white balance. But I'll admit to setting up a shot to test the filters when I felt a bit creative, and I wanted to take a closer look at the ISO, so I messed around doing that for a bit.
I got used to the layout and menu system fairly quickly. Sure, it was unfamiliar initially, but that was to be expected. You choose your mode, from fully manual to fully auto, using the dial on the top of the camera, where there's also the wheel to adjust aperture or shutter speed. There's a dial on the front that can accommodate your favourite filters and a green button on the back that you can customise to access your most-needed function.
The four-way controller on the back covers white balance, ISO, flash, and the timer. There are also the information and menu buttons to take you down into the guts of the camera. Seeing as the camera's so small, it's hardly a surprise that its buttons are, too. I coped fine with them, but anyone who's a touch bigger than me or has finger nails a sliver shorter than mine might struggle, let alone if you're a body-builder in your spare time.
The flash has a pop-up facility, which I found suitably amusing and of course is useful for preventing the curse of red-eye and ensuring that your extra light won't just bounce off of a longer lens. I was slightly concerned that it might take out my eye if I were to deploy it in a hurry, though.
The response time between switching on and being able to take a photo was good, and navigating between and adjusting shutter speed, aperture, and ISO was intuitive. But when I began taking photos, I ran into a couple of problems.
First, I kept running into arguments with the autofocus. There would be occasions when it simply focused where it thought it should be focusing, not where I wanted it to focus. If I'd had it on auto mode, that might be just about understandable, but in fully manual, it's beyond comprehension and terribly frustrating. You don't get many second chances in photography and seeing them float by because of a tipsy autofocus was disappointing.
Second, every now and again the metering would seem to waltz away and have a party of its own, leaving my images wildly under-exposed. This wasn't nearly so prevalent as the autofocusing issue, but it did mean that I was more exasperated with a camera than was exactly healthy.
So what of the images? I've taken some photos that I really like and my favourites are up there for you to see. The colours weren't muddy or washed-out, although the white balance was occasionally off by a quarter country mile - so much so that my poor brother looked green in a few portraits - but that was nothing that a bit of post-processing couldn't fix. The noise levels didn't want to make me scratch out my eyes until at least ISO 800 or 1000, which is entirely reasonable.
When I compared the RAW and jpeg images straight from the camera, what struck me the most was the barrel distortion from the lens. The warped horizons on landscape shots was very noticeable, and I found the bent look in my office floor almost alarming. Sure, the jpeg option straight from the camera does correct it, and it's something that you can fix yourself in the RAW file in post-processing, but it's rather significant.
There are more filters and options to do crazy things with colour and processing in the Q than I think I've had hot dinners this year. At first it was almost overwhelming, but as soon as you surrender to your childish desires to combine posterising with bleach-bypassing, or grimace at just how hideous you can make a perfectly decent picture look with selective colour, it's a lot of fun.
When it came to packing the Q into its box and sending it back, I was a lot more reluctant to do so than I thought I'd be. Despite the odd temper tantrum involving autofocusing or exposure, I've enjoyed playing with this camera over the past week or so, and doubtless I'd continue to if I had it for longer. But I've a sneaking suspicion that a great deal of this fun is reliant on knowing that I've a proper optical viewfinder and a much better sensor waiting for me in my dSLR, and my S95 slips into my jeans pocket, has a lens that's far more versatile than the 8.5mm standard lens on the Q, and produces images of about the same quality. If the Q were my only camera, I think I'd spend a fair chunk of my time feeling frustrated.
There's no denying that Pentax, Nikon, Olympus, they're all on to something with teeny-tiny interchangeable lens cameras. These are a significant development in the photographic world, but they're not there yet. So I can't recommend that you buy a Pentax Q when for less you could pick up a Canon S100, a Nikon P300, or an Olympus XZ-1 that delivers just about the same image quality with greater versatility and in a more compact package. One day, maybe; but not today.
It’s Friday. Time for a treat. We’re bringing you the first in an occasional series written by Ross Sheddon, who’s an official ship’s photographer on a cruise liner. How much of an awesome job is that? We thought that we could enjoy his wanderings vicariously, as he talks us through where in the world he happens to be at the moment, and what he’s learned about photography in the process. In turn, what we can learn, too. And try not to turn green with envy. So, here we go, where in the world is Ross, and why didn’t he take that photo?
It’s a beautiful day in Scotland, the sun’s out, it’s almost warm. But I’m not there. Early morning and two hours north east of Qingdao I can see my breath on the cold clear window of the old bus. I wiped the condensation away for the hundredth time as the most amazing vistas of barren fields and leafless trees swept by.
I absent mindedly flicked the shutter speed up another notch on my trusty old 40D. It had been sitting in my lap like a sleeping child for most of the journey. It, like me, had very little to do until we reached our destination.
I sighed, a basic lesson of being a professional is this: You never shoot through windows. And you never, never, never shoot through the windows of a moving vehicle. The urge is always there but training and experience tells you that the shot will not be one of quality. You don’t do it, it’s the rules.
I’m sure you think you see where I’m going with this, rules are meant to be broken et cetera, et cetera. That’s for another article, what to take away from this is not to break the rules, simply to be ready. The best shot will come at you when you least suspect it and if you’re not ready you’ve no chance to capture it. You can’t always be in the front row of the rock concert; you’ve got to make the best of the opportunities that arise.
The bus swerves to give more room to an old truck trying to pass on the inside of the blind bend and I grip my camera a little tighter in reassurance. A flash of trees. A lake appears. It’s there for two seconds or more then it’s gone.
On a small back road, far outside Beijing, early in the morning, I’ve grabbed an image from the world around me. It’s not the sort that you get a second chance to shoot; my colleague behind me didn’t have her camera case open before it was past. If you’re ready when the shot comes you can take it, if not… well we’ve all had the pleasure of looking enviously at our friends and colleagues shots from the day we forgot to charge our battery and accidently left the spare packs in our other bag.
It may not be a shot that’s going to win any competitions; it may not sell as stock. It may simply sit forever on my hard drive but I got it. I got it. Every time I look at the image it reminds me of that time and place, the feel of the piece deeply invokes in me the memories of the moment, of the trip, of the whole country.
Around us at all times are shots waiting to be discovered. If we don’t have a camera in our hands then we’re going to be missing that opportunity. You can’t walk around every day with all your equipment strung around you like a Jessops-sponsored Rambo. I only suggest that when you know something might come, when you’re in an interesting place, have you camera set up and ready to crack of that shot before it presents itself, otherwise who knows what you’ll miss.
Perhaps more importantly remember, whatever country you’re in, the same things will always stop you grabbing that perfect shot:
Ross is a portrait photographer and digital artist, currently working for Princess. In his career he’s worked everywhere from Vietnam to China to Egypt, Greece, Alaska, and back. Despite running out of new countries to visit his eyes remain open for new weird and wonderful sights always around him.

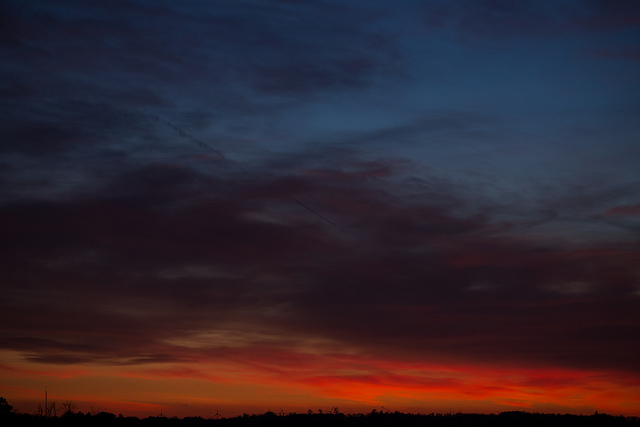
Photographing in the dark can seem a daunting and difficult task when encountering it for the first time, but here at Small Aperture we have a few quick pointers to help you out. Hopefully this article will, wait for it, shed some light on the subject (I’m so, so sorry). So what can we do to combat low light photography? There are, thankfully, several options available to us.

I shot this at f/2.8 at ISO 1600 - the shutter speed needed to remain high.
One option is to work with a larger aperture. What is aperture, you ask? Well I’m shocked and appalled, quite frankly, that you haven’t already read up on our article about it. The bigger your aperture, the more light you’re going to be letting in. Of course, sometimes, you can’t afford to / don’t want to lower your aperture. Whatever shall we do? Well, you could always…
Increasing your ISO will increase your sensor’s sensitivity to light, which will help make the most of what little light you’ve got to work with. What are you talking about Gareth? What are these kooky letters you’re putting together? As always, we have it covered – nip over to our guide to ISO and then come back to me when you’re up to speed.
All done? Good. So, increasing your ISO can help you capture those precious, delicious slivers of light skulking around in the darkness. But what about all this horrid noise? It’s spotty and grainy and yucky – this won’t do at all. Well, how about we only increase the ISO a tad and look at changing some other settings?

and this one required all three - ISO 1600, aperture of f/2.8 and a shutter speed of 1/100. Take THAT, low light!
Lowering your shutter speed can also help your camera gather more light for when there is little to play with. Guess what? We have this one covered, too – take a look here. The longer we have the shutter open for, the more time light has to get in. Too low a shutter speed can lead to image blur, however, and unless you’re going for that look, images that aren’t sharp are, well, unsharp. Image still too dark? Well, I’m afraid that’s all your options exhausted. Bummer. Or is it…?
Go on, do it now. Open a new window in your browser, go to Amazon, and get it ordered. Unlike other things in your kit, a decent, sturdy tripod doesn’t really ever need to be replaced for a newer model and should still be useful for years and years to come. This means you’ll have to give it a name, of course. Mine’s called Trev. Trev the Tripod. Trev has always been there for me when I’ve needed him. The best thing about Trev is, when I need to lower my shutter speed to a duration for which I couldn’t possibly hold my camera still, I pop it on Trev and he keeps it perfectly still for the whole exposure.
Good old Trev.
You’ll mostly find a tripod useful for grabbing yourself some lovely sunset / late evening landscapes, which will afford you to work with a very small aperture AND a low ISO setting in order to get some lovely, low light landscapes.
To defeat the low-light menace, try a combination of these factors:
Depending on what sort of image you’re after, you’ll be using a combination of these for one image and maybe just altering a single factor for another. There is no greater teacher than experience, so get out there armed with this new-found knowledge and experiment! Seeing as it’s Friday, if your friends invite you to the pub just tell them ‘Can’t make it tonight, I’m afraid; I’m spending the evening in a field with Trev.’
