little bit

What is noise?

Photography Fundamentals has reached part 'N', for 'noise'. Digital noise is instantly recognisable in a photo, and we know that keeping your ISO low is the best way to avoid it, but why exactly does it happen? Why does your image quality go down the pan as soon as you touch that ISO dial? What's with all the digital noise?


In 2006, this was the reality of digital noise in photos ...

How does an imaging chip work?

Whether you use a CCD or a CMOS chip in your camera, the basic functioning of an imaging chip is pretty much the same: Imagine millions of tiny little light meters squashed into a tiny little chip the size of a postage stamp. How many million? Well that depends on the resolution of your camera, of course, but if you’ve bought yourself a Canon EOS 700D, you’ve got a 18.5 or so million pixels (of which 18 million are used). All of these pixels are somehow fitted on roughly 22mm by 16mm sized space – yes, that’s about the same area as the button on your average door-bell.

When you take a photograph, there are a set of shutter curtains which move aside – exposing the imaging chip for as little as one eight thousandth of a second – giving the sensor time to measure the light that falls on it. Then, the shutters close again, and the sensor sends the measurements to the camera’s cpu, which does some calculations, and then stores the whole thing as a digital file.

Where does ISO come into it?

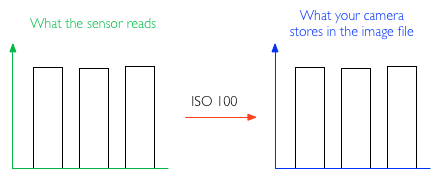
Now you know pretty much how an imaging chip works – but where does ISO come into it? Well, all imaging chips operate at the lowest ISO your camera supports – usually ISO 100. In this mode, your camera takes its light measurements from its millions of tiny little light sensors, passes it directly to the brain of the camera, which then stores it.

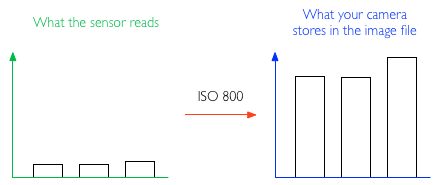
When you crank up the ISO value to, say ISO 400, another step is added to the mix: Your camera still takes the same measurement, but in the CPU of the camera, the measured values are multiplied by 4, to get ISO 400. Or by 8 to get ISO 800. Or by 32 to get ISO 3200. Pretty straight-forward stuff, right?

So, er, Where does digital noise come from?

Silhouette in concert
Silhouette in Concert by yours truly – Also see the full-resolution image for an excellent example of digital noise in photography

Well, think about it: while chips have gotten much, much better in recent years, it’s still a case of 18 million tiny little sensors doing their thing in a space the size of your thumb nail.

The problem is that – as with all precision measuring instruments – they can only be so precise: all of them introduce a degree of measuring inaccuracy. The problem with imaging chips is that they are internally inconsistent, and they are unpredictable.

The inconsistency is a problem which can largely be resolved: The camera can take a photograph, and realises that if one particular pixel always reads a little bit higher than its immediate brethren, it can calibrate so that one pixel is adjusted down to fit better. This calibration is done before the camera leaves the factory, and it’s trivial for camera manufacturers to built-in calibration checks on an ongoing basis – it’s relatively trivial to detect a dead pixel, for example, and then interpolate what its likely value would have been from its surrounding neighbours; and because there are 18 million of them, and we rarely check each individual pixel of a photograph, you’d never know.

The unpredictability issue is different, however; imaging chips are sensitive to temperature, and the act of taking a photograph actually causes the chips to warm up a tiny little bit (there’s a lot of electronics in a camera, after all, including the battery, the CPU, and all the circuitry to tie it all together – all of which generates various amounts of heat). Some cameras have a ‘noise reduction’ feature where they take another photograph immediately after you take a long-shutter-time photograph – but with the shutters closed. The theory is that it should be recording perfect darkness, but in practice it records a variety of readings from all the sensors. By subtracting these readings from the original image, you reduce (some of) the digital noise in an image.

Imaging chips are precise enough that at ISO 100, the differences in readings introduced by digital noise are practically unnoticeable. The problem comes from the multiplication process.

A thought experiment

Imagine you take a photograph of a perfectly grey wall at ISO 100, ƒ/8.0 and 1/30 second exposure time. Three randomly selected pixels now read 100.5, 100 and 102. No problem; it looks great, and the stored values are within 2% of each other – the wall looks like a perfectly even, gorgeous grey wall.

iso_100.png

Now, switch the camera settings ISO to 800, ƒ/8.0 and 1/240 second. The final result — in a perfect world — should be precisely the same: We’ve reduced the shutter speed to 1/8 of the original exposure, but the camera will multiply the exposure by 8 because we’ve changed the ISO. The same pixels now read 12.6, 12.5 and 15.5: The margins of error are the same as above. The camera multiplies it all by 8, and stores 101, 100 and 120 to the memory card. Suddenly, there’s a 20% discrepancy between the three values, which becomes very clear in the final image: What you’re seeing here is digital noise.

iso_800.png

Now, imagine the same effect at ISO 3200: the pixels read 3.5406, 3.1250 and 5.1875, which the camera multiplies back up to 113, 100 and 166 – a far shot off from the 100, 100, 100 you’d get with a perfect imaging chip.

iso_3200.png

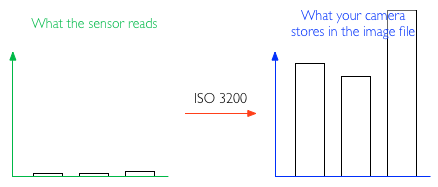
In reality, the metering tolerances in an imaging chip aren’t that pronounced; but the point is that if you multiply any meter reading by 32 (or much more, depending on how your ISO settings on your camera will take you), you’re talking about pretty serious discrepancies, and some pretty serious noise in your final image.

How can I reduce digital noise in my pictures?

Use as low ISO as you can get away with; Often, it’s better to use a tripod and a remote release cable combined with a longer shutter speed and lower ISO, than trying to shoot free-hand at shorter shutter speeds and higher ISO.

Use shorter shutter speeds; If you can, use shorter shutter speeds – the metering discrepancies will still be there, but less pronounced.

Keep your camera’s insides cool; when you take a lot of photos, you’re introducing more camera noise. Also, if your camera has a ‘Live View’ mode, it sucks battery, and means that the camera’s electronics are constantly working hard – which causes heat, and introduces more noise.

Use noise-reduction software; There’s a few options out there by now, but I've been consistently impressed by the RAW processor built into Lightroom - the before-and-after pics at the top of this article, for example, were processed with Adobe Lightroom. Personally, I quite like a bit of noise in my photos – it makes them look more accessible and ‘real’, I feel – but that might just be me.

noisynoisy.jpg

TL:DR;

A super-brief summary of all of the above, courtesy of Redditor IAmSparticles

When you increase the ISO setting on a digital camera, you're increasing the gain and magnifying any faults in the data from the sensor. It's like turning up the volume on a radio station with really bad reception. You can hear the faint signal better, but the static gets louder, too.

The problem is worse on smaller sensor chips (pocket cameras and phone cameras) because all the pixel sensors are packed together in a tighter space, causing more heat buildup and interference between them, and therefore more errors in the output.

Macro << Photography Fundamentals >> Prime lens

Is stock imagery getting too specific?


As a stock photographer, you have to make your money any way you can. I suppose there are only so many saleable photos of 'businessman on mobile phone', but when you look at stock sites, you'll often find photos that are just a little bit ludicrously specific. The funny-guys over at CollegeHumour spotted that as well, and created this rather fabulous video about it:


So, the question - dear readers - is stock photography getting way too specific, or is this the only way that stock photographers can still carve themselves out a niche?

Fujifilm's F800EXR, trying to win back the smartphone crowd with wi-fi


With all the focus on Fujifilm's gloriously stylish range of premium cameras, it's easy to forget that they've a range of competent compacts, too. Yesterday, they added one more to the line-up, ready to convince the social media savvy cool kids that they really do want a compact in addition to their smartphones.

This is the F800EXR, successor to the F770EXR. This makes it a little bit more than your average point-and-shoot that's a mania of megapixels and frenzy of filters packaged in garish pink. It's Fujifilm's flagship compact camera, with full manual control and Raw capability. 

It comes with a 16 megapixel back side illuminated EXR-CMOS sensor (the EXR sensor is Fujifilm's proprietary technology that enables the sensor to switch between three modes–high sensitivity/low noise, dynamic range, and high resolution–depending on conditions, for optimal results), 20× optical zoom, and when you deploy the intelligent digital zoom function, you can bump that up to 40×. In auto mode, it can select between 103 patterns to get the best results for an image.

The press release is very cleverly worded to make it seem as if the F800EXR has a faster start-up, shot-to-shot, and auto-focusing speed than its predecessor. However, looking back at the F770EXR's spec, they remain at 1.5 seconds, 0.8 seconds, and a minumum of 0.16 seonds (at the shortest focal distance), respectively. 

But the focus is on making it connected and trendy, so what's the deal? First, you can transfer photos to a tablet or smartphone that has Fuji's Photo Receiver app installed. Up to 30 photos can beam their way from camera to device in one go, wirelessly, and password free.

Second, with the Fuji Camera app, you can send your camera's location back to itself, via your tablet or smartphone. And via that, your camera can also act as your tour guide for wherever you happen to be. Somehow, that seems needlessly complicated to me, with far too much backwardsing and forwardsing between devices. And really, why not just use your iPhone or your iPad to locate your nearest landmarks and points of interest? There's even an app to pinpoint the closest public convenience, and your camera can't do that.

Like any good camera, it has its filters, so that you can flip between pop colour, high-key, toy camera, miniature, dynamic tone, and partial colour, at the touch of a button. And of course you can make full HD video (1920x1080 pixels).

You can create 360º panoramas and there's a multiple exposure mode, too.

When it comes out (I've heard rumours of August in the US, September in Europe, and prices around $350 or £280), it'll be available in black, red, or white.

The question is, is all of this enough to convince those who are deserting compacts and heading off towards the bright horizon of the smartphone? I don't think so. If you want convenience and immediate Facebookableness, you'll still use your smartphone. If you want a gamut of impossible filters, then you'll stick with your smartphone, too.

If you want a compact camera because of the benefits of having a compact, the wifi gimmicks probably won't make much difference. I've a compact for situations when my dSLR is inappropriate or inconvenient, but I still want the control it affords. I'm hardly going to edit my Raw images on an iPhone, am I? And transfering them wirelessly sounds murderous. My parents use a compact camera because they don't have a smartphone, which makes the F800's connectivity a joke for them. We'll buy compact cameras because of their performance, not because of their corresponding iPhone apps.

I remain convinced that there's a place for compact cameras in the market; I think that camera manufacturers need to work out where it is and concentrate on that.

Free Photography School


Insert a deeply insightful caption with something about building blocks here.

You're just starting out in photography, but you can't quite seem to get the hang of things? Or perhaps you've been taking photos for a while, and you're itching to get some inspiration to develop? Or maybe you've always been a person who learns best when they get a little bit of a push in the right direction?

Well, I've got some good news for you; I'm starting a photography school.

Well, a virtual one, anyway.

The first ever course starts on May 1st, so if you sign up before then, you'll be part of the very first course - but don't worry; we're starting additional courses after that, too.

It's completely free, it'll be a lot of fun, and you'll learn a load about photography in the process. How awesome is that?

For more information and to enroll, check out the Photocritic Photography School website.

Enjoy!

One simple step to improve your photos


When I'm asked what I do for a living, the responses that I get range from the infuriating: 'You must have a really great camera' to the inane: 'People write books about photography?' as well as the interesting. One of the interesting ones landed my way the other evening when I was chatting to someone whose wife enjoys taking photos.

'What one thing can my wife do to improve her photos?'

My answer was immediate, and pretty simple: 'Evaluate them.'

If you want to get better at taking photos, it's all very well being told that you need to practise, practise, practise, but you need to do a little bit more than that. You see, unless you critically assess your photos to work out what worked, what didn't, and why, all that practising will just result in a harddrive full of images that suffer from the same flaws and foibles. So you need to evaluate them: the good, the bad, and the what should I do differently.

Haje has written a very helpful guide to practical photo evaluation. His approach is both creative and technical and I would definitely recommend it for people whose photographic knowledge is above average and are serious about improving. But if you're just starting out, or if you just want to know how to make your holiday snaps that bit better, it might be a touch too complex. 

So here's a simpler version.

  • You do this at home on a big screen. Don't try to evaluate photos properly on the screen on the back of your camera. That's a recipe for disaster.
  • When you look at the photo, choose one thing about it that works. Is the composition bang-on? Have you captured the moment perfectly?
  • Then ask yourself: Why is it working?
  • Now identify one thing that isn't working. Is the exposure slightly off? Are the eyes not quite in focus?
  • In which case, what do you need to do to improve it?
  • Next time, make sure that you do it!

If you follow this process for every photo that you take, you'll quickly discover that you probably have certain photographic strengths and particular photographic weaknesses. By identifying them, you'll be able to build on what you do well, and make adjustments and improvements to remedy the areas where you struggle. With time, you should notice that you're taking better photos all round, and maybe even that what you're good at and what you find less easy, change.

Then, as you learn more, you can progress to far more thorough photo evaluations, and grow even more advanced!

Rest In Peace, Steve Jobs


I'm perfectly happy to admit that it's a little bit curious to be sad about the death of a man I've never met... But there can be little argument that Steve Jobs' impact on the worlds of technology and - indirectly - photography have been absolutely immeasurable.

My thoughts go out to his wife and his four kids - and all the others he leaves behind.

Steve Jobs, thank you for being a strong and inspirational figure.

Editor's note: All of us here at Pixiq are saddened by the death of Steve Jobs. Our thoughts go out to his family, friends, and to everyone who was touched by Steve Jobs. RIP Steve.

How do you time-lapse?

timelapse-silhouette

So, I’ve been thinking about doing a cool little project where I’m building a way of adding time-lapse to any camera – and have been wondering if perhaps I should be offering the final product as a commercial product that you can buy.

To make this a reality, I’d love to hear a little bit about the solutions you’re currently using – and what you like and dislike about it. With a bit of luck, I should be able to come up with something (gasp) better – at a lower price, too!

If you’re interested in telling me what you are currently using – or if you would just like to add a wish-list of stuff you wish a timelapse timer could do, please do me a favour and fill in the survey!

Awesome, thank you.

~ Haje

The battle of the Instagrams

Screen shot 2011-03-07 at 18.49.15

It’s a very simple idea and it’s a little bit addictive, too. It’s a website where Lomo-fi can do battle against 1977; Toaster can take on Inkwell; and Apollo and Hefe can slog it out. Two Instagram images are placed side-by-side and you get to choose which you prefer by clicking on it. And then another two appear. And another two. And another two. Oh hell, before you know it, you’ve been sucked in and you’re late for your dinner date.

It’s called Pic A Fight. It was developed by Paul Stamatiou and Chad Etzel, because, as far as I could tell, they could. It entertained them. It’s been entertaining me this evening, too. Instagram users can sign up and submit their images to contest fights. The images that score the most highly get displayed in the Top Pics gallery. And, yeah, that’s about it.

Kapow! Fairy lights versus dessert

You can even send other users’ pictures into pitched battle if you fancy a bit of fratricide, though.

Pic A Fight: slightly addictive Instagram aesthetic contests.

(Headsup to TechCrunch.)

Stopping down a Canon EF lens

A stopped down lens should look a little bit like this. Or a lot like this, in fact. The size of the hole depends on how far you've stopped down your lens.

If you’re used to manual lenses, you know how easy it is to stop them down. If you are a little bit more advanced than that, and have ‘graduated’ to more advanced lenses, stopping down a lens (i.e making the aperture smaller) while it is not attached to a camera body can get a little problematic. There is a way to do it, however… 


All of Canon’s newer lenses (the whole EF and EF-S series) have electronically controlled aperture. Normally, that’s great, because you can select what aperture you want with the thumb wheel or via the camera’s menu system, instead of having to do it with a wheel on the lens itself.

There is a trick you can use to stop down lenses, however. Mind you, this is probably a bad, bad thing to do, and it may break stuff. Having said that, I have been doing this for years, and it seems to work fine, without any adverse effect.

A stopped down lens should look a little bit like this. Or a lot like this, in fact. The size of the hole depends on how far you've stopped down your lens.

Stopping down a lens is done by putting the lens on the camera, and setting the camera to either manual aperture (A or Av) or fully manual (M). Select the aperture you want. Then, press and hold the aperture preview button. If you don’t know where that button is, it is probably the one near the bottom of your lens, on the side. The one that you never use. Yes, that one. Press it, hold it, and then take the lens off the camera exactly like you would do normally.

If you have done it right, you are now holding the lens, which should still be stopped down. It should look approximately like in the picture with the red circle.

Finally, this trick for setting the aperture is not a “recommended” method (not that there really is one), but at worst the “ERR 99″ or “ERR 01″ it may produce on the camera can be cleared up by turning the camera off and back on.

So why would you bother?

Well, this trick will come in most useful when you’re using your lens detached from the camera, obviously. This would come in particularly useful in macro photography, such as if you are using non-electronically connected spacers between your lens, so your camera can’t send the right signals to the lens to make the aperture change.

If you are reversing your lens with a set of reversing rings (or using my nifty homemade lens extender), it would also be useful, if you want to use the lens at anything other than fully open.

And hey, it’s a nifty trick. Sometimes, that ‘s all you need, right?

Finally, if you like this post and want to learn more about macro photography, check out my book on macro photography (in the sidebar over there →).


Do you enjoy a smattering of random photography links? Well, squire, I welcome thee to join me on Twitter -

© Kamps Consulting Ltd. This article is licenced for use on Pixiq only. Please do not reproduce wholly or in part without a license. More info.

Sometimes, copyright is upheld!

larajade-dvd-300x300

Sometimes, the law does come down on the side of the photographer. The fight might’ve been bitter, bloody, and protracted but a young photographer has just reminded a porn peddler from Texas that you can’t use someone else’s image for commercial gain unless you’ve come to some sort of agreement with her or him.

Back in 2006 a 14 year old Lara Jade Coton snapped a self-portrait showing her in a black ballgown and top hat—all rather tasteful—and submitted it, and a few others, to Flickr. That’s not so unusual. How many of us have self-portraits on Flickr? A little bit more unusual, though, might be finding that your image is being used to market a pornographic DVD.

In the grand copyright scheme of things, whether or not the image was being used on a pornographic DVD is probably neither here nor there (although I am intrigued by the implications of using an image of a minor), just that the image was being used commerically without permission from the photographer or model. Doing what I’m sure anyone else would do, Coton wrote to the producers (TVX) and requested that they stop using her image. They were less that co-operative. There’s a surprise.

Would our young photographer give up because a nasty man sent her a nasty email? Of course not. Granted, it did take three years of legal wrangling but finally Coton was awarded $129,173.20 in damages. It wasn’t quite the $434,000 that she sought, but hopefully it’ll make people think twice about using people’s photographs commercially without permission.

Headsup to El Reg, with more details available here and here. And if you’re unsure on your picture rights, you can check out our quick and dirty guide.

Yogile: quick and easy photo-sharing

Yogile

There is such a plethora of web-based photo-sharing options out there that I’m always a little sceptical of someone telling me about a new one. It’s not just that it is a flooded market, but the front-runners do it so well. However, I think I might just have been pointed in the direction of something a little bit different.

How about an online collaborative gallery? One where lots of people can upload their own photos of a particular event — for example a wedding — to a single place, and then share the photos amongst themselves or make it available to the general public. It’s available over at Yogile.

After someone has established a gallery, potential contributors, or just viewers, are emailed a URL and password. They click the link to see the gallery and follow the simple instructions to upload photos. Alternatively, photos can be emailed to the gallery directly. Apart from the person establishing the gallery, no one has to be a member.

It’s a clean, unfussy interface and you can even leave comments. Yep, simple, stress-free photo-sharing. Now someone just needs to get married, or throw a party, or organise a village fete…