darkness

Photographing in the dark

The Magic Numbers, by Gareth Dutton

Photographing in the dark can seem a daunting and difficult task when encountering it for the first time, but here at Small Aperture we have a few quick pointers to help you out. Hopefully this article will, wait for it, shed some light on the subject (I’m so, so sorry). So what can we do to combat low light photography? There are, thankfully, several options available to us.

Use a larger aperture

I shot this at f/2.8 at ISO 1600 - the shutter speed needed to remain high.

One option is to work with a larger aperture. What is aperture, you ask? Well I’m shocked and appalled, quite frankly, that you haven’t already read up on our article about it. The bigger your aperture, the more light you’re going to be letting in. Of course, sometimes, you can’t afford to / don’t want to lower your aperture. Whatever shall we do? Well, you could always…

Increase your ISO

Increasing your ISO will increase your sensor’s sensitivity to light, which will help make the most of what little light you’ve got to work with. What are you talking about Gareth? What are these kooky letters you’re putting together? As always, we have it covered – nip over to our guide to ISO and then come back to me when you’re up to speed.

All done? Good. So, increasing your ISO can help you capture those precious, delicious slivers of light skulking around in the darkness. But what about all this horrid noise? It’s spotty and grainy and yucky – this won’t do at all. Well, how about we only increase the ISO a tad and look at changing some other settings?

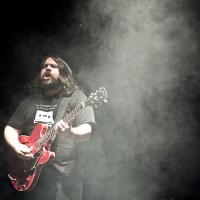
and this one required all three - ISO 1600, aperture of f/2.8 and a shutter speed of 1/100. Take THAT, low light!

Lower your shutter speed

Lowering your shutter speed can also help your camera gather more light for when there is little to play with. Guess what? We have this one covered, too – take a look here. The longer we have the shutter open for, the more time light has to get in. Too low a shutter speed can lead to image blur, however, and unless you’re going for that look, images that aren’t sharp are, well, unsharp. Image still too dark? Well, I’m afraid that’s all your options exhausted. Bummer. Or is it…?

Get yourself a tripod

Go on, do it now. Open a new window in your browser, go to Amazon, and get it ordered. Unlike other things in your kit, a decent, sturdy tripod doesn’t really ever need to be replaced for a newer model and should still be useful for years and years to come. This means you’ll have to give it a name, of course. Mine’s called Trev. Trev the Tripod. Trev has always been there for me when I’ve needed him. The best thing about Trev is, when I need to lower my shutter speed to a duration for which I couldn’t possibly hold my camera still, I pop it on Trev and he keeps it perfectly still for the whole exposure.

Good old Trev.

You’ll mostly find a tripod useful for grabbing yourself some lovely sunset / late evening landscapes, which will afford you to work with a very small aperture AND a low ISO setting in order to get some lovely, low light landscapes.

Let’s summarise, then.

To defeat the low-light menace, try a combination of these factors:

  • Use a larger aperture
  • Increase your ISO
  • Lower your shutter speed and, if it’s too low for a sharp image…
  • …Use a tripod!

Depending on what sort of image you’re after, you’ll be using a combination of these for one image and maybe just altering a single factor for another. There is no greater teacher than experience, so get out there armed with this new-found knowledge and experiment! Seeing as it’s Friday, if your friends invite you to the pub just tell them ‘Can’t make it tonight, I’m afraid; I’m spending the evening in a field with Trev.’

How exposure works

To understand exposure in photographical terms, EV is probably the single most important number you will have to understand, to understand the theory behind the art of photography. This goes from your tiniest, least significant compact camera, to your cock-on-the-table style medium format camera with a digital back.

Non-technical

Let us imagine a value called TCE. This TCE (The Correct Exposure) does not exist, because you might for a variety of reasons want a different exposure than the TCE. But for the sake of argument, let’s assume TCE exists, and this is what you will want when you take a certain picture.

To get a correct exposure, you will want to have EXACTLY the right amount of light to capture your image. Not too much, and not too little.

So, what is it that might affect how much light comes to the film or imaging chip?

  • Shutter speed – Imagine a mug with a lid containing a mysterious source of light, and the room you stand in is covered in darkness. Shutter speed would be how long you open the lid.
  • Aperture – Same cup, same concept, but this time, how far you open the lid (if you open it a little – small aperture, i.e. high aperture numbers (for example f/22). If you open it all the way – large aperture – i.e. low aperture numbers (for example f/2.8)
  • These are the two basic ones. The last factor that comes into play is your film speed, or the light sensitivity of your surroundings while holding the cup if you will.

That’s all there is to it – these three factors combined allow you to manipulate the light in all kinds of ways (big depth of field through small apertures, freezing motion through fast shutter times, etc).

So, to get TCE, you will want to combine these three factors into JUST the correct way. Now, if you replace TCE with TCEV (The Correct Exposure Value), you understand what I have been on about.

EV is a number describing an exposure – any exposure – regardless of its “correctness”.

Technical

The definition of EV=0 is an exposure of 1 second at f/1 using ISO 100 film, or any equivalent thereof (2 seconds f/1.4, 4 seconds f/2.0 etc)

The technical definition of EV is 2EV = LS/C.

EV = the exposure value – explained above
L = field (or zone) luminance –
C = Exposure Constant – This is a constant that depends on what unit you are using to express the luminance (L)If you use candelas/ft2, it is 1.3. If you are using candelas/m2*, it is 12.5*. If you use apostilb, it is 3,98.
S = film speed following the ISO standard

*) some of you might know cd/m2 as lux or lumens/m2,

This also means that 2ev = A2/T

A = the f-stop number of the aperture
T = shutter time in seconds

Combining these two; EV = log2(A2/T) = log2(LS/C) – which is the only formula you are likely to need, if you want to understand the basics of mathematics behind photography.

So what is the EV number used for?

Ah. Well, the EV number is used internally in cameras – an EV number of 10, for example, would refer to all the combinations of shutter times and apertures that would give a given exposure using ISO 100 film. This is useful, because a camera only has to add one thing to this equation; A light measurement. A camera with a lookup table or an algorithm to calculate the correct EV is all set for using all the different combinations that are able to give you the exposure you want.

But why would I care, if the camera handles everything?

Because the camera doesn’t always get things right. You may also want to use alternative exposures for artistic reasons.

Most cameras have an EV compensation wheel/dial, allowing you to choose how much you want to over/underexpose an image. This is usually measured in +/- 2EV, 1/3 steps. This means that you can over- or underexpose an image by two whole EV steps (which, incidentally, would mean the same as two full f-stops either way), in steps of 1/3 EV.

I hope that made things a little clearer – if not, leave a comment, and I’ll see what I can do!


Do you enjoy a smattering of random photography links? Well, squire, I welcome thee to join me on Twitter -

© Kamps Consulting Ltd. This article is licenced for use on Pixiq only. Please do not reproduce wholly or in part without a license. More info.