cameras

What is exposure?

The next stop in our (mostly) alphabetical journey through photography's fundamental principles is at 'e', for 'exposure'. Are you ready? Excellent! Onwards!

Exposure

Without an exposure, we wouldn't have an image (that's how fundamental this principle is) because it's the action of revealing your sensor, or your film if you're old-school, to light in order to record an image. Introducing too much light to your sensor will result in over-exposure and a too-bright image. Conversely, under-exposure is the result of not exposing the sensor to enough light, rendering a too-dark image.

Under-exposed to the left; over-exposed to the right; just right in the middle. (Image by Haje)

So far, so simple.

ExposureTriangle

Exposure is measured in 'stops' and controlled by three variables in your camera: aperture, shutter speed, and ISO. As well as determining how light or dark your images will be, they all have other aesthetic effects on your images, which is why you need to understand and be able to manipulate them to produce the images that you want. We started this series with aperture, which controls depth of field. We'll get to shutter speed and ISO and their respective abilities to freeze or blur motion and to introduce noise into our pictures. But for now, we'll concentrate on the impact of varying aperture, shutter speed, and ISO on exposure.

Equivalent Exposures

By giving and taking from aperture, shutter speed, and ISO, you can keep your relative exposure the same, but change how your image looks.

You might've set up shot to get a 'good' exposure, but you decide that you want a greater depth of field so need to use a smaller aperture. A smaller aperture allows less light to hit the sensor, so if you change only the aperture, your photo would be under-exposed. How can we solve this? You can use the other two adjustments to compensate for the lack of light captured by using a smaller aperture: maybe you want to use a slower shutter speed, to expose the sensor for longer? Or perhaps increase the ISO to make the sensor more sensitive? You could even do a bit of both.

Equivalent exposures

Let's look at an example with some numbers. We’ll start with an exposure of 1/200 second, ƒ/8.0, and ISO 400. What would happen if you were to change your shutter speed to 1/100 second? That would let twice the amount of light into your camera compared with 1/200 second, because the shutter was open for twice as long. Your photo will now be brighter.

Now you change your ISO to 200. This halves the sensitivity of the sensor, and the photo will come out looking like it is the same overall exposure. The photo won’t be identical, but from the point of view of brightness, it will be about the same. It’s possible to change any of the settings to compensate for any of the other settings.

A faster shutter speed can make up for a larger aperture, a lower ISO can make up for a slower shutter speed, and a smaller aperture can make up for a higher ISO. They’re all related.

TL;DR

  • 'An exposure' is the action of revealing your sensor (or film) to light to create an image
  • Too much light results in an over-exposed, too bright image; too little light produces an under-exposed, too dark image
  • Exposure is controlled by three variables: aperture, shutter speed, and ISO
  • Exposure is measured in 'stops'

Dynamic Range << Photography Fundamentals >> Focal length

Hello personal project! Hello Games!


For readers who've followed me here from Small Aperture, you might have been wondering what happened to my trusty side-kick Gareth. Well, apart from becoming Daddy to his adorable little girl in December, he's embarked on a project to document a year in the life of a videogame company. This is his mid-term report, showing how he settled upon the project, the insane fears that initially overwhelmed him, and how he thinks he's doing so far.

Welcome back, Gareth...

When we think of great photography, to many, it's the idea of that one, iconic image: the one that sums up a whole story, an attitude, a way of thinking, an era, in one shot. These images should form imprints on our minds, be burned into our retinas as significant, moving pieces of imagery that make waves, make things happen, raise awareness, engender change.

Well I'm here to say knockers to that, because I'm doing the exact opposite – a long term photo project that will, once it's done, have taken me over a year to complete. Although it's true that everyone loves an iconic image, it's also true that everyone loves a good photobook, or a photo story. Yes, everyone. Yes, no, I can see your hand raised there, I'm going to ignore it. You DO enjoy a photobook, now put your hand down. All the way down. And don't sulk. I can see thattoo, so stop it. Thank you.

This is, essentially, my first, proper, long term, large-scale personal project. The first thing that smacked me in my big, beardy face was the difference between a project like this and a single commission. Imagine taking the visualisation you have in your head of a shoot lasting four or five hours. Now try and do that for a year.

How am I supposed to imagine where this will be in a year's time? What if we have hovercars by then? Should I incorporate that into my plan? Maybe cameras will be installed directly into our eyes and I will have become redundant as a photographer. Maybe, just maybe, cameras will have become sentient, like those Terminator films, and they'll be walking around, Gorillapods for legs, photographing us and uploading the images to Flickr where their other camera friends will comment on how good the shot is, even if it's not that good: 'Sony Cybershot #432 says "great shot, love the tones on that human, lol"'. We'll all be rendered artistically obsolete, and all the Canon EOS 1Ds will have MySpace profiles where they photograph themselves from a high angle to make their bodies look thinner.

Admittedly, I may have panicked a bit too much about it, but with these incredibly likely future events looming on the horizon, I wondered whether I was too casually getting into a project of a scale far larger than I was used to.

As one of my main hobbies is videogames and I have a bulk of editorial portraiture work I have undertaken for videogame publications, I decided to approach a small, independent games company with the prospect of documenting their day-to-day lives as they developed a videogame. I decided on this project for three, simple, extremely important reasons:

  1. My heart would be in it, as it's a subject I'm passionate about.
  2. It is a subject that I have not seen covered before anywhere else, so it is unique and fresh.
  3. Arguably the most important reason, it is about the people involved and a document about how much they love and care about what they are doing.

Keeping these reasons in mind simultaneously boosted my confidence and raised the stakes. These people had seen my quite-nice-portraits of industry figures they recognised and loved: they had been taken in by those images. As far as they were concerned, I would definitely do a good job of documenting their lives and the images would all come out as absolute classics to rival Neil Leifer's shot of Muhammad Ali standing over a downed Sonny Liston. Except instead of it being in a boxing ring in front of a couple of thousand people in Lewiston, Maine, I was to create the same, timeless images in a small, converted office that houses ten people in Guildford, Surrey.

The whole team are so nice and we get on so well that I would constantly (and still do, to some extent) have this enormous fear that I would let them down, that the work would not measure up to what they were expecting. My first piece of advice to anyone undertaking a large project would be to get a mock up put together as soon as you can. I spent a good six months looking at the images I had been taking in isolation, but once we did a mock up or put them in context in some way, I felt so much better about them. Similarly, when the article recently went live on Eurogamer (a popular gaming news and features website) and I could see the images in context, with an accompanying story, it made so much more sense.

Essentially, I'm learning as I go: it's incredibly fun, if a little stressful, and I am soon to spend an entire week with them in the attempt to capture some more natural shots of the more nervous members of the team, by sheer virtue of battering them into submission by constantly being there.

So to summarise this wall of insane, yet honest, writing, I'll tell you what I've learned about photo projects:

  1. Make sure you give a damn about the subject you're covering. If your heart's not in it, you won't produce interesting, emotional results.
  2. It's about the story and the people, and not necessarily about whether everyone in the shot is on the rule of thirds or exposed perfectly (although don't use this as an excuse for sloppy images)
  3. Get the shots in context in some way as soon as you can. Seriously, it will stop you from going insane.

Once the intensive week is complete (and I get a second to myself), I will bring you another update, documenting my ups, downs, and ultimately what I have learned from the experience. Basically, you'll be my collective, silent psychiatrist.

Canon C300: now with BBC approval


The Canon Eos C300

When it comes to approving cameras for use, the BBC is notoriously hardcore about the makes and models that it deems acceptable to film its programmes. And that's programmes produced by both its internal and external providers. They've got a reputation to uphold, I suppose.

It's understandable then, that Canon should be cock-a-hoop that the C300 has just been approved to shoot programmes that can be screened across the BBC's HD channels. The C300 is the third of Canon's camcorders to have received the BBC's seal of approval since January last year, the other two being the XF305 and XF300.

But you get the feeling that Canon is especially proud that the C300 passed the test, as it's the first in the EOS Cinema range, that combines Canon's video, broadcast, and dSLR expertise. Now they're excited to see how the BBC puts it to use. And I bet a few other people are interested, too.

Bouncing around with the BeetleCam


Will Burrard-Lucas (left) and Matt Burrard-Lucas (right) with two BeetleCams. Masai Mara, Kenya.

Back in 2009, The Brothers Burrard-Lucas - Will and Matt, an ingenious duo of wildlife photographers - set off to Tanzania to test out their home-made camera buggy, the BeetleCam. The idea was that a camera mounted on a small remote-controlled vehicle would allow them to capture close-up shots of animals in the wild that they wouldn't be able to achive with their cameras firmly in their hands or mounted on tripods. And it worked. Up to a point. Unfortunately they lost a camera in the process, and BeetleCam came off far worse in its single encounter with a lion.

However, the photos that the original BeetleCam had managed to help capture convinced Will and Matt that they really were onto something; the BeetleCam would allow them to take ground-breaking photos of wildlife. So undeterred, Will proceeded to rebuild and modify BeetleCam in 2011. He came up with two new versions: one with more advanced capabilities and the other with an amoured shell that should be able to withstand the inquisitive approaches of big cats.

With their modified BeetleCams, they set off to the Masai Mara to test them out again. And this time, they returned whole - if battered - and with a host of super-impressive photos. Take a look for yourself up there, or head to the BeetleCam site to see even more.

Flush with success, they've decided not to keep BeetleCam all to themselves, either. If you'd like your own one, they start at £1,250 for the basic unit and then increase with all the exciting optional extras that you can build in to them. Interested? Get in touch with them and they'll see what they can do.

Then it'll be your turn!

10 ways to improve your photography


Think outside the, er, manhole cover.

One of my favourite things about photography is that it's so accessible as an artform. To create a painting, you can't expect to be able to deliver anything if you go and buy some canvases, brushes, and some paint without any training or idea what you're trying to do (although, to be fair, some modern art does give that impression)... In photography, you can take your very first photo, and it'll come out well-exposed, and it'll be of roughly whatever you pointed your camera at. Cool beans, now let's take a look at how we can get better...

1. Invest in Good Equipment

The photographer makes the photo, not the camera, but there's nothing wrong with considering some new equipment every now and again. For some people, upgrading to the latest and greatest is all the inspiration they need to get out there and take better snaps. You don't have to buy a fancy DSLR, but really research your next camera and find one that truly fits your needs.

Nowadays there are hundreds of different types of cameras that you can choose from, so really put some thought into what you will be using your camera for before you invest in one.

2. Learn how to Use your Equipment

Another great tip is to read your camera's manual. Reading the manual will give you the edge; it will allow you to know your camera inside and out and in turn you'll understand the mechanics of a camera.

After reading the manual, play with it; try taking photos in every photography modes, and try setting youself little challenges - like "only taking photos at ISO 1,000 today" or "this week, I'm using manual focus only" or similar. Your photos may not necessarily come out better, but inventing games to help you understand your camera better is a huge step forward. Want some more fun exercises? Try 10 ways to break photographer's block

3. Take a Photography Course

Community colleges or community centers often offer fairly inexpensive photography classes. It could be to your advantage to take one of these courses and learn a few tips and tricks from your fellow classmates and from your teacher about the technical aspects of photography. Alternatively, there's plenty of books out there that could help you along - perhaps one of mine? ;-)

4. Try Something New

Don't be afraid to try something new in your photos. For example, if you normally take photos of your family and friends, then you can try out new lighting, or new settings on your camera. You could also try shooting at different times of the day. Night photography is a whole new world compared to day time photography, so don't be afraid to try something new and experimental in your photos.

5. Find your Niche

Find what you like to take photos of the most, and specifically work on that aspect of photography. Many people gravitate towards portrait photography, but give other branches of photography a chance as well. You never know, you could fall in love with architectural photography or pet photography.

Whatever you find you like best, try to become really really good at it - it won't be easy, and it'll be a lot of hard work - after all, if you love doing it already, it won't feel like work!

6. Take your Camera Everywhere

Always carry your camera! You never know when the perfect photo-op will arise, so it is a good idea to always have your camera close. Also, if you keep your camera with you, then you will be able to practice your photography more and more each day.

7. Be adventurous

Be adventurous in your photos. You can travel with your camera and go on many adventures with your camera in order to learn more about photography.

Going on adventures are fun, normally inexpensive, and can be fun getaways from the stresses of everyday life; they also make great photo memories. So, grab your family and go on a mini adventure one weekend. Whatever you do,  don't forget your camera!

8. Join an Internet Photography Community

Online photography communities are abundant and are super supportive. Photography communities are home to photographers who are beginners all the way to professional photographers. Joining a community can help you get the feedback you need to take your photos to the next level.

9. Look through Magazines and Photo Books

Researching photo techniques is a great way to create higher quality photos, and there is no better way to do so than to look through magazines and photography books. By looking at the photos in these publications, you can learn all about certain qualities of photography such as point of view, framing and color balance.

Lacking inspiration? Try my lust of 50 must-read photography books!

10. Have Fun!

The best advice for taking better photos in 2012 is to have fun! If you aren't having fun with your photography, then it will show in your photos. Photography is a fun form of art, so don't be shy and have as much fun as you can with your camera.


The Breathalyser Photo Booth


Hey Cindy, I think you're probably drunk enough to get your photo taken now. Cindy? Cindy? Oh well.

As I was writing up the user guide to the Triggertrap, I was googling around to find out what kind of sensors you could conceivably connect to the Aux port of the device. I came across a sensor I didn't even realise existed: An Alcohol Gas Sensor.

Brilliant. Spectacularly brilliant. Why? Because it gave me an idea for a completely novel way to use the Triggertrap that I hadn't thought up quite yet. You probably see where this is going already, because once you know that such a thing as an Alcohol Gas Sensor exists, the idea writes itself:

The Wobbly Photo Booth.

For parties, rig up a 'photo booth', connected to the Triggertrap, that measures the alcohol content of your breath. If you're sloshed enough, it'll take a photo of you!

To create something this awesome, all you need is a $4.95 Alcohol Gas Sensor wired to your Triggertrap, like this:

Now, you need to calibrate the device. You can either use mathematics, or you use a reference: Pick someone who seems quite inebriated, and get them to blow on the alcohol sensor. Set the Threshold on the Triggertrap's Aux sensor to the value they just blew, and get everybody to try.

Get ready to Facebook a gallery only of the most sloshed people at your party! Fabulous.

Of course, the Wobbly Photo Booth is simply one of many, many other sensors you could use to trigger your cameras.

This little project illustrates why I'm so excited that we included an Aux port on the Triggertrap - it opens up for all sorts of crazy and creative uses of the device, letting trigger the camera using literally anything you can think of.

What's your favourite crazy idea for the Triggertrap?

This article was first published on Triggertrap.com

Help Portrait 2011

Screen Shot 2011-11-01 at 00.10.42

Seeing someone’s reaction when they look at a potrait of her or himself is always so cool, especially if she or he isn’t that confident being photographed. There’s this kind of rush you get from making them feel good about themselves. I reckon that doing that for someone who could really do with that sort of confidence boost, or someone showing an interest in them, or spending time with them, would be pretty fantastic, which makes me think that Help Portrait is one awesome idea.

People with cameras, whether they’re pros or not and wherever they are, spend a day taking photos of people who are in some way in need. This year that day is 10 December. Reckon you could help?

Help Portrait is now in its third year. It was founded by Jeremy Cowart and it’s probably best if you hear what he has to say about it in his own words.

If you want to find out even more, like how to get involved, wander over to the Help Portrait website and see what you can do.

Focus and re-focus after the event with Lytro

I get asked what I think the next big thing in photography will be, or what direction technology will take, quite a bit. It’s one of those things that you can’t really answer. Not until you’re actually living in that imagined future does it seem possible. So if you’d asked me a few years ago if a camera that would allow you to focus and re-focus your image as much as you wanted to after you’d captured it was on the cards, I’d've probably shrugged my shoulders. But it’s here now. It’s the Lytro.  

The idea behind the Lytro is that it captures all of the light rays in a given scene. According to Lytro, it captures a scene in four dimensions by recording the colour, intensity, and the direction of every ray of light that hits the light field sensor in the camera. And what does it do with all this information? It processes it using a light field engine so that you can re-focus pictures directly on the camera. If you want to share your images on-line, this light field engine will travel will them, allowing anyone to interact with them from any device, from mobile phones to desktop computers. No special software required.

I’ve had a play with some sample images: you click on the area where you want to focus and… tah-daa!… the focus will shift there in a second or so. It’s simple and quite good fun. You can mess around there, too.

Despite the technology involved, Lytro wants to keep their cameras sleek and simple. There are just two buttons on the camera – on/off and the shutter – and everything else is achieved through a touchscreen. As for the design, I can’t help but think it looks a bit like something I would’ve made using mirrors and cardboard when I was seven, but perhaps I was weirdly ahead of my time. Still, it’s small, light, and comes in blue, red, or graphite.

The lens has a constant aperture of f/2.0 and an 8× optical zoom. With no need to focus, it’s pretty speedy; and as it captures all of the available light in a scene, it should have pretty good low-light capability, too.

The Lytro comes in two sizes, an 8GB model in blue or graphite that stores 350 photos, or a 16GB version in red that holds 750 images. They cost $399 and $499 respectively. If you’re one of Lytro’s first customers, they'll provide you with free storage for your light field images uploaded to Lytro.com, too. They should be shipping come the new year.

You can learn more from Lytro.

AoP Awards winners

aopawards_photo_4col

In case you missed it, the Association of Photographers held their annual awards last week, which honours professional photographers and their work – both commissioned and non-commissioned – across genres including advertising, portraits, and editorial. So as to keep up with the changes that are being made to cameras, and specifically to cover video capability, the AoP introduced the Moving Image category this year, too.

Almost 3,000 images and videos were submitted by nearly 400 entrants. There were 17 ‘Best in Categories’ and three Gold awards. A few of them are here for your perusal. Enjoy!

Nick Meek – Best in Catergory and Gold winner for the Environment series

Allan Stone – Best in Category and Gold winner for the Object series

To take a look at the other winners, head over to the AoP Awards website!

(All images are, of course, copyright their respective photographers.)

Sony's range of video marketi... ahem... tutorials

Screen Shot 2011-08-11 at 14.31.57

Oh Sony, you get my hopes up, and then you dash them. Actually, you’ve done more than dash my hopes, you’ve disappointed me. I was so excited by the prospect of the Sony HowTo videos that you released today. People seem to love video tutorials and I really thought that you were on to a winner with your series of four minute shorts to help people get the most out of their cameras. ‘Aha!’ I naively thought, ‘Somewhere I can direct newbies to help them out a bit!’ But I’m hanging my head here.

You see, I don’t want to watch a four minute advertisement for a Sony product. And I can pretty much guarantee that people who already own the product – and are looking to make the most out of it – really don’t need any adverts for it. No, if I watch a four minute video called Learn to shoot in low light, I’m expecting a quick fire session in shutter speed, aperture, ISO, and the benefits of using a tripod. I don’t want to be preached at about the benefits of Sony lenses and sensors and the Auto HDR mode on some its cameras.

Get better results from your digital camera shows me how to shoot large or small resolution images, obviously on a Sony camera. Is that the best that you can manage in four minutes? Really?

There are more, but I can’t face wading through any more Sony adverts.

You’ve missed a trick here, Sony, and made fools of yourselves. Shame on you for calling them tutorial videos. That would be about helping people to become better photographers. These are self-promotional guff. Educate people for education’s sake, not for advertisement. It’ll serve you far, far better in the long run.

Camera remote hacking


I've written this caption four times, but every time it comes out like a cheap sex joke.

You may have heard about a little project I've been working on the past few months; it's an universal camera trigger that lets your camera trigger based on events; a sound, light, lasers, time-lapse photography (even non-linear timelapse photography), and any number of other things you could dream up.

screen_shot_2011_07_28_at_130524.jpgAs a part of this project, I've been spending way more time than what's healthy looking at camera remote control cables, and I've done a few cool hacks to them. Among other things, I've looked at how you can make your own camera connection leads. Making your own is the quickest way to create leads (well, after buying them from us directly, of course), it’s not always the best way to go about it.

Reducing waste

Why? Well, the problem is that many cameras use rather obscure plugs, and you can’t turn to Maplins or Radioshack to buy them. So, Unless you’re Triggertrap Megacorp and able to order them by the hundreds, for most of us, the only way to actually get your hands on the right connector lead for your camera, is to go online and buy a cheap knock-off remote control for your camera on eBay.

I always thought it was a bit of a waste to take a perfectly good remote control, lop off the remote control part, and only use the cable. So, that got me thinking: Is there a way to leave the remote control intact, but add a 3.5mm socket to the casing, so you can use it as a normal remote control, but so you can also connect the Triggertrap to it when you want to use it?

So basically, we're adding a remote control to your remote control? Well that makes sense. Let's do it.

Before we get started; Here’s how you recognise what camera remote you need, and there’s a list of cameras and their corresponding remotes as well.

Step 1

First of all, you need to source a 3.5mm jack socket. Technically, it's known as a 'Screened Chassis Socket'. Try Maplins or Radioshack, but they also show up on eBay from time to time.

Step 2

Get a remote control that fits your camera. This one is a MC-30 camera for Nikon cameras; but you can adapt most remote controls quite easily.

Step 3

When you look at the insides of these things, you realise why they're so cheap: But it works, which is the important part. Also, its simplicity means that it's easy to adapt to our needs. See that little space at the end of the metal parts? That's where we'll be installing our socket.

Step 4

There's three wires. From the top, they are Ground, Focus, and Shutter. Wanna know how I know that? A multimeter may have helped a little bit.

Step 5

To get the socket to fit in the confined space, I had to take off the little rear wing

Step 6

I didn't have a drill or my Dremel handy, so I used my soldering iron to burn a hole in the side of the remote. Highly not recommended, I probably shaved about 2 years off my life by breathing those fumes. Anything for a good blog post, eh?

Step 7

Everything soldered in place and the socket installed. Because the hole is small enough that the threading on the socket grips properly, I didn't need to put the flange back on the end (besides, the remote's walls were too thick to make it fit anyway). I'll have to be careful when inserting the mini jack so I don't use too much force, but so far it works fine.

Step 8

Voila! It's hardly the most beautiful DIY job in the world, but it does the trick.

Step 9

Step 10 – Enjoy the spoils of your endeavours!

Well will you look at that! It works!

Leica (not) in bed with Apple

leica-i9

So the internet has been a-twitter about the Black Design Associates concept which marries a Leica M9 with an Apple iPhone, creating the Leica I9 concept. The idea is that you’d use Leica optics and sensors, but your iPhone to control the camera.

It’s a pretty nifty idea, although chances of Leica going for anything like this are beyond slim – Leica tend to make cameras for the ages, and Apple aren’t known for their open standards: Nobody knows whether the iPhone 5 will have a shape (or connector) anything similar to the iPhone 4. Besides, it’s not like Leica to interface with anything.

Having said that, I do hope that someone, somewhere, decides to make one of these cameras – the screen on the iPhone 4 is legendary, and slotting it into a dozen-megapixel camera with some decent optics would be hellatasty indeed. Something for Panasonic, perhaps? Do it!

More info on Engadget!

Film gets a look in at Sony World Photography Awards

IMG_1365

Although the shortlists for the Sony World Photography Awards have already been announced, there’s still one category for which entries haven’t yet closed. It’s the Moving Image Award, which was introduced this year in recognition of the awesome things people are doing with their cameras that moves beyond still images.

If you get your skates on, you can still submit an entry as the deadline is 1 March (but you do need to be an Advanced World Photography Organisation member). The judging panel will be looking for ‘…an approach that combines the unique strengths of the different media forms and brings them together in a powerful interpretation that goes beyond forms and into the realm of memorable and narrative experience.’ All in a three minute film.

Win that, and along with a shiny Sony NEX-VG10 Handycam you get to attend the awards ceremony at Odeon in Leicester Square on 27 April.

However, we, the general public (or at least a few of us who like photos and pictures and films and happen to know about the competition) get to form our own judging panel, too. We get to decide the People’s Choice award. (Somehow, the term ‘People’s Choice’ makes me think of megalithic supermarkets and bulk quantity dog food. But never mind.) The other judging panel, the one that selected the Overall Moving Image award, will shortlist a selection of films, and we can vote for our favourites on the WPO website. The winner of that one bags a Bloggie camera.

Want to know more? It’s all over on the WPO website.

Fisher Price's new kid-proof camera

Kid-Tough-See-Yourself-06

That I’m pretty much evangelical about kids using cameras is no secret. I’m always on the look out for cameras that I think are suitable for them and ideas that I think will get them hooked on photography. But, I’m not so enamoured by the idea of cameras designed specifically for children, much the same way that children’s menus in restaurants make me cringe. However, when I read about the new Kid-Tough See Yourself camera from Fisher Price, I was intrigued.

My interest definitely wasn’t piqued by its either garish (black and white) or insipid (pink and lilac) colour schemes, more because it has a rotating lens that allows kiddies to take pictures of themselves easily. Not that I want to encourage narcissism, but it seemed pretty nifty. Think about it this way: it might be the perfect solution when you want pictures of you and your friends on a messy, drunken night out: it’s tough, it’s durable, and you’ll be able to get everyone in the shot.

If you’re wondering about the camera’s spec, it has a 1.2 megapixel sensor, a 4x zoom, an SD card slot, and runs on four AA batteries. All for around $70.

(Headsup to Engadget, who have all the groovy pictures, too.)

When heads and cameras don't mix

bilal

In November, David wrote about Wafaa Bilal, the New York University lecturer who had a thumbnail-sized camera surgically installed into the back of his head. The idea was that it would snap one picture every minute for an entire year and the feed would be displayed in the Museum of Modern Art in Qatar. Except that Bilal’s body wasn’t too impressed by the foreign body stuck in his skull and rejected it.

Whatever the cocktail of steroids and anti-biotics that Bilal was taking, it couldn’t stop the implant from becoming unbearably painful. So out it came. Still, Bilal is planning on continuing with his experiment. He’s going to strap a camera to the back of his neck, instead.

I know that there’s this weird idea of suffering for art, but wouldn’t that have been the more sensible option in the first place?

(Headsup to Engadget.)

From found photographs to found cameras

ifoundyourcamera

Maybe you’ve been there before. You’re at a pub with some friends on a Saturday night. You’ve got your digital point-and-shoot camera in your pocket or bag, and as the beer starts to flow easier with each pint, you start snapping pictures like a twelve year old girl at a Justin Bieber concert.

But unlike the twelve year old, you’re completely obliterated. A few hours and eight tequila shots later, you stumble out onto the streets, leaving something behind on your barstool. It’s not that any of those 127 pictures you took that night are worth a damn, but still… you lost your camera and some memories of you and your friends in a drunken stupor. (Well, I guess they’re not really memories if you don’t remember them. Evidence, perhaps.)

In the past, you’d suck it up and deal with it. What else could you do but go and buy another camera? Well now, my friends, there’s hope. Two years ago, a Canadian guy, Matt Prepost, started a blog with the intention of reuniting lost cameras with their hopeless owners.

Finders of lost cameras can go to www.ifoundyourcamera.net and send in four or more photos taken from the memory card. Prepost will then upload the pictures along with details of where the camera was found in the hopes that its owner will visit the site and claim the camera.

Since its creation, the site has over 400 posts for lost cameras and has seen almost five million visitors. Cameras have been found and reported from California to Italy to Indonesia, and while only a few dozen have been claimed to this point, the site has potential to help reunite hundreds of camera owners with their long-lost photos.

Being a victim myself, I love the concept behind this site. However, my camera was stolen in Barcelona rather than being misplaced in a neighbourhood bar, so it’s highly improbable that the thief will be sending in my photos of a Cruzcampo-laden Carnival trip to Cádiz anytime soon. Jeez, come to think about it, do I even want to see those pictures, anyway?

The quiet revolution in photography

dynamic-range-thumb

Shutter speeds? Yaaawn. ISO speeds? Oh-god-not-again. Megapixels? Oh puh-bloody-lease, that’s so 2003. The newest frontier of digital photography is dynamic range – and it’s arguably the most exciting (r)evolution that’s happened in dSLR-world so far.

Interestingly, most manufacturers are continually improving the dynamic range of their cameras, but somehow seem to forget to tell us about it – which means that we’re witnessing – or should I say not witnessing – a quiet revolution.

It seems as if ‘dynamic range’ gets forgotten in PR world, where a bigger screen, better battery life or Live View is an easier way of getting regular consumers exited. The real technological leaps have been happening under the bonnet, though, and the result of the ongoing improvements will mean that your next camera will be significantly better than your current one – but you wouldn’t be able to tell from just reading its specification sheet.

So, why, exactly does this make a difference to us as photographers? All will be revealed… 

Is this the same as HDR?

Well, we’re still talking about ‘Dynamic Range’, and higher-dynamic-range-than-before at that, but when people are usually talking about ‘HDR’, they mean multi-shot HDR photography, which we covered thoroughly a few weeks back.

Multi-shot HDR is very exciting stuff, and it’s a taste of what is to come, but this time around, we’re talking about single-shot HDR photography and how cameras have been steadily improving over the years.

The improvements have happened so slowly, it seems, that nobody has really noticed – but grab a 5 year old dSLR and compare it to a current-day snapper, and the biggest difference in picture comes from the dynamic range.

Whatevz, can we start from the the beginning, please? What is dynamic range?

The human senses have an absolutely incredible dynamic range – think about it: when you’re inside a concert venue at a rock gig, you can hear every note and enjoy every instrument.

When you’re in a quiet room, you can hear water flowing through your radiator heater, and the extremely faint buzzing of the phone charger is loud enough to notice. More incredibly still, you can keep a conversation going with someone in the next seat while the jet you are sitting in is taking off, which is a testament to the width of dynamic range which is possible – although that particular example has more to do with psycho-acoustics than your ears themselves.

If you thought your hearing was amazing, well, your eyes are even more incredible. On a bright day, you can see perfectly, but you can also see things by moon- and starlight on a clear night. Not impressed? Try taking a photograph or do some filming by starlight without using a tripod…

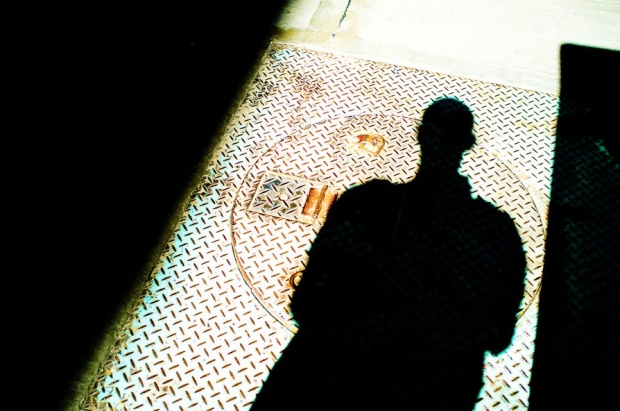
Now, these examples of your eyes’ dynamic range come with a caveat – you cannot stand in a dark room and look out into a sunny landscape and see both perfectly – you’ll either be able to see the indoors, or the outside, with the other being over- or under- exposed, respectively. For photography purposes, the important thing is how much dynamic range you can see simultaneously.

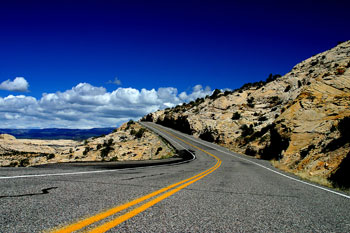
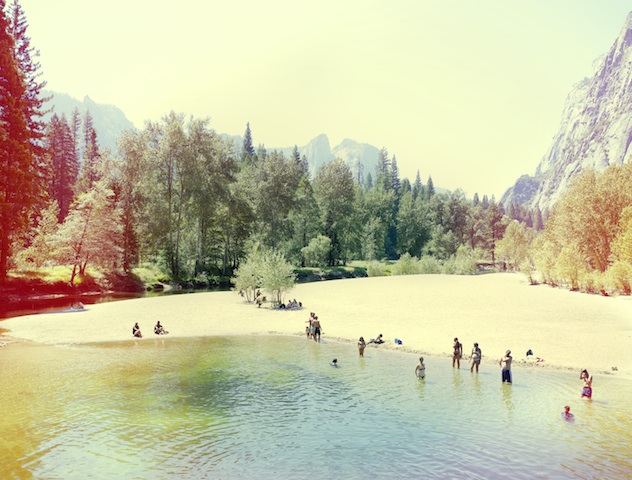
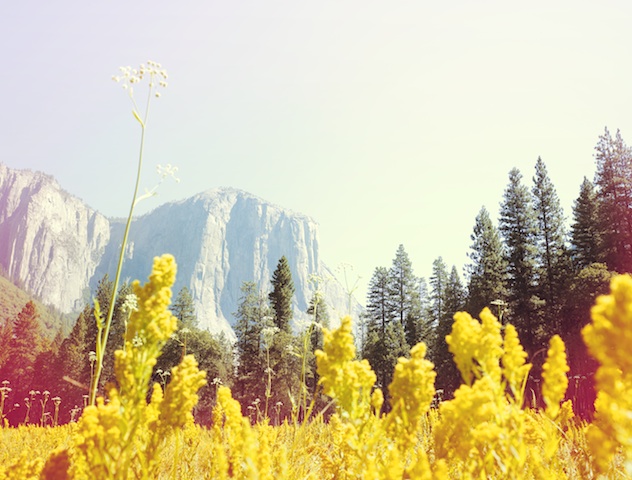
Allow me to illustrate: Take a landscape photo where the clouds are nearly over-exposed. The dynamic range of the particular imaging-chip you’ve got, decides how much details you get in the darker parties of the image. The higher dynamic range, the more shadow-details you can expect.

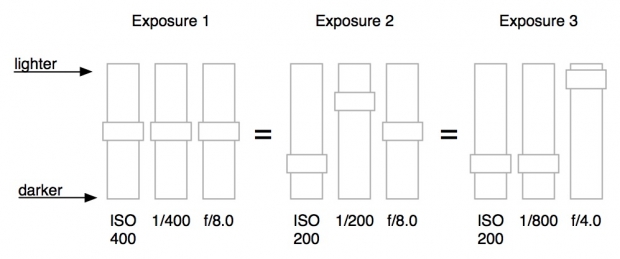
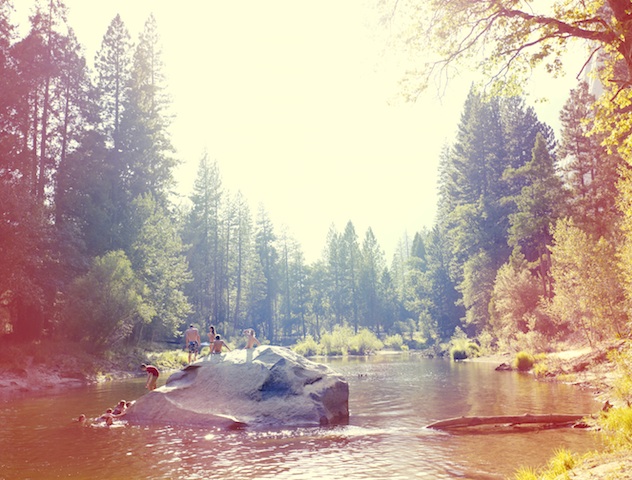
A theoretical camera with perfect dynamic range wouldn’t need shutter speeds – you would select an aperture to get your depth of field, and you could select any shutter speed you need. The sun would have texture, and the deepest, darkest shadow parties of your image would still have detail in them, too. Of course, perfect dynamic range is impossible (for now…) but that doesn’t mean that increasing dynamic range isn’t a great thing…

Riveting, I’m sure. But is it really that different from 5 years ago?

Back when I first started taking digital photographs in the mid-1990s (I know, we still listened to The Cardigans, Tracey Bonham, Marcy Playground and Tonic…) and I did some playing about with shooting in RAW format, comparing it to just using the JPEGs straight out of the camera. Back then, I decided that RAW was a complete waste of expensive memory stick space, because it was nigh-on impossible to spot the difference. I didn’t know why that was the case back then, but I think the answer is pretty clear right now: The dynamic range of 8-bit JPEG photographs was, in fact, pretty similar to that of the imaging sensor inside the camera.

A couple of years ago, I believe when I got the then-brand-new-on-the-market Canon EOS 20D, I decided to switch to RAW. I spotted that the quality was better than with JPEG, and I stuck with it. Mostly, I did it because I could never quite get the white balance right, and with RAW, you defer the decision until you’re at your computer, which always suited me quite well.

More recently, I upgraded again, this time to a Canon EOS 450D, and the difference is quite noticeable – right from the start, I felt that the 450D was taking better photos than my old 30D, but I was struggling to figure out why. Ignoring the resolution (the 30D delivers 8.2mpx files, whereas the 450D has a slightly smaller imaging chip, but saves 12.2 mpx files to the memory card), the 30D is a better camera in all possible ways: Better top ISO, faster top shutter speed, better autofocus, quicker continuous drive, magnesium body, and so on and so forth. Nonetheless, I swear I was getting better photos with the 450D than with the 30D, on quite a consistent basis.

Then, finally, a few days ago, the penny dropped. I did some test shots on my 450D, setting it to shoot JPEGs, and then some more shooting RAW. The difference was vast – by using Photoshop’s built-in RAW editing tool, I was able to pull incredible amounts of extra information out of the RAW images from the 450D, compared to the ones from my 30D.

Now, add to that the fact that the Canon EOS 450D is Canon’s entry-level digital SLR, and that Canon’s R&D department haven’t been twiddling their thumbs in the meantime either – but as always, they save the best goodies for the people who cough up serious cash for the more hard-core semi-pro and professional lines of cameras.

I haven’t had a chance to have a go myself yet, but it’s rumoured from various fora that the Canon EOS 5D mk2′s RAW files (in addition to being full-frame and significantly higher resolution) have a 15-bit dynamic range which is completely out of this world.

What’s in it for me? How does this mumbo-jumbo make my photos better?

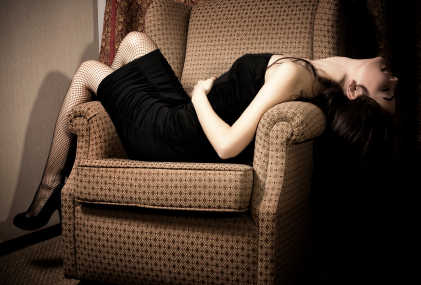
Much in the same way as how tastefully done multi-shot HDR photographs can look realistic and fantastic at the same time, single-shot HDR photographs can do a lot of good for you as a photographer.

Already, photographers all over are shooting in RAW instead of JPEG, because they’ve noticed that it’s a Better Thing – but only rarely do people stop to think why that might be. The reasons are above: you simply gain a lot more flexibility by having a higher dynamic range to play with, than if you limit yourself to the 8-bit limit of JPEG.

This extra flexibility isn’t just camera geekery either: It’s extra raw data in your photograph which you can genuinely use to deliver better final photographs. When I’m out taking photos in difficult lighting situations (such as dancing, concert photography or similar), I now routinely dial back the exposure by a full stop.

Yes, I know that it means that I lose some data in the top end, but because I’m shooting in RAW, I get away with it: The software will save me, and, more importantly, I can get a full stop faster shutter speed. When you’re out taking photos at a concert, the difference between 1/60th of a second and 1/100th are significant.

It isn’t just in poor light that the benefits are obvious, however – In fact, I can’t think of a single genre of photography where extra flexibility isn’t a good thing.

Look at it this way: If you go on holiday and bring two sweaters, you can always choose to wear the thick one or the thin one; when you’re shooting in RAW, you can always decide to go with the suggested automatic choices, and at worst you’ll have lost a few megabytes of storage space for a few hours (or days, or weeks, depending on how long you keep your photos on your camera), but seeing how cheap memory cards are these days, that’s hardly a huge problem – the extra flexibility is there when you need it, and it’s better to throw away data when you don’t need it, than to wish you had more when you don’t.

OK, I’m convinced, how can I join the fun?

So, how can you gain from all this extra goodness already? Easy – just set your camera to RAW. Stop reading right now, and set your camera to RAW. Yes, you. Yes, now. Then experiment. See how much your photos allow themselves to be tweaked without losing significant quality in the process.

What’s coming up in the future?

Frankly, I think digital SLR cameras can only go in one direction.

We already have higher resolutions than we know what to do with (I stick to my opinion that we never needed more than 6 megapixels, although it’s nice to be able to crop your images when needed without quality loss), and the top professional cameras are currently better, both in terms of dynamic range and resolution, than the top film-based SLR cameras ever were (and are rapidly closing in on medium format film cameras), and there are DSLR cameras that can film in full 1080p high definition video.

The way forward, is that dSLRs drop further in price, as the components that go into them get cheaper, and people get bored of the megapixel race. Canon, Nikon, if you’re listening, start selling a $200 8-megapixel sub-entry-level, and you’ll make enough money on the licensing of your lens mounts to make up for the loss in body sales; much like the way printer manufacturers (including Canon, interestingly), sell cheap printers with expensive ink refills.

The other boundary that needs to be pushed is dynamic range – I want a camera with completely ridiculous dynamic range, please, and I don’t mind if I have to sacrifice a bit of resolution or ISO speed to get there either. 20 bits worth would be nice. 24 bits if I can get it, so the dynamic range of my camera matches that of my screen.

Having such a camera means that I can become sloppy, but I can still rescue any photo unless I really balls it up. More importantly, however, it’ll allow me to do stunning HDR photos in a single click of the shutter. And, finally, it’ll be the last nail in the celluloid for those poor sods who still hang on to their film with a desperation which is inversely proportional to their dignity – and directly proportional to the grin on my face.

But seriously – start using RAW now, you might be amazed at how good your camera really is.