photograph

Hallelujah! Guidance for security guards when it comes to photographers

Screen Shot 2011-11-04 at 15.23.17

It’s taken bloody long enough and has come at the expense of dads being told that they can’t take photos of their kids in shopping centres, but finally there is some guidance for jumped-up heavies in uniforms who pass for security guards on what they can and cannot say and do to photographers. It’s the result of some pretty lengthy discussions that involved the Home Office, the British Security Industry Authority (BSIA), and photographers’ representatives such as Amateur Photographer and SceneThat. But by Juno, I’ve read it and it’s clear and reinforces some important points that we’ve been trying to teach them for a while now.

As far as I’m concerned, these are the edited highlights. You can go peruse the rest of the document – and it’s only four pages long – on the BSIA website.

  • The size and type of cameras are not, in themselves, indications of suspicious behaviour. Large cameras, lenses and tripods should therefore not be viewed as being more suspicious than other types of equipment.
  • If an individual is in a public place photographing or filming a private building, security guards have no right to prevent the individual from taking photographs.
  • Security guards cannot delete images or seize cameras, nor can they obstruct individuals from taking photographs.
  • Members of the public and the media do not need a permit to film or photograph in public places. This includes where an individual is in a public place but taking a photograph or film of a private building.

There is more, but this alone should help photographers reinforce that they’re not terrorists and by taking a photo, they’re not breaking the law or doing anything that’s otherwise nefarious. I think I’ll print out a copy and keep it in my camera bag.

Camera Exotica: the Pellicle mirror


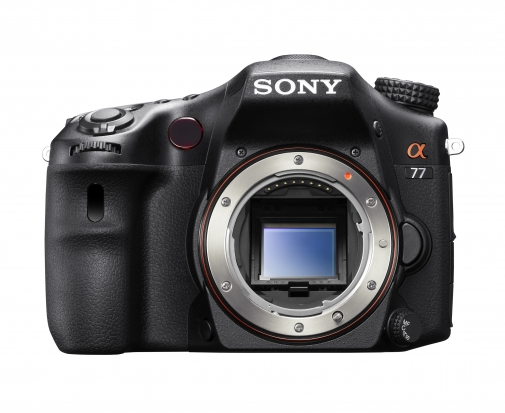
Sony's new Alpha SLT 77 uses ancient tech in a new way. Nifty stuff.

A pellicle mirror is a semi-translucent mirror used in a few very rare and far-between cameras - until recently, when Sony re-introduced the technology in a few of their compact system cameras. So why are Sony reaching into photography history to make new cameras?

Let's take a look at the technology...

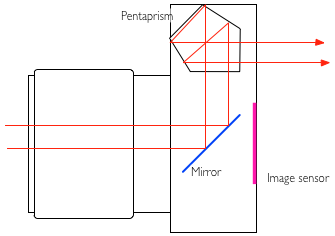
The idea of a pellicle mirror is that it takes the place of a moveable SLR mirror. In traditional SLR cameras, the tech looks something like this:

penta_1.png

The lens focuses the image and flips it upside-down in the process. It then reflects off the mirror, into the pentaprism. The pentaprism flips the image rightside-up again, so you're looking at the world as you're used to seeing it.

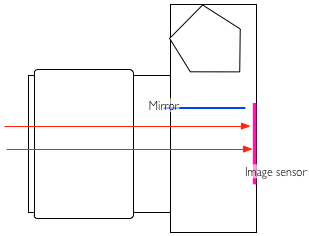
When you are taking a photo, the mirror flips out of the way, so the light reaches the sensor, enabling you to take your photograph:

penta_2.png

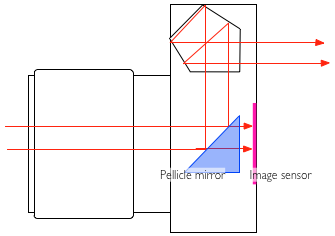
A pellicle mirror does things differently; it is, in fact, a semi-translucent mirror, which lets some light through to the imaging sensor, and some light through to whatever else needs to see the light: In Pellicle mirror SLR cameras, it sends part of the light into the pentaprism so you can view it through the viewfinder:

penta_3.png

Why use a pellicle mirror?

The advantages of using a pellicle mirror are many: The viewfinder never goes dark, so you can see what happens all the time. There's no mirror slap - this is good for macro photography, where even the slightest shake of the camera can cause a blurred image - and it makes the camera significantly quieter as well.

Finally, back when pellicle mirrors were first introduced back in 1965, it was the only way to get high-speed photography done, enabling pictures to be taken at a faster continuous rate. Why? well, because the mirror does not have to go up and down for every image.

The EOS 1N RS (RS stands for Rapid Shooting), for example, can take 10 pictures every second

There are a few disadvantages to using a pellicle mirror - traditionally, pellicle mirrors caused about a 1/3 stop of light loss. (Some light has to go to the viewfinder). In addition,   The mirror has to be kept perfectly clean, or else the light sensor and other electronics (as well as the image quality, obviously) will suffer, but cleaning a pellicle mirror is a bit of a specialised job.

The reason why a pellicle mirror has to be kept so much cleaner than a 'normal' mirror, is that a normal mirror isn't part of the optical path to the film or sensor: If you have a dirty mirror in your SLR, that's annoying when you're using your viewfinder, but it flips out of the way before a photo is taken, which means that it doesn't really matter. In addition, when you change lenses, the mirror offers a little bit of protection for the shutters whilst the innards are exposed. On a pellicle-mirror camera, what you see is what you get: It's the front-most element of the camera, and if it gets dirty, your images will degrade in quality.

Pellicle mirrors have been used in the Canon Pellix QL (1965), the Canon F-1 High Speed (a limited edition camera introduced for the 1972 Olympics), the Canon EOS RT (1989), and the Canon EOS 1N RS (1994). On the Nikon side, pellicle mirrors were used in the Nikon F2 HS and the Nikon F3 HS; the latter was introduced for the 1998 Nagano Olympics.

Pellicle mirrors in the digital age

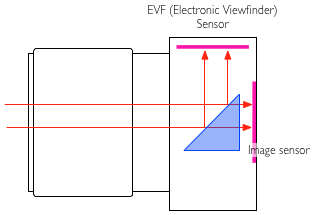
Sony have re-embraced the technology in a couple of new launches, including the top-of-the-line Sony SLT Alpha 77, and the Sony SLT Alpha 65:

penta_4.png

The advantages of using a pellicle mirror in this case are many; Using the image sensor for the EVF causes it to slowly heat up, which degrades image quality through the addition of extra noise. By using a dedicated (presumably lower-power-consumption) secondary sensor for the image preview, you can get better battery life, and higher quality photographs to boot.


Why Projects are Good for You

An image from the early stages of a project I'm working on, looking at possessions.

Do you sometimes feel like you’re snapping away aimlessly, fluttering from one photographic subject to another with no rhyme or reason, like some sort of gormless butterfly? Do you feel like you’re at saturation point with your usual subject matter? Have you said to yourself recently “oh look, a lovely sunset. I should get my camera out really, but…meh”? This is, in some ways, a good sign. You’re not content with just taking a photograph, you want more out of your end product. What you need, my disillusioned friend, is a project.

Projects are hard. You have to come up with an interesting theme with an element of originality, work out what form it’ll take, ideally write a project statement and then figure out how it’ll all come together once it’s finished. It’s a long term, complicated process. Which is why it’s very good for your photography. Now I don’t claim to be Mr Project who lives at Project House, Project Lane, Lower Project, Projectsville, Projectstershire but I thought I’d offer a little advice to get you started on and excited about project work. Let’s look at a few key elements that should factor into your project, whatever if may be.

An image from the early stages of a project I'm working on, looking at possessions.

Shoot What Interests You

The well known saying “write what you know” holds a lot of truth. If you write about something that you know about, you do so from an informed standpoint. Writing about an area in which you are knowledgeable gives you a solid foundation from which to create something entertaining and artistic. With photography, it’s slightly different. Rather than just shooting what you know, you should shoot what interests you. Even if you’re au fait with the subject matter, if the subject doesn’t interest you, the work is likely to lack that passion which, in my opinion, is an essential ingredient for creating a piece of work that has real artistic value.

With writing, you can break the “write what you know” rule in a way, but not properly. You may wish to write about something that you know little or nothing about but are interested in: this is still possible but first you must research the subject in some way. Therefore, you can never truly write about something you don’t know about. With photography, you have the freedom to shoot something you are not familiar with. A perfect example of this is the British photographer Leo Maguire, who has spent four years entering and documenting the lives of two families from the Irish traveller and Romany gypsy communities. The subject interested him, yet he knew nothing about it. This is the advantage we have as photographers. Whatever you shoot, be sure that you genuinely care about it.

Have A Plan

So you know what you want to shoot, now you need to think about how you’re going to shoot it. For the sake of example, let’s say you have an unhealthy interest in apples (is that possible, given their inherently healthy nature?) and want to create a project around apples. Apples is the project for you, you appley weirdo. You need to consider a number of factors – will you be shooting all the different kinds of apples you can find? Will you be documenting the journey of an apple from being picked to ending up on a supermarket shelf?

Those are the only two things I can think of for apples, probably because I don’t care enough about apples.

Then you need to think about the overall structure and presentation of your final project. If you’re just shooting apples and the different varieties you can eat, you may want to take each individual apple, set up a mini studio with clean, white light, take a shot of the whole apple, cut it neatly in half, take another shot, turn the pieces over, take another, get in close for that essential pip detail, take another. Then you’ll want to put those four images into a 2X2 square format, mounted into a frame, and entitle it “#12 – Braeburn, 18th August 2011″. Maybe if you’re following the life of an apple, you’ll want to order your final images into a sensible, chronological order, then turn them into a photobook, sprinkled with facts about apple production and quotes from people involved in the process.

Why am I talking about apples so much?

The point I’m making is if you have an idea of how the finished piece will look in your mind’s eye before you begin, it will help the final project look more cohesive and connected. Also, knowing what form you want your end product will take means you will shoot accordingly, in a fashion that will suit the layout, media and presentation you have in mind for the final piece.

Be Efficient: Set Targets

This one is very important. Simply put, make it like a homework project. If you don’t set yourself targets and goals, you’ll never actually get it finished. Going back to the apples (I’m committed now), it might be “photograph and post-process two apple types a week” or “have 30 apple types photographed and ready to be printed by the 1st of September”. It doesn’t matter too much exactly what your targets are, just set a goal that is quantifiable in some way.

Be flexible - the initial layout of these pieces was significantly different to their current form.

Be Flexible

Once you’ve got the wheels in motion, you may find that there are elements of the project that you don’t like, don’t work or don’t excite you. This can happen to you at any time. You need to be prepared to change things, to cut things and to rethink things. This may feel frustrating at first, but think of it as a natural evolution of the project. If, halfway through your freaky apple project you think “What in the Jimmy Cricket am I doing, photographing apples all the time?! Pears are my one true passion!” then go ahead and restart your project using pears. More sensibly, if the 2X2 format looks boring to you, evolve it and make it 3X3, or a single, ultra high detail single photo of an apple exploded into several sections.

When I wrote that last sentence I meant the photo exploded into sections, not the apple, but now I’m thinking it would be more interesting to explode the apple. Heck, let’s have two images in a diptych format: one of a pristine, perfect Golden Delicious and one of that same apple smashed up all over the clean, white studio background. See what happened in those last few sentences? That’s the evolution of an idea. By remaining flexible we’re now on our way to a much more interesting, artistically valuable project.

Projects are Good for You

Projects are good for you because they teach you form, discipline and planning. Not only that, but photography comes into its own once you start creating images that are relevant to each other. A strong photo series can be an exciting journey – a story can be told, a theme runs through that can be followed, understood, appreciated and enjoyed. If a picture is worth a thousand words, a project is worth ten thousand. Finally, projects are good for you because they should make you think more deeply about every aspect of your photography, which means that your work will improve substantially. Don’t worry too much if your project isn’t too original at first, just getting into the habit and the process of creating and completing a project is more important. Plus, it’s incredibly fun and will refresh your enthusiasm for photography.

(How do you tell if a butterfly’s gormless?)
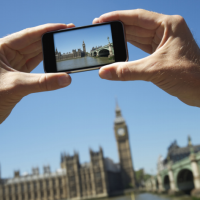
Looking death in the eye


Which photos are suitable for publication? And which aren't?

When the news broke that Osama bin Laden had been killed in a raid on a complex in Abbottabad, Pakistan, by a crack team of US Navy Seals, there seemed to be two main questions: one, how on earth had the Pakistani authorities not noticed his presence; and two, when would the White House release photographic evidence of bin Laden’s death?

I’m not going to speculate on the issue of the Pakistani intelligence service. This is a photography news site, after all. (Although it is always worth remembering that one of safest places to hide anything is in plain sight.) But I followed with interest the unfolding saga of the images, from the fakes to those of other people killed in the raid. Initially, my opinions were on the ambivalent side of ‘they probably shouldn’t release a photo of his body’. But they gradually began to solidify into a more definite, ‘no, they really shouldn’t’.

I recalled the furore, and indeed my own sense of disgust, when images of Saddam Hussein’s sons’ battered faces were splashed across newspapers in July 2003. The release of those photographs was intended to reassure those who were nervous or to prove to those who were sceptical that they really had been taken out. But those images either didn’t or didn’t need to prove anything. People who were fearful would not feel safe until they actually were safe; people who were sceptical would remain so, picture or not.

Now, as then, the rhetoric remains the same. A photograph of bin Laden’s body will not satisfy anyone who doubts that he really is gone; there is enough distrust in the motives and the modus operandi of the White House administration to render a photograph very flimsy evidence indeed. For anyone who does believe that he’s gone, a picture is hardly a necessity. But the significance of whether bin Laden is gone or not doesn’t rest in a photograph; it’s in the consequences of the operation, and how people react to it.

The more that I thought about it, the more that I could only see an image of bin Laden’s body becoming a grotesque and vaunted hunting trophy. This is not what evidence is supposed to be and the degradation of another human being to that extent seeks only to brutalise us as people; it takes us a long way from justice.

No, that image was best kept under wraps.

Then something happened yesterday that made me see things from a different, and more intense, perspective. Wouter Weylandt, a Belgian professional cyclist who rode for the Leopard-Trek team was killed on the descent of the Passo del Bocco in the Giro d’Italia. According to the reports, it was an horrific crash that shattered his skull even with the protection of a helmet. And out of respect for his loved ones, the specialist press and quite a few of the major news outlets aren’t carrying photos of the crash. Try Cycling News; try Cycling Weekly; try the BBC; try even Reuters. Yes, that very Reuters that bayed for pictures of bin Laden’s body and showed images of the other men shot in the Abbottabad compound.

From a news perspective, these are two very different scenarios. We are comparing the death of the man dubbed the world’s most wanted with that of a 26 year old sportsman. They are universes apart in terms of international impact. Yet they have their similarities, too.

Aren’t they both some mother’s son?

Dehumanising bin Laden might, somehow, enable us to rationalise his actions and his ideology, but he didn’t spring fully formed from the whirlwind of Eris. No, he was flesh, and blood, and bone, and he had a family. Regardless of how I view bin Laden and his contempt for human life and dignity, I’m struggling to justify treating his family any differently from that of Weylandt’s. He chose his career path, a high-risk one of brutality, destruction, and grief with the potential of a savage end; but his family did not. However you choose to interpret bin Laden’s death – a gross violation of political sovereignty and a political assassination, or a valiant act of redemption – his family does not deserve to suffer the indignity and humiliation of seeing their son’s, brother’s, or father’s bloodied and broken corpse spattered across every newspaper and screen on the globe.

Weylandt knew the risks of his profession; cycling, just like a lot of other sports, is a dangerous business. He met a tragic and untimely end doing what he loved and in the knowledge that it might just possibly turn out that way. Yet the press has thought better than to make his family deal with shocking and distressing images of the crash whilst they’re wading through torrents of catastrophic emotions.

The goalposts appear to be different here and I’m not sure if the choices of individuals can justify such disparate approaches when it concerns the treatment of their families. No one exists in isolation, and we, as photographers, should be aware of the bigger picture.

Very little in life, or in death, is governed by absolutes. To say that no images of death should ever be published would be a foolhardy statement; we would be setting ourselves up for a monumental fall there. But I am convinced that we should always default to a position of restraint and respect, if not for the subject of the image then at least for those with whom she or he shared a life. Humanity will thank us for it.

It's Just Not Cricket. Oh Wait, Yes It Is.

scott-barbour-winner

At the end of last year, we looked at the announcement of the Cricket Photograph of the Year Competition. Entrants were allowed to submit up to three images that were linked to cricket in some way. Needless to say, I was furious to discover that my photo of a box of crickets didn’t even get a look in.

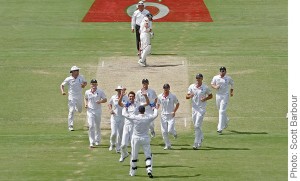
Eleven images were shortlisted, with one winner being announced (pictured here, image by Scott Barbour). Go and have a quick peek at the eleven finalists on the Lord’s website.

Now if you’ll excuse me, I just have to run out. Run out? Geddit? Sorry.

The winning image, taken by Scott Barbour.

December photo competition winner!

Champagne copy

Christmas might’ve been and gone, and New Year possibly passed in a haze, but there is yet more celebrating to be done as we announce the winner of our December photo competition. Throughout December, we were looking for a portrait that made us go ‘Ooh!’ You rose to the challenge admirably, and as the entries began to roll in, we began to wonder how we would ever choose a winner.

I’m not sure that either of us has recovered yet from the exertion that was required in judging. There was a lot of uhm-ing, ahh-ing, and ooh-ing. We did, however, manage to select a winning photograph.

Untitled, by Patrick Lecuyer

Many congratulations! It was the eyes that did it for me. Please do get in touch with me Patrick so that I can arrange delivery of your prize.

Please do take a look at all the entries, which are here, and we look forward to lots of entries in January’s competition, which we’ll announce shortly.

Veolia Environnement Wildlife Photographer of the Year

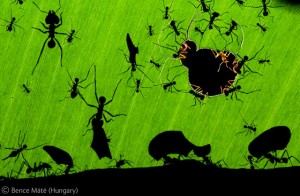
A Marvel of Ants, by Bence Máté

The winners of the Wildlife Photographer of the Year competition have just been announced, and boy are there some cracking photos on display. You’d hope so, as well, knowing that the winner was bitten all over by chiggers when getting his shot, one guy lost his camera to a polar bear, and another had to avoid being chomped on by a caiman!

Last year’s competition might’ve been bathed in scandal, as it emerged that the winner’s photograph of a wolf wasn’t quite as authentic as he’d claimed, but that didn’t deter the entrants (or the organisers) this year. If anything, it made them up their game and submit some eye-watering images.

A Marvel of Ants, by Bence Máté

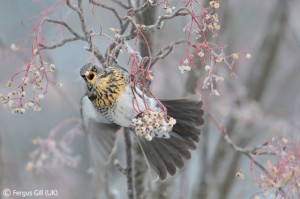
The overall winner was Bence Máté, with his picture of leaf-cutter ants doing their thing in a rain forest in Costa Rica. The Young Photographer prize went to Fergus Gill, for a glorious shot of a fieldfare feeding on a frozen Rowan tree.

The Frozen Moment, by Fergus Gill

The exhibition of the winning and commended photographs opens at the Natural History Museum in London tomorrow. But if you can’t make it there, then spend a while wandering through the online gallery. It’s all worth a look, but I’d especially recommend the young people’s photos.

The Wildlife Photographer of the Year exhibition runs from 22 October 2010 to 11 March 2011 at the Natural History Museum, Cromwell Road, London, SW7 5BD, UK.

Pictures in the park

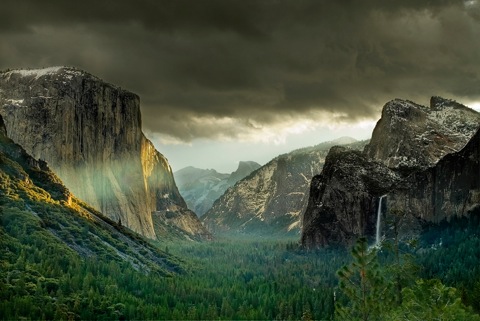
Picture 3

It might be cutting it a bit fine, but if you’re an American resident and you’ve a stunning picture taken in just about any park, or at a National Monument, in America you’ve still time to enter into the Canon Photography in the Parks competition. There are some rather cool prizes up for grabs, too.

It’s free to enter, and you can submit photos until 30 September 2010. There are two categories, one for entrants aged 13 to 17 and another for those aged 18 or over. You never know, you could walk away with a new Canon 5D Mark II, or a Pixma Pro9500 Mark II printer, or a trip for two to a national or state park.

And to inspire you, here’s the photograph that took the grand prize in the 2009 Teen Contest: First Ray, by Chikku Baiju.

First Ray, by Chikku Baiju, winner of the 2009 Teen Contest Grand Prize

Other 2009 winning entries can be seen here, whilst far more details, including The Rules, are available from Photography in the Parks.

PhotoEngine: edit in real-time

Oloneo

If you’ve ever wanted to turn off or dim a light in a photograph after you’ve taken it, or if you’d like to be able to adjust exposure as if you were still behind the lens but aren’t, then the people over at Oloneo might have just the piece of HDR software for you. What’s more, it makes the adjustments in real-time.

PhotoEngine allows you to alter the lighting in your pictures, for example to switch on or off light sources or adjust their white balance. It also gives you the capacity to recover details lost to over-exposure, or to restore areas that have been under-exposed. And there’s a noise reduction tool, too.

PhotoEngine is still in Beta and is only available for Windows, but you can learn more about it and download it for free from Oloneo.

Lens Cloth of Rights

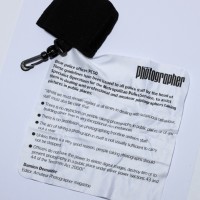
AP Lens Cloth

One day, the British police might get the hang of what it is that photographers can and cannot do in public places, and stop telling us that we can’t take pictures because it contravenes the Terrorism Act 2000. Until then, how about a handy-dandy lens cloth which sets out your rights as a photographer on it?

If you pick up a copy of Amateur Photographer on Tuesday 6 July, you’ll also get a free lens cloth that states, very clearly, what you are allowed to do — or even what the police aren’t allowed to do — if you are taking pictures when out and about. There are five points, and they were issued by no less than the Assistant Commissioner of Specialist Operations at the Metropolitan Police Service as the guidance for dealing with professional and amateur photographers in public places. Doesn’t get clearer than that, really, does it?

And just for completeness, or if you’d like to print off the guidance, laminate it, and keep it with your camera, here’s a recap of what it says:

  • there is no restriction on people taking photographs in public places or of any building other than in very exceptional circumstances
  • there is no prohibition on photographing front-line uniform staff
  • the act of taking a photograph in itself is not usually sufficient to carry out a stop
  • unless there is a very good reason, people taking photographs should not be stopped
  • officers do not have the power to delete digital images, destroy film or to prevent photography in a public place under either power (Sections 43 and 44 of the Terrorism Act 2000).

Of course, this doesn’t apply if you’re outside Britain, but these links might be useful if you’re in Australia, Canada, New Zealand, or the United States.

Happy snapping!

Learning by example

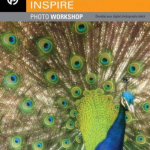
Photos that Inspire is one of the few books I'm aware of that goes into detail about the individual photos, with how, why, where and when they were taken - perfect to start learning

Some people learn best when they start at the basics: This is a camera. Press this button to make it go ‘click’, and it takes a picture. Change the aperture to… etc. Me, I like to work the other way around – I learned a long time ago that photography – like computers, cars, etc – is interesting mostly for its results, rather than for its technology. Who cares if your camera can do 1/4,000 second or 1/12,000 second shutter times… Unless, of course, you need the faster shutter time to achieve something.  


Learning by example, then, is the act of starting at the other end of the learning process: Find a photograph you like, or come up with a crazy idea, and then start stepping backwards: What do I need to do to create the photograph I have seen / imagined / come up with.

What’s the point?

Boats on Ha Long Bay in Vietnam. Taken with a Canon Digital IXUS at ISO 200, f/8 and 1/30 second exposure, at widest possible zoom

Boats on Ha Long Bay in Vietnam. Taken with a Canon Digital IXUS at ISO 200, f/8 and 1/30 second exposure, at widest possible zoom

The interesting thing of learning by example is that there’s a pretty good chance you miss whole fields of photography. If ISO or lens length isn’t relevant to the shots you’re taking, you’ll never have to learn them… It’s kind of like mathematics: I could never wrap my head around calculus. Not because I don’t have the brain capacity (or, at least, I would like to think), but because I never saw the point. Just like I never saw the point of geometry, until someone managed to bring it to life by explaining how I could apply it to my life – suddenly, I had a need for a bit of knowledge, so I went out to acquire the necessary information and understanding, and was able to do the calculations I needed.

I’m a strong believer in doing the same thing with photography: If you don’t think you need something, well, you probably don’t. You’ll eventually find out that the techniques you’re using at the moment are limiting you – or making the things you’re trying to achieve more difficult – but that’ll be new motivation to learn something new again.

So, how do you do it?

My sister in Vietnam. Taken at ISO 100 with a 50mm f/1.4 prime lens stopped wide open, aperture mode. Shutter time was whatever the camera suggested. Slightly desaturated the RAW file to get a more timeless feel

My sister in Vietnam. Taken at ISO 100 with a 50mm f/1.4 prime lens stopped wide open, aperture mode. Shutter time was whatever the camera suggested. Slightly desaturated the RAW file to get a more timeless 'feel'

Well, it’s easy: Find a source of inspiration. Personally, I use all sorts of sources: Magazines are a great starting point (especially amateur photography magazines like Digital Camera Magazine or similar – also check out PhotoRadar). Flickr, of course, is a marvellous source as well. The problem with on-line, however, is the nature of computer screens. Call me old-fashioned, but I really prefer the high-resolution way of looking at photography: Prints, books, magazines, etc.

The other problem is that, even on Flickr, not that many photographers take you through their way of thinking, or their technique for getting the shot (I love the idea of the How I Took It group, but so far, only 22 photos have been posted, which seems like a huge shame). Luckily, you can often ask questions, and many are good enough to help you along, but that’s still not an ideal way of getting tucked in. (Of course, I’m also guilty of this, but if you find any photos in my photo stream which you’d like explained and deconstructed, I’d be more than happy to – leave a comment and I’ll dig out the info!)

Using books for inspiration

Photos that Inspire is one of the few books I'm aware of that goes into detail about the individual photos, with how, why, where and when they were taken - perfect to start learning

Photos that Inspire is one of the few books I'm aware of that goes into detail about the individual photos, with how, why, where and when they were taken - perfect to start learning

There are a lot of fantastic photography books out there, but many of them are by a single photographer – the problem with that is that they have only a limited number of styles, and most of them say nothing about how the photos were taken – you’re expected to enjoy them as art, rather than as part of a learning experience. As you get better, this is a sensible approach, but when you’re starting out, it can be mighty frustrating.

The best one I’ve found that does things a little differently is Photos that Inspire (Amazon US / Amazon UK) is in the same series as my macro book – the Photo Workshop series published by Wiley – and it’s a peach.

For one thing, it has a couple of my photos in there (which obviously makes it a much better book already) but the important bit is that it contains tons of photographs taken by professional photographers – who explain why and how the shots were taken. It’s like a small art gallery with a personal guide by each of the individual photographers – and a fantastic place to start learning, of course.

How do you learn?

So, that’s my take on it – How do you prefer to learn about photography? Where do you get your inspiration? There’s a comment box down there somewhere…


Do you enjoy a smattering of random photography links? Well, squire, I welcome thee to join me on Twitter -

© Kamps Consulting Ltd. This article is licenced for use on Pixiq only. Please do not reproduce wholly or in part without a license. More info.

Front focus? Back focus?

Many of us trust our autofocus implicitly – because it’s just one less thing to worry about, really. But what when the lens starts to do weird stuff? My mate Chris over at DSLR Blog has the skinny…

If you auto-focus on an object the camera will attempt to fix the focus at the correct distance between the camera and the object.

Front focusing is when this calculation goes wrong and it focuses before the object, back focusing is where it incorrectly focuses behind the object. Either way what you achieve is a photograph where the focus is in the wrong place making your object blurred or soft.

Manually focusing still works but in effect something is wrong with either the lens or the camera.

Some more info, along with tips as to how you can test for these problems, in the Front and Back Focussing Explained article.

Colour to BW using channel mixer

06-21.jpg

Yeah, I know… It isn’t as if it is rocket science. You press apple + U, and the picture is nice and de-saturated. However, this also means that you have no control whatsoever about the final result of the image. Instead, a little bit of knowledge how RGB colours work will allow you to create some pretty impressive black and white photos from digital files… 


01.jpg

When you de-saturate (apple + shift + u, or image -> adjust -> de-saturate) this picture, this is what happens:

02-1.jpg 02-2.jpg

Yes, it is a black and white picture, but – if you ask me – it isn’t particularly exciting – and definitely not anywhere near a piece of art. To make this picture even remotely interesting, we have to change the way of turning the picture into black and white.

If you have worked with coloured filters to improve your black and white pictures before, you know what I am talking about; The coloured filters block certain colours from hitting your black and white film, thereby enhancing your photograph. This, then, is the secret: When you shoot in colour, you can add these coloured filters later! This is the reason why, even if you digital camera supports taking black and white pictures, you always should shoot in colour.

03.jpgThe best way of turning a picture like this into black and white, is to use something called the channel mixer – one of the lovely functions found in Photoshop, or indeed most image editing apps.

You find the channel mixer in the in the Image menu – here you find a submenu called adjustments. In this menu, you find some of the most useful commands in Photoshop. Among others, you find the Levels tool (I will do a separate tutorial on this tool before too long), a curves tool (incredibly useful, especially for print work), the de-saturate tool (already mentioned above), and – if you have a quick butcher’s down the list, a Channel mixer.

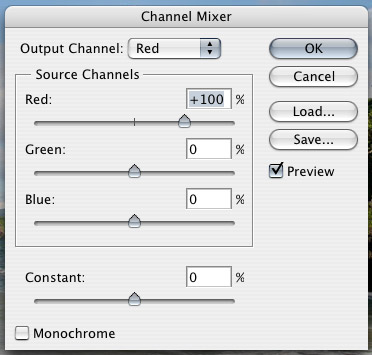
The Channel mixer is your Friend. Trust me on this. When you open the channel mixer menu, you find something along the lines of the illustration to the left.

The channel mixer can be used for adding great effects to colour pictures as well – such as changing the red and blue channels and stuff like that, making colours really wacky, turning the ocean red and the skies green. Stuff like that – I suggest that (after you finish trying out the stuff in this tutorial, of course) you play more with the channel mixer later.

For our purpose, however, we will check the Monochrome checkbox. This changes the output channel from Red (or green or blue) to gray. This means that now you are mixing the three channels (RGB) into one channel. Of course, this is basically what de-saturation does. Except now you have the option of controlling how it is done: The three sliders are there for you to decide how much of each channel is taken into consideration when converting the three channels to black and white (i.e. mixing the channels. Hence, Channel Mixer.).

On the picture below (marked with R, G and B) I have used 100% blue, green and red, to illustrate the difference between the different channels. Because the sky is largely blue, it appears whited out in the blue channel (see the part of the picture marked "B"). In contrast, the palm tree (which is quite red) will have a lot of dark colours in the blue channel, yet a lot brighter in the red channel.

04.jpg

When turning people into black and white, the differences can be even more surprising – and effective:

05-1.jpg


05-2.jpg 05-3.jpg

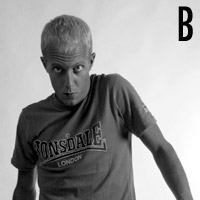
In this image, using the red channel makes the model unhealthily pale-looking. Using exclusively the blue channel, however, makes him look ridiculously tanned. Basically, this is what the tutorial is all about: Combine the different shades of the colour image, in order to get the exact effect you desire.


In the next example, we combined 60% red, 10 % green and 20% blue to make the black and white edition.

06-1.jpg 06-2.jpg

For women, the red channel is a highway to fair skin (small blemishes – being red, normally – completely disappear), while for men, using the blue channel usually lifts up the facial characteristics. For people who have really faint freckles, pulling up the blue channel a bit will enhance the visibility of the freckles. I once photographed a model who – when she saw the images – claimed I had painted on freckles. I denied, and sent her to a mirror. She was 24 years old, but it took a Photographer and some Photoshopping for her to realise the first time in her life that she actually had freckles!

Now that you know what the different channels do, you will want to start experimenting with the settings, so we can turn the images into black and whites the best possible way.


Do you enjoy a smattering of random photography links? Well, squire, I welcome thee to join me on Twitter -

© Kamps Consulting Ltd. This article is licenced for use on Pixiq only. Please do not reproduce wholly or in part without a license. More info.