


You may have spotted the lightbulb, cloud, electricity and woodshed symbols on your camera's screen or menus. You may have also ignored them as being yet another degree of complexity that you don't need to know about. Alternatively, you may have seen people on the Internet earnestly discussing colour temperature and swearing by all sorts of essential products that will guarantee perfect results, if you re-mortgage your house this one last time. And ignored it as another expense that you can probably do without.
Well that thing you're ignoring is one of the most powerful ways of making your photos convey the scene you wanted to capture: white balance.
All a question of balance
 The idea behind white balance is very simple: it's a way to correct all the colours in your image to take account of the light they were shot with. This is because not all light sources (bulbs, fluorescent strip lamps, conveniently nearby stars), produce light equally across the whole of the visible spectrum.
Midday sunlight pretty much does, but conventional tungsten-filament light bulbs don't – they mainly produce light down at the red and yellow end of the spectrum. This is why all you get rather muddy orange photos if you take pictures indoors without a flash. Fluorescent strip lights, street lights and camera flashes also produce limited ranges of colours.
The visual spectrum

Although this scale is only approximate, it gives an idea of how colors relate to one another. The visual spectrum are the colours that your eyes are sensitive to. Idealised midday sun will shine roughly equally across this whole range. Other light sources will only emit some of these frequencies, or will be biased towards one end of the spectrum.
Your eyes are good at compensating for this — amazingly good, in fact — but your camera isn't.
How it works
Although the maths behind it is pretty fiendish, the way cameras deal with white balance isn't too hard to understand. Your camera measures the amount of red, green and blue light that have been reflected onto its sensor. If the light source you're using isn't producing much at the blue end of the spectrum, then the blue bits of your sensor will receive much less light than they would in daylight. The green will be a bit muted and the red end of things will be quite happy.
Changing the white balance simply tells the camera to expect disproportionately low levels of blue light and makes sure it bears this in mind when deciding what colours things should be.
What do I do about it?
There are several ways of making sure you get the white balance right. The first is to choose one of your camera's presets that is designed for the type of light you're working with. Choosing the light bulb setting when you're working under conventional light bulbs should give a pretty good result, for instance. It won't be perfect, though, because light bulbs aren't all exactly the same, and one fresh out of the packet will produce whiter light than one that has been hanging around for a couple of years, so you may find that none of the presets give you the right result. Morning or afternoon sun won't match the ‘sunshine' setting, and particularly light or heavy cloud cover won't match the ‘cloudy' setting, so camera presets have to be averages and best-guesses.
A much better way of getting the right result is to set the white balance based on the actual light you're shooting under. Most cameras have the ability to set a manual white balance. This usually involves shooting a picture of a white (or, better still, neutral grey), object under the lighting that you're working under. This teaches it how to balance the levels of the red, green and blue information that it's recording. You must remember to do this every time the lighting conditions change, though.
The final way of getting the white balance right is to correct it later. Without wanting to get dragged into a debate about file formats (I can be as geeky and techie as the next man, often more so, but life really is too short), the best way of correcting the white balance after you've taken your shot is to save the RAW data coming from the sensor. Although some software will try to adjust the white balance of jpeg images, the results are simply not as good because there's a risk that the data the software needs to work with is exactly the data that's been thrown away in order to make the file so lovely and small.
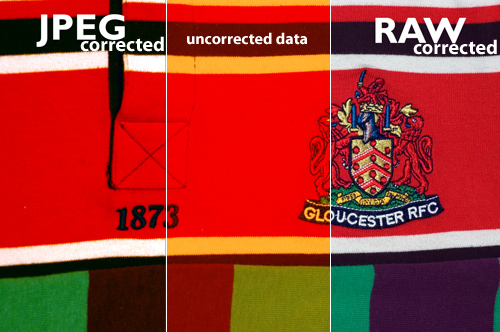
Let's look at this with an example — This raw and a jpeg files above are intentionally exposed with completely the incorrect white balance (see the middle bit). The raw was very easily corrected to give a realistic impression of colour. However, in spite of a great deal of tweaking, the same rendering of colour could not be pulled back out of the JPEG file. Note especially the areas in the intersecting area between the red and white: The RAW file renders this perfectly, while the JPEG file is obviously struggling.
However, if your camera doesn't let you save the raw data, don't worry, you can usually tweak the white balance a little bit before the quality suffers too much. As with every other aspect of photography, the best thing you can do is get the shot as perfect as possible when you press the shutter button. If you set a manual white balance before you take the shot, it will minimise or eliminate the need to correct later.
Buy buy buy
There are a variety of products available that can help you get your white balance right. They fall into two main categories: neutral cards and diffusers. Neutral grey cards can either be used as a known-neutral object for setting a manual white balance value, or can be slipped into the photo and used as a reference, when fiddling around on the computer later. Diffusers slip onto the front of the lens so that, when pointed at a light source, they spread the light out across the sensor and allow a manual white balance to be set.
That's it. No magic involved at all. They don't really add functionality, they just let you use your camera's built-in functions better.
What to do instead
Some people try to use the translucent plastic lids from various snacks as improvised diffusers. This can work, so long as the lid is neutral in colour. But most people find that they get good results using a piece of photocopier paper. You know, the white stuff. It's not always perfectly white and it can be a bit hard to get hold of half way up a mountain, but for most situations, it works very well. It won't guarantee that the bride's dress appears EXACTLY the right shade of off-white, but it'll make sure that your team's rugby shirts are recognisably cherry and white. Which is what's important.

For reasons that aren't entirely obvious, that icon just up there is a common symbol for manual white balance. Perhaps it is supposed to be a gray card? Only icon designers will ever know.

Although this scale is only approximate, it gives an idea of how the presets relate to one another, with the ‘tungsten' lightbulb correcting for very orange light and the ‘shade' setting compensating for very blue light.
No right answer
All the way through this article, I've talked about getting the white balance ‘right'. Well, just like the eternal question ‘which camera should I buy,' there is no definitive right answer. That's because, up until now, I've been talking about how to get white (and, as a result, colours), to appear as it would do under bright sunlight. However, there are lots of situations in which you don't want your photo to look like it was taken in midday sun.
Sunrises, for instance. Or sunsets. If you're going to spend three hours sitting in a cold field, waiting for the sun to rise or set and give you the perfect light, I wouldn't recommend that you then try to correct for the thing that made the light so good: the fact that it doesn't look like midday sun. So don't try to set a manual white balance and make sure the camera isn't trying to automatically correct the colour. So try using the ‘sunny' preset value, this will ensure the image shows just how different from midday sunshine the scene looked (which is presumably why you're taking it).
You may find, however, that this gives a more extreme orange or blue tinge than you expected. This is because your brain is very good at compensating for different colour temperature and still judging what colours should look like. That's why photos taken in orange-ish light come out astonishingly orange. So I'm afraid you still have to play around on the computer if you really want to convey the scene as you remember it or to tell the story you want to. Because, hell, this is photography, not a science.
How does White Balance relate to Colour Temperature?
In this section, we're getting geek-a-licious, and going into depth to find out why white balance is important, how it works, what colour temperature is, etc. If you're new to all of this, you can happily skip this, and know that the first half of this article probably made you a much better photographer. If you're a hard-core photographer, geek, or perhaps even both, however, you'll want to read the rest of this… Because geeks get all the hot chicks.
Depending on which camera and software you use, you may have found white balance described in terms of colour temperatures, using a scale marked K. Although it may seem like an odd way of describing the characteristics of light sources, there is actually a good reason for it.
The idea of colour temperatures comes from a simplified model used by physicists to show how energy is given off objects when they are heated. Think about how hot steel becomes red hot, then white hot: that's essentially what they're going on about.
Who is this Kelvin bloke, anyway?
 Colour temperature is measured in Kelvin (named after a rather clever physicist who was made Lord Kelvin in recognition of his work and, like all good Victorian scientists, had an excellent beard), which is pretty much the same as Celsius, but starts counting at absolute zero (-273 degrees C), rather than the freezing point of water. Its relationship to colour is actually the work of Max Planck who, being more recent German scientist, had a moustache, rather than a beard.
Basically, the idea is that as an object gets hotter, it gives off shorter, more energetic, wavelengths of light. So when it's relatively cool (a mere 1500K – 1773 degrees C), it gives off most of its energy at the red end of the spectrum and could be described as red hot. By 5500K, it will give off all frequencies in the visible spectrum equally – it will be white hot. As it gets hotter still, its output will increase and it will produce less red light, lots of blue and even some UV light, beyond the limits of human vision. You can think of it as the crest of a wave, rolling through the visible spectrum from red to violet as the temperature increases, if that helps.
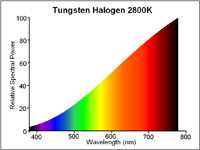
A traditional lightbulb (‘tungsten light') has a low colour temperature, it produces most of its light at the red end of the spectrum. Boosting the levels of blue and reducing the levels of red will compensate for this.
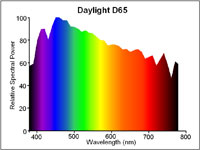
6500K (also known as D65) is the standard for midday sunshine. The entire visible spectrum is lit with roughly equal amounts of all colours and a neutral object would reflect red, green and blue equally. Many cameras use 5500K as their daylight setting because the sun in the morning and afternoon is cooler than D65.
It's worth noting that, rather helpfully, red and orange-tinged light relates to a colder temperature than blue-tinged light, which occurs at high temperatures. So be careful when you start talking about making pictures look warmer, because you could mean two completely contradictory things by saying it.
What does this mean for my camera?
Your camera measures light in RGB, which is a colour space which takes light measurements at three points along the visible spectrum, red at one end, green in the middle and blue near the other end.
As we have seen, under candlelight, there are far more red photons bouncing around than blue photons, so you have to tell your camera to adjust the levels of red, green and blue in relation to one another, so that they compensate for the low temperature of the light. More precisely, colour temperature actually adjusts the relationship between red and blue, with very little need to mess about with the green.
A different light
Now think about a situation in which your subject is sitting in mixed lighting. Take a picture of a person sitting under artificial light, but with daylight coming in from the window. Try to correct for the daylight and the artificial light goes orange, correct for the artificial light and the daylight goes blue. Unfortunately, there's nothing white balance can do about this. Even the most expensive white balance correction tool won't help, the best it will offer is an average of the light sources, depending on how you use it. The best thing to do is close the curtains or add some flash to ensure you have control over the dominant light source.
But that's not quite the end of the story, because there's more to white balance than just colour temperature. Colour temperature is based on the behaviour of heating an idealised material, which is a good approximation for light sources that generate light by heating things (lightbulbs, candles, the sun). The key property they share is producing light all the way across the visible spectrum; they are just biased towards one or other end.
This is not true of all light sources however and, consequently, not all light sources can be adequately described with a colour temperature. Fluorescent strip lights, for example don't work by being heated*, so don't behave like the idealised material and only produce light at certain wavelengths along the spectrum.
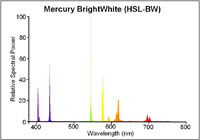
Even a modern, bright white fluorescent strip light will only emit light at very specific points along the spectrum. Note the large green spike. Correction for this peak requires more than a simple colour temperature, red/blue adjustment.
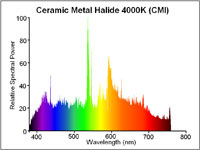
Exotic light sources (such as ceramic metal halide arc lights) produce an even output across the whole spectrum, making them excellent for judging colour. The pronounced green spike is still present.
The same is true of street lamps. In fact, the low pressure sodium vapour street lights used by many countries to light motorways only produce light at two wavelengths along the spectrum, both of which are orangey-yellow. If you were to shoot a photo under these lights, no matter how you tweaked the white balance settings, you would never get the colours right because the only thing that your camera could tell you about the objects is how well they reflect orange. A black and orange image, rather than black and white.
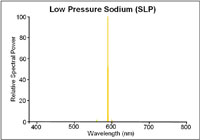
Low pressure sodium lights only emit light at two very specific wavelengths. It is impossible to interpret any colours under such a light.
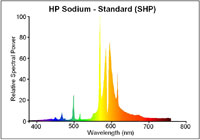
High pressure sodium lights tend to be used in town. They're still predominantly orange but produce enough other wavelengths to allow colour recognition.
That's an extreme example, though. Usually, the problem is just that there are gaps, here and there, in the light's emission spectrum. The way that your camera or software deals for this is to boost or reduce the level of green. This adjustment of the green, in relation to the red and blue you adjusted with the colour temperature, attempts to compensate for a peak or an absence in the middle of the spectrum. It can't work miracles, of course and, as we've seen with the low-pressure sodium lamp example, it can't create information about colours that weren't being lit in the first place, but in most cases, correct use of white balance will get your whites brilliant white. Though not at 303K (30 degrees C).
Footnotes
All diagrams with kind permission of lamptech.co.uk
*) Extra geekery: fluorescent light strips work by electrically exciting mercury until it emits UV light, which is then absorbed by a coating on the bulb that then re-emits the energy as a lower-energy, visible light photon in a process known as fluorescence. Well, you did ask…
This article was written by my good friend Rich. In his everyday life he's an engineer and a journalist, but after work hours, he becomes the uber-geek and highly talented photographer I know best :)
Vibration and camera shake << Photography Fundamentals >> Zoom
