

Once you feel you’ve started to get the knack of pointing your camera at things and clicking the button, it’s time to start taking control of all the lighting in the scene. But, as it turns out, that’s bloody tricky.
I keep having to explain how to ‘visualise’ different types of lighting to people, and it turns out that it’s rather difficult – not because what I’m doing is particularly advanced, but because sometimes, it’s just tricky to make the connection between what is happening in a photo, lighting-wise, and how the lights are set up.
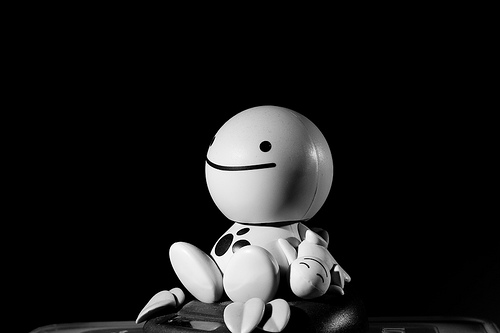
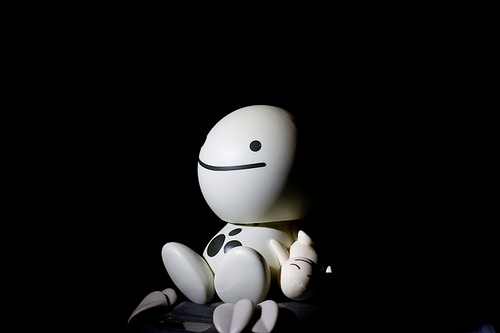
I’ve put together a collection of examples which I hope will help. For these photos, I’ve used a figurine with a nearly round head – this will be very useful to determine where the light is coming from; but remember that all of this is as valid with more complicated shapes, including people.
This picture of HappyHead is part of a series of photos designed to explain some basics of studio lighting.
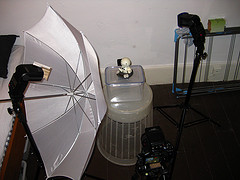
If you’re curious, this is the equipment I’m using throughout this post (and when I’m taking photos in general, for that matter).
For most of the photos, the lighting set-up is like this:
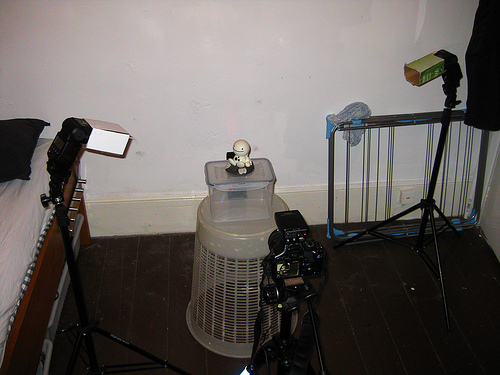
Check out the Flickr page for a detailed breakdown of everything you see in this photo.
Or, for additional clarity:

A couple of basics
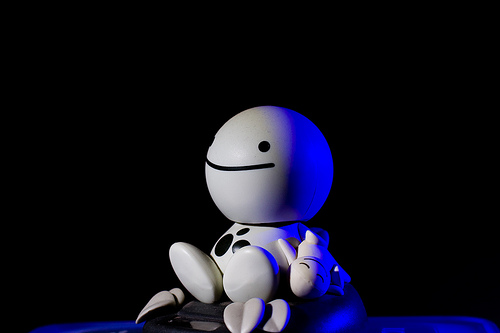
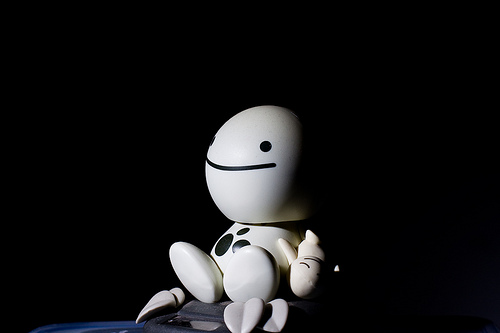 Picture 1 – Lit by a single 580EX II flash from top left (flash 1 on the schematic) at 1/32 power output.
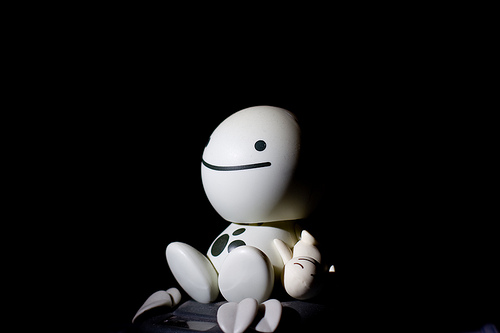
 Picture 2 – Same as Picture 1, but with an additional flash from the right (flash 2 on the schematic), slightly behind HappyHead, at 1/64 power, to lift the shadow a little.
 Picture 3 – Same as Picture 2, but with an additional flash at full blast on the background (flash 3 on the schematic). Note the light fall-off to the right, due to the flash being too close to the wall, and not aimed correctly.
 Picture 4 – Shows just the flash to the right (flash 2 on the schematic), slightly behind HappyHead.
 Picture 5 – Shows just the flash behind HappyHead (flash 3 on the schematic), used to blast the background.
Troubleshooting lighting.
The observant among you will have figured out that Picture 1 + Picture 4 + Picture 5 = Picture 3. As a general rule, you can often just switch on one flash at a time to figure out which flash gives what kind of light – but only when they are in manual mode, obviously: In E-TTL mode, the flashes will attempt to compensate for the missing flashes.
So what is all of this good for?

When you’ve perfected this lighting setup with a figurine, it’s time to replace the doll with a real, live person. Take a close look at this photo – the lighting setup is exactly the same as that we used for HappyHead!
Gels add a touch of colour

 Picture 6 – introduces the use of coloured gels. This is basically Picture 1 plus the same set-up as picture 2. However, the gelled flash has a much higher power output (1/32) to help overcome the light loss from the blue gels
Umbrellas or softboxes make the light softer

 Picture 7 – This uses the same flash setup as we’ve had so far, but with an umbrella on the left-hand flash to make the light softer. Notice how much gentler the light fall-off (i.e. how much less harsh the shadow is) is in this photo compared to the ones before in this series
Preventing spill-light
 Picture 8 – Same as picture 7, but I have turned the right-side flash to the background, with the blue gels on it. Note how the blue in the background looks quite washed out. This is because the umbrella is great at spreading the light, but it also throws a lot of light onto the background, which causes the blue light to be ‘contaminated’ with white light
 Picture 9 – Same as picture 8, but here, I have added a piece of cardboard to the flash on the left, to ensure less of the light hits the left side of the umbrella:
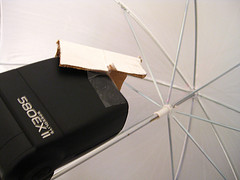
That, in turn, that means that less light is diffused onto the background, so now the blue flash can do its job better. Note that the flash output in Pic 8 and Pic 9 is identical – the only thing that changes is a tiny bit of cardboard. Incredible, eh?
Don’t forget about reflectors
 Picture 10 – Okay, back to the original (this is a different picture than pic 1, but uses essentially the same settings, so should look very similar). See how dark the right side of HappyFace’s head is? In Picture 2, I fixed it by adding a flash, but you can be more economical with your flashes

 Picture 11 – is exactly the same photo as Picture 10, except I’m holding a reflector (that’s a posh word for ‘a piece of A4 paper’) just out of the frame on the right side of the image. The light from the flash is reflected off the paper and back onto HappyFace, causing it to look much less dramatic.
From night to day with the flick of a switch
 Picture 12 – is quite similar to Picture 1, but has been set up to contrast with picture 13… Also note how the light has been moved further towards the camera (i.e. further to the front of HappyFace). This is so you can tell the edge of the head better – instead of getting the effect like in picture 7, where you can barely tell where the side of his head ends and the wall begins, here you get a clearer definition of his head.
 Picture 13 – The only difference between picture 12 and 13 is that in Picture 13, I have turned the flash lighting up the background off. Two completely different looks at the flick of a switch. It’s bloody magic, I’m telling you
Time to show off
 Picture 14 – is just showing off, really, and combines a whole series of lessons: The background is beautifully lit with a 420EX, the right side of HappyHead’s face is lit with the familar strobe, but with a red gel on it.
Iin retrospect, I wish I had umbrella’ed that strobe, because it’d have gotten rid of that bright red specular highlight just at the edge of HappyHead’s mouth.
Good luck!
This is only a very quick’n'dirty introduction to lighting, but it seems as if most people who e-mail me are actually struggling at this level – I’ll pick up with a more advanced lesson in a couple of months, I think.
Originally posted on 26 May 2011, but definitely worth dusting off and dragging out of the archives.