


To clarify, this month’s Photography Concept on Friday is not a self-help guide for photoaugliaphobics ( people with a fear of glaring lights – of course I looked that up ) – it’ll centre more around the basics of studio lighting and the basic properties of light. If you’re interested in a bit of studio lighting but don’t know where to start, or would like to know at least a little before you begin, then this month’s PCoF is for you.
Specular Highlights and Diffuse Value
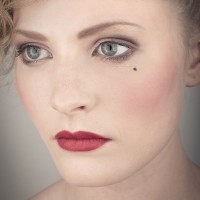
Softboxes were placed very close to the model here, meaning there is very low contrast between the specular highlights and the diffuse value, giving flattering, evenly lit skin.
Now it’s very easy to go into too much detail too quickly with studio lighting. I am writing from the point of view that you have never seen or considered the principles of lighting before, so please don’t roll your eyes too far back into your head if any of this seems obvious. Everyone starts somewhere – I started to improve my studio lighting the moment I got these concepts into my head.
Specularity refers to an object’s shininess. If you imagine a snooker ball in a pub (or snooker hall, if you’re a more reputable sort than myself), the bright white spot on that ball is the specular highlight of the ball.
Diffusity refers to how evenly spread out light is across an object. The more diffuse the light, the less contrast there is. This is represented by a more gradual transition from light to dark across an object. An object with a strong specular highlight has a higher contrast value around that highlight, as the brightness of the object changes much more suddenly.
In Short – Specular Highlights mean more contrast, Diffuse Lighting leads to less contrast.
Now, let’s look at a situation where we control the light source- we’ll ignore the different properties surfaces can have for now, to keep it simple (a snooker ball is a lot more reflective than human skin, for example. If your skin is as reflective as a snooker ball, see a doctor).
Controlling Light
There are two factors we should keep in mind for basic control of lighting. These are the size of your light source and the distance of your light source from the object being lit.
Size of Light Source
The size of your light source determines how it lights the object in question. Assuming the distance is the same, let’s look at the difference between a torch and a softbox (which look like this).
A torch has a very focused, directional beam – the light isn’t very diffuse. When you use a torch in the dark, it only lights the small area you point the torch at. On our imagined snooker ball, this creates a strong specular highlight, giving high contrast to the ball. If we replace this with a softbox, a much larger light source, we create a light source with more diffuse, spread out quality. This will lessen the contrast on our snooker ball, and light it more evenly than the torch will.
In Short – The larger the light source, the more diffuse the lighting, giving us less contrast. The smaller the light source, the more focused the lighting is on one point, giving us greater contrast.
As an extra point if you’re not confused yet – the more diffuse the light, the darker it is, due to the light available from the light source being spread more thinly.
Distance of Light Source
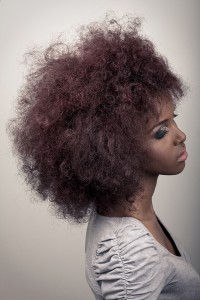
Due to the Afro of Doom in this pic, I had to move the light sources much farther away. This has led to a greater contrast between the specular highlight and the diffuse, which is why we see the stronger highlights on the bridge of the nose, for example. To combat this, I used my large light source for the face and brought the smaller one in for the hair.
The distance of the light source shares many qualities with the size of the light source, seeing as they are almost exactly the same thing as far as your camera is concerned. The closer the light source is to your subject, the larger it is and the further away it is, the smaller it is. Therefore, all the qualities pertaining to size of light source apply here also. There are two differences, however.
The first, most obvious difference is that the closer the light source, the less far the light has to travel, meaning the light is stronger.
The second, less obvious difference, is the difference between the specular highlight (high contrast area) and the diffuse value (low contrast area). The closer you place the light source, the less difference there is between the specular highlight and the diffuse value. The farther away you place the light source, the greater the difference there is between the specular highlight and the diffuse value.
In Short / To Simplify – All you really need to keep in your head here is that the farther away you place the light, the more contrast you will have between the shiny bit and the non-shiny bit. As you put the light closer, the difference between the two will be lessened, allowing for much more even lighting. So, for even lighting, put your light source closer. For higher contrast, move it back.
Oh Sweet Lord My Brain What Have You Done?
Essentially, explaining the basics of lighting is the equivalent of explaining the offside rule in football – it’s actually fairly simple but once you start trying to explain it, it sounds horribly complicated. It’s really not. What I suggest to you is, take this mini guide, go and rent some portable studio lighting (when I rented mine a few years ago, it only cost me £40 for a week), find some unsuspecting victims (or snooker balls) and try this stuff out. It’s not nearly as daunting as you might think. Go on, get some studio lights and try it yourself, it’s fun!
In the future, I’ll do some more lighting write ups, if people have found this useful. Just remember, if you’re still having trouble with the difference between size of light source and distance of light source, use this handy, cow based reference.