occasions

Infinite iPhone colour manipulation with ColorTime

When it comes to smartphone photography my default editing app is Snapseed. It does just about everything that I want in an app that I use on a device with a screen that's the size of the palm of my hand and it's intuitve. Sometimes, however, I find myself looking for a bit more control, the ability to adjust shadows, highlights, and midtones independently, or a white balance correction that is more fine-tuned. I've found it. It's called ColorTime. mzl.ncemfpho.320x480-75

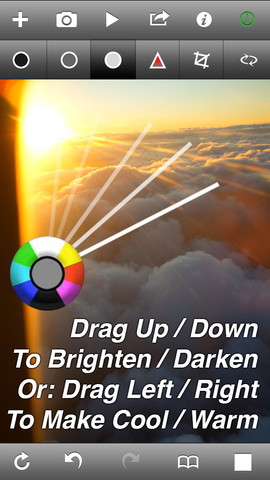
ColorTime allows you to select between shadows, mid-tones, highlights, and saturation, adjusting the intensity on a colourwheel. Dragging up adds white or brightens the image; swiping your finger downwards introduces darker tones; and then you can increase warmer tones by swiping to the right and cooler colours by swiping leftwards.

Furthermore, you can paint particular areas of your image to adjust the tones selectively, or choose between the centre or edges of the image.

A rather blue-tinged peony

There are of course many occasions when any of this is useful, but I've found it particularly helpful for correcting the white balance in my iPhone photos, which always seem to be far too blue, and for adding a golden hour-like glow. If that's all far too subtle and practical for you, it's possible to make near-infinite adjustments: you keep moving your finger upwards (or downwards, left, right, four o'clock, 11 o'clock, whatever) until you reach the edge of the screen, and then you start over again.

... made to look rather more pink with ColorTime

The independent shadow, mid-tone, and highlight functions, in combination with the colour wheel, means that you can add blue to the highlights but orange to the shadows. If you want.

If you decide that you don't like you last adjustment, you hit the back arrow and it revokes it; if you decide that you've screwed it all up and want to start over, select the revert button. Should you not be able to decide, you can toggle between the original image and your adjusted image to decide which works best. Or you could select the animate function and let ColorTime present you with a loop of optins.

There is a crop and rotate function, but I haven't found it that easy to use. It feels underdeveloped and doesn't give you the control that you'd expect when the rest of the app is so responsive. It's not a huge problem, but for the moment, I will continue to crop in Snapseed.

I've really enjoyed using ColorTime and it has provided me with some terrific results. However, it is a learning curve. None of the buttons is labelled and I have occasionally found myself mistakenly adjusting entirely the wrong thing, but thankfully there is that undo feature. And there's a guide that is relatively easy to access.

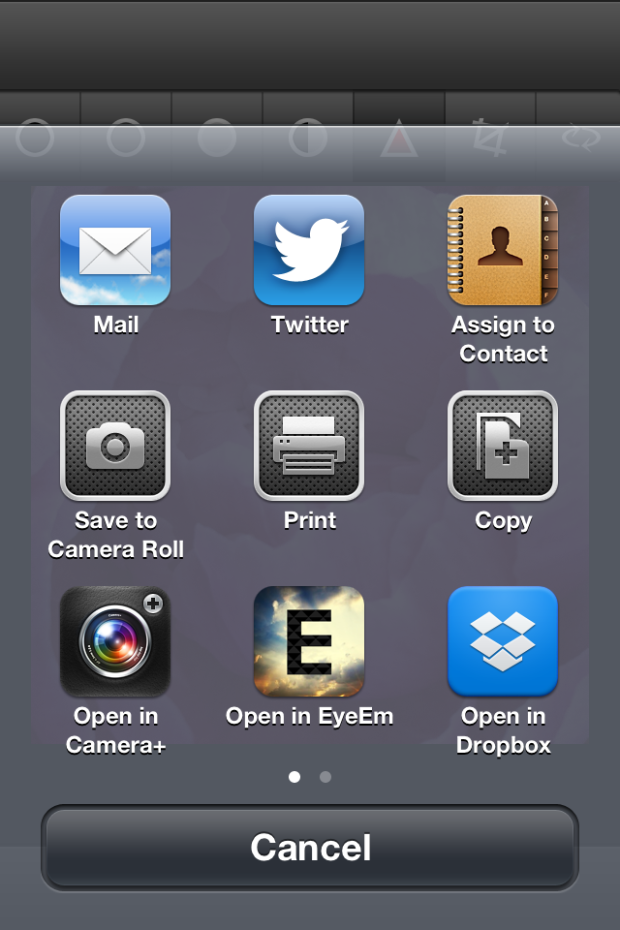
When you're done, you can save your fixed image to your camera roll, email it far and wide, tweet it, save it to your Dropbox, or choose from a few other options.

photo

ColorTime is £1.49 in the App Store. For anyone who does even a moderate amount of iPhone photography, I reckon it's worth it.

It's back! The Polaroid 300

Polaroid 300

The Polaroid 300 is back after a hiatus of just over two years, and rather cute it looks too. Mmhmm, the original instamatic camera has been revived and relaunched and looks good enough to eat. Seriously, one of my friends took one look at it and asked if it were edible.

I assumed a more conventional approach and took photos with it. I also carried it with me wherever I went and asked friends and family what they thought of it. Aside from the enormous amount of fun I’ve had with it, and the constant stream of ‘Oohs!’ and ‘Aaahs!’ from my nearest and dearest, what’s the Small Aperture verdict on this pretty piece of kit?

Design

Aside from looking delectable, the Polaroid 300 is a very tactile camera. It has a rounded but chunky design that you really want to hold. This is a good thing in more ways than one: although it does have a flat bottom and can stand up, the bottom is too small and it falls over far too easily. Thankfully it seemed to survive the couple of occasions that it did take a drunken wobble, but I wouldn’t want it tumbling from any great height.

The shutter release button is a big thing on the front of the camera and there’s a dial on the top which allows you to select your shooting mode. Everyone seemed to muddle up the two initially, but when you know, you know. Next to said dial is the film slot, where your picture pops out when it’s taken.

There's the shutter release button, on the front

The viewfinder is on the far right of the camera. One of my friends who is left-eyed found this problematic, but I didn’t notice, being right-eyed and all. What I did find irritating was my finger’s ability to wander in front of the viewfinder when searching for the shutter release button. They’re a little too close for convenience.

Loading the film into the back of the camera was super-easy. So easy in fact, I worried that I’d done something wrong. There’s a little counter in the bottom right corner showing you how many pictures out of your pack of ten you’ve left to take.

I’ve been playing around with the bright blue model, but there’s a gorgeous burgundy red option. Or you could stick with plain black. But who’d want black for a fun camera such as this?

Oh so lovely in red. And look at that on-off function!

My favourite-feature award has to go to the on-off mechanism, though: you pull the lens away from the camera body and on it comes. How groovy is that?

Handling

You’ve four shooting modes to choose from: indoor/dark; cloudy/shady; fine; or clear. Whichever mode you’re in, though, the flash will always fire. And to be entirely honest, it’s a bit of a hit-and-miss affair. The lens is freaking huge, though, and it doesn’t tally up to the size of the viewfinder. You’ll get whatever you can see through the viewfinder and quite a bit more besides in your photo.

The picture whirrs out of the slot almost instantly, but you’ll see nothing at all for at least ten seconds. Then your image will slowly begin to emerge through the misty white haze of development. After about 40 seconds you’ll have a much better idea of what you’ve snapped.

Pictures

They’re Polaroid pictures. They’re tiny. The colours are washed out. Everyone’s skin tone is about six billion shades out of whack. I took one photo in the garden, using the cloudy/shady setting (because, well, it was) and it looks as if I took it in the dark. Everything is soft and mushy. But they’re Polaroid pictures; what else did you expect?

I’m going to magnet mine to my fridge.

The verdict

Each picture works out at around £1 a go. That’s not cheap, and some people might find this prohibitive. But it is instantly gratifying and this camera is, essentially, a toy. You’re not going to use it to document your entire trek across the Himalayas or your safari through the Kruger National Park. It’s for parties and for picnics and probably even a bit of posing.

When we’re so accustomed to being able to take hundreds of photos, to discarding the terrible ones, to editing the ones that we do want to keep, that it’s refreshing to revert to old-fashioned one-shot photography. Even if the camera is pretty much a play-thing, it makes you think about your picture that tiny bit more.

Polaroid 300s are available lots of places, including the lovely Amazon, for £79.99 in the UK, or $89.99 from Amazon US. A pack of film (10 exposures) is £12.99.

Lens Flare - and how to avoid it

lenshood.jpg

I get a lot of people sending me images with ‘mysterious’ problems, and I figured it was only fair if I run a series of articles about how you can alleviate these problems. The most frequent problem is actually a lens-flare related problem, and there seems to be some confusion as to what lens flare actually is.

I suppose the first thing we should discuss is just what lens flare actually is. Most commonly seen in photographs, lens flare can appear as bright circles, smears of light or glimmering lines.

On some occasions, it can even appear as a thin film over the entire picture that makes the image itself lighter.

lensflare-2.jpg

Why does this phenomenon occur? Lens flare is normally seen because the photographer took the picture into the general direction of the sun. The basic idea is this – some sunlight gets into the camera lens at just the right angle that it bounces around the interior of the camera until some of it ends up on the film.

If that’s the case, then how can you test your camera to see how it deals with the lens flare issue? First and foremost, there is the obvious way of aiming it right at the sun and taking a picture. This is the most common way to get your lens to produce lens flare, but not the only way. In fact, some lenses have no problem taking photos towards the sun, but fail miserably in other tests.

lensflare-1.jpgA second way to test for lens flare is what is known as the ‘window test’. Aim the camera someplace indoors, but have a bright window just out of the view of the lens. If your image, upon developing ended up with the tell tale signs of lens flare, you know your camera can’t handle that sort of situation so well.

Another way that you can test your lens is the ‘bird in a tree’ approach. For this, aim your camera at a bird (or something of similar size and detail) against a bright sunny sky, but without aiming directly at the sun. Check for contrast loss at the edges of the bird or object. Generally, what you will see is the light ‘swallows’ up the outer edges of the bird. The more of the bird that is ‘swallowed’ up, the more lens flare is occurring in this case.

These aren’t the only ways to come up with lens flare. In fact, you don’t even need to have lens flare show up in your original photo to have it appear later. But why is this? Well, Photoshop has come up with its own ‘lens flare effect’ that you can apply to your images long after you’ve originally taken them. It offers a wide range of options to choose between to get you the look you are after.

lensflare-3.jpg
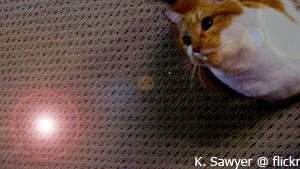
Okay, so I thought we were trying to avoid lens flare. Why would Photoshop come up with something people try to avoid? For the simple fact that lens flare shouldn’t always be avoided. In fact, it can a little something extra to your images when used in the right circumstances.

Thing is, well, there are very rarely ‘right circumstances’ for lens flare: There’s an excellent reason for why photographers have been trying to avoid them for dozens of years, and it’s a bit daft to try and use software to put ‘em back in…

Is there an easy way to avoid lens flare?

Why yes, there’s a very easy way: Keep your lens-cap on your camera when you’re taking photos!

Okay, so maybe that’s not the most convenient piece of advice. It does have a kernel of truth, though: If you can stop direct light (from flashes, reflections, or sunlight) hitting the front element of your lens, the lens flare effect will be reduced significantly, or even eliminated altogether!

lenshood.jpgTo keep the light out of your lens, you can block it out with your hand (not particularly convenient, as you’ll need both hands to operate your camera most of the time), you can get a friend to block out the light with a reflector, or just by standing in the sun so the front of your camera is in the shade.

Alternatively, you can use a lens hood (it’s one of those attachments that go onto the front of your lens – on the picture above, it is the flowery-shaped attachment), which will go a long way to blocking out stray light. You can also get straight lens hoods (without the flower-shape), or you can even make your own.

Guest article by Amanda Stachowski (thank you, Amanda!). Photos are all CC photos from Flickr, by Ian BC North, Yuan2003, ratkinson and K Sawyer.


Do you enjoy a smattering of random photography links? Well, squire, I welcome thee to join me on Twitter -

© Kamps Consulting Ltd. This article is licenced for use on Pixiq only. Please do not reproduce wholly or in part without a license. More info.