When you hear the term 'high-res' thrown about with such abandon when it comes to images for web use, have you ever stopped to think just how big or how high quality and image meant for the web needs to be?
There's an assumption that high-contrast images are more dynamic, more compelling, more inviting. Have a go at some low-contrast photography. You might surprise yourself with the results.
Photographing buildings doesn't have to mean wide-angle lenses and fretting about correcting for the keystone effect. Any lens, and angle. Don't believe us? Let us show you!
If Android users have been feeling a bit left out by the dearth of remote controllers available for their cameras, that might be about to change. A Dutch company, Chainfire, has just released a beta dSLR controller app that needs only a USB cable to give you control over the aperture, shutter speed, ISO, white balance, metering, zooming, and loads of other things that you’d get bored if I listed. Only problem? As yet it’s only cmpatible with Canon Eos cameras. But, it is a start.
The app costs $8.51, but this is expected to increase once it comes out of beta. In fact, Chainfire wasn’t due to release it yet, but demand has been so high that they felt it was better to get the beta out there and work on the kinks than keep people waiting.
The developers have a huge wish-list of things that they’d like to introduce once things are running more smoothly, including but not limited to: video support, timelapse, scripting, and image review and transfer.
There are loads of reasons for why you could want to trigger your camera remotely – to avoid camera shake, for example, or to be able to take a photograph of yourself without having to rely on a timer. If you want to build more ambitious projects, however, you may have to consider getting more exotic.
I recently built a little device which triggers my camera whenever a laser beam is broken. It is about as simple an electronics project as you can pull off, but it’s going to form the base of a couple of other cool projects I’ll be working on going forward (stay tuned…), so I figured I’d do a quick post explaining how I did this.
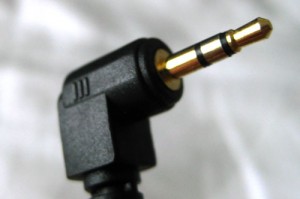
Talking to the camera
This looks a lot like a headphone jack, but it is not - headphone jacks are 3.5mm, this is 2.5mm.
Even though it isn’t strictly necessary, I decided to use my Arduino (check out Arduino.cc) as the base for this project.
I say ‘not necessary’ because you can build this project using just electronic components, which makes it all a lot simpler – however, what I really wanted to do is to build a base on which I can build further in the future. If you want to get more advanced, it becomes a lot easier to use a programmable micro-controller like the Arduino, so I figured I may as well start where I mean to continue.
I stripped the wires from the remote lead. Connecting green and red triggers the camera.
To interface with the camera, I decided to keep things as simple as possible, and I used the 2.5mm jack port on the side of my Canon EOS 450D. If your camera has a different remote control port, you should still be able to use the tips described in this post, but you’ll have to source the actual plug yourself.
Using the remote control port has several advantages, the biggest of which is that it’s really easy to trigger the camera this way. All you need to do is to make a connection between two wires! I bought a couple of cheap remote controls from China and used one of ‘em to interface with my camera, but you can go into your local electronics store to pick up a 2.5mm jack for next to no money…
Triggering the camera with the Arduino
This is the most important part of this mini-project: As soon as you can trigger the camera with the Arduino, only your imagination will stop you from coming up with ways of using this. Because the Arduino will accept input from any number of sources, you can program it to take photos in just about any circumstance imaginable. Just a few ideas:
Motion sensor (trigger the camera when it senses movement)
Heat sensor (take a picture when the)
Sound sensor (take a picture when the dog barks or the phone rings)
Telephone trigger (Hook up the arduino to a mobile phone. Call or SMS the mobile phone to take a picture)
Timelapse photography (Program the Arduino to take a photo every minute)
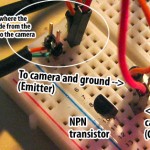
There are a few different ways you can use the Arduino to trigger the camera – I considered using a relay, but the problem is that even very fast relays are quite slow, so I decided to use a transistor instead:
You! At the back! no sniggering at my atroceous schematic drawing skills!
The Arduino sends a signal to the transistor, which connects the two leads leading to the camera, which triggers the camera.
Forgive the rubbish picture - I was prototyping, so it's less than clear what's going on here. The important bits are in the schematic above. Honest, it's piss easy.
Getting the laser trigger to work
I hooked up a LDR (Light-dependent resistor) with a pull-down resistor to ensure that it wouldn’t trigger randomly to the analog sensor pin 0 on the Arduino. The programme uploaded to the Arduino is as follows:
int sensorPin = 0; int sensorValue = 0; int cameraTrigger = 13; void setup() { pinMode (cameraTrigger, OUTPUT); } void loop() { sensorValue = analogRead(sensorPin); if (sensorValue > 700) { // trigger is quite low, might need to be higher in daylight digitalWrite (cameraTrigger, LOW); } else { digitalWrite (cameraTrigger, HIGH); delay(10); digitalWrite (cameraTrigger, LOW); delay(1000); // Take max 1 pic per second } }
Pull-down resistor to ensure true readings, and a LDR to do the actual light measuring.
With the arduino all programmed, I just had to add the LDR.
Now, I rigged up a laser module aimed at the LDR, and I checked what the common sensor values were – turns out that it drops to about 200 when the laser beam wasn’t hitting the sensor, and goes up to about 900 or so when it is hitting the sensor. I set the sensor trigger to about 700 to give me some leeway.
In the above snippet of code, the interesting stuff happens in the loop: Basically, it checks if the sensor has gone ‘dark’. If it hasn’t, it simply checks again.
The bright pink bit in the photo here is the laser beam hitting the LDR.
If the Arduino detects that the sensor has gone ‘dark’, it triggers the camera for 10 milliseconds, then untriggers it. This is to ensure that the camera doesn’t continue taking photos for the duration of the beam being broken – I have my camera set to ‘one shot’ anyway, but by adding this line of code, it should still work if the camera is set to continuous shooting when the shutter button is held down.
When the Arduino detects a broken beam, it takes a photo, then waits for a second, before checking for a broken beam again. If it’s still broken, it’ll take another photo and then waits another second.
Does it even work?
Yup. But a video says more than a thousand words so check ‘er out:
(forgive the crummy video quality, but you get the idea)
So, er, what the hell can you use this for?
It’s all a little bit theoretical at this point, because I haven’t actually used the trigger for anything useful yet. For one thing, it’s not very portable yet, but I’m planning to take a version of this and solder it all together so it’s a bit more sturdy. At least I know it works, which was the purpose of the exercise.
I have a couple of fantastic ideas for how I can create some pretty cool projects where the camera can just stand there and take photos automatically. Think birds on a bird-feeder, people walking through a doorway, balls in flight, etc.
If you plan to use the kit to take people by surprise, you may have to hide the lasers away a bit better. In a cleanish room, the red laser is pretty much invisible anyway (although it shows up in specs of dust etc), but if you want the sensor to be completely invisible, you can just use an IR laser instead – it’ll make it invisible to the naked eye.
Disclaimer
I haven’t broken my own camera equipment doing any of this, but if you balls things up, there’s a good chance you might. Be careful, know what you’re doing, and don’t come running to me if you blow up your camera, please!
Do you enjoy a smattering of random photography links? Well, squire, I welcome thee to join me on Twitter - Follow @Photocritic
Recently, I realised that while I do an awful lot of writing about photography, I’m not actually spending all that much time actually taking pictures myself anymore.
A sad state of affairs – especially as I recently bought a gorgeous Canon 50mm f/1.4 prime lens. (I could rant about prime lenses for hours, but I’ve done so in a previous post, which (if I may nest my parantheses and be so bold as to recommend one of my own articles) is well worth a read), and I have a fabulous city right on my doorstep.
Anyway, so I have never really done that much street photography before, but I figured it’d be a crying shame not to have a go at it…
For someone who hasn’t done much (read: any) street photography before, I think I did pretty well – these are some of my favourites:
Mean Fiddler
This photo, Mean Fiddler by Photocritic.org on Flickr, was a lucky one indeed. Shot from the hip just as he was finishing playing a song, the colours came out magnificently, and I got quite lucky with the focussing as well – Seeing as how I was shooting from the hip at f/1.4, it wasn’t as if I had a lot of leeway with my depth of field.
Technical Details: Canon EOS 450D with a Canon 50mm f/1.4 prime lens. 1/320 second at f/1.4 and ISO 100, metered in Aperture-priority AE with a -2/3 stop EV bias. More tech info here.
"Is he taking a picture of me?"
This photo, "Is he taking a picture of me?" by Photocritic.org on Flickr, was taken in the midst of a St Patrick’s day parade on Trafalgar square. She was hanging out with some of her friends in front of a fountain, and the light kept catching her, so I figured I’d try and capture that. The back-lighting was quite tricky (and, considering that all of these photos were taken on a single attempt, with one shot at getting it right, I think I got lucky), and I’m happy that I was shooting this in RAW, because I needed to do a few adjustments to make the photo come out well.
Technical Details: Canon EOS 450D with a Canon 50mm f/1.4 prime lens. 1/1250 second at f/1.4 and ISO 100, metered in Aperture-priority AE with a -2/3 stop EV bias. More tech info here.
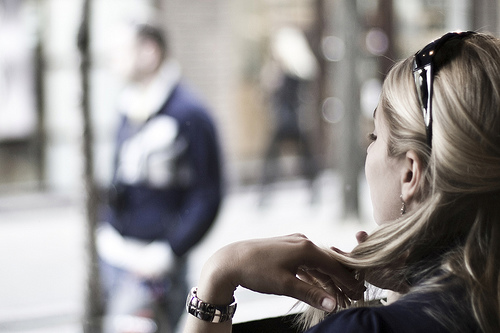
Dreaming over Coffee
This particular shot, Dreaming over Coffee by Photocritic.org on Flickr, came about right at the beginning of the walkabout in London – I was in line for the queue at Nero coffee, and spotted this girl, who was sitting there, enjoying her coffee, and being rather blase about checking out the cute guys walking by – what is more summerly than that? When the moment came, I simply lifted the camera to my face, snapped the shot, and paid for my coffee. Simples.
Technical Details: Canon EOS 450D with a Canon 50mm f/1.4 prime lens. 1/200 second at f/1.4 and ISO 100, metered in Aperture-priority AE without EV bias. More tech info here.
Me too, brother. Me too.
This one, Me to, brother. Me too. by Photocritic.org on Flickr, was taken immediately after the girl above. We were sitting on the statue in the middle of Seven Sisters, and were watching the world go by. This fellow just showed up, stopped right next to me, and stared at the sky for a bit – His T-shirt made me laugh, so I couldn’t not take the shot.
Technical Details: Canon EOS 450D with a Canon 50mm f/1.4 prime lens. 1/200 second at f/2.8 and ISO 100, metered in Program-mode AE with a -2/3 stop EV bias. More tech info here.
Also, if you haven’t seen many updates from me recently, it’s because I’m out of the country for a while, doing a load of photography and eating a lot of lovely food while visiting my parents in Mumbai, to be precise. When I come back, I’m finally moving back to London again – if I can find myself a place to stay, that is.