


Birds and bees and all that.
I recently received an e-mail from a reader with the following question: "I have taken a series of nude photos of my wife. I enjoy having them, but our daughter is getting old enough to use my computer, and I am not sure how to keep her from finding them by accident. What would you recommend?"
It can come across a little bit funny, perhaps (Nude photos of your wife? Are you sure you're just not trying to hide your porn stash from your wife and kids?), but it's a fair enough question: Whether it's photos, videos, or other sensitive files, we all have items on our computers that we'd rather others didn't interfere with.
 The obvious solution, of course, would be to stick everything on a USB thumb drive (They have a whole category dedicated to USB thumb drives in Amazon.com and .co.uk.) and hide that somewhere; Thumb drives come in small packages with enormous storage capacities these days, so that should be easy enough. But what if you want to keep the data safe also if they're on a thumb drive?
I can't speak for the Windows world, as I haven't used a Windows PC for years (and I'd love to keep it that way, if I can help it), but on the mac, there are a few clever tricks you can try.
Creating a virtual drive
Personally, I think the best solution for sensitive documents is to use Disk Utility to create a virtual drive. I've created a little video showing you how:
(video not showing up? Look at this post in its original location!)
If you can't be bothered with the video, the steps are as follows:
- Open Disk Utility (from the /Applications/Utilities folder)
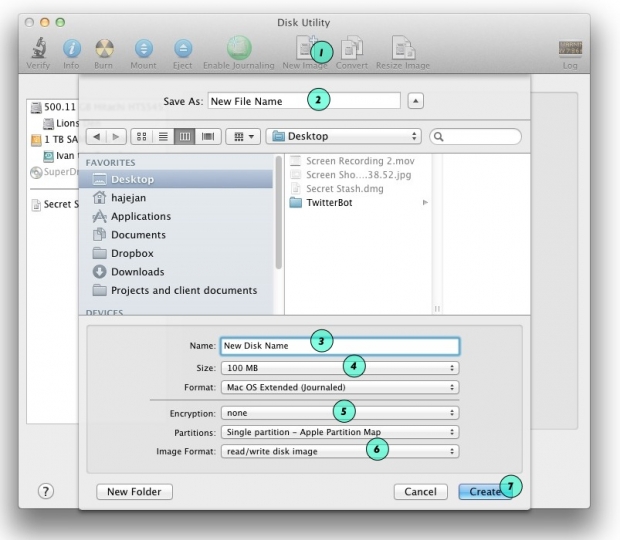
- Click New Image (1)
- Give the new file a name (2)
- Give the new virtual disk a name (3)
- Choose the size of your new virtual disk (4)
- Choose your encryption (256-bit encryption is military-grade, and should be more than sufficient)
- Choose your Image format (6). At this step, you can either choose read/write disk image. This will create a file that's the same size as you selected as your 'size' in (4), above. This is useful if you don't want to show how much data you have in your file. Whether the disk is "empty" or "full", it'll always be the same size. The other option is Sparse Disk Image. This file will be slightly bigger than the files you've saved inside it, but it means that the virtual drive takes up less space on your harddrive. Of course, if someone were to monitor the file, they can see it growing or shrinking in size, indicating that you are adding or removing files to it - which one you choose depends on practicality and exactly how paranoid you are being.
- Click create (7)
You will now be asked to enter a password:
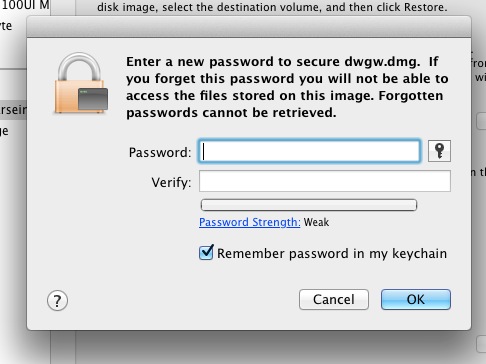
Enter it twice, make sure you untick the "remember password in my keychain" tickbox, and click OK. Now, it's absolutely imperative that you remember this password: If you don't, your files are going to be inaccessible forever: There is no 'back door', and the encryption is hard-core enough that it's virtually uncrackable with current technology. Forget your password, and you may as well delete the virtual drive: You'll never see your files again.
To use the drive
To use the drive, you'd use it much like you would use a DVD or a CD - or an external drive.
- Double-click the drive image file
- Use the files as usual - you can open them, edit them, delete them, or add additional files to the drive. You can use folders etc, the same way as you could with any other drive.
- Unmount your drive by dragging it to the trash. The files will now be safe, and nobody can get to them without knowing your password. Nifty, eh?
Photo credit: The photo in the top of this post was licenced from iStockphoto.