


Every photographer experiences a creative block at some time or another. So what do you do when this happens? I personally fall into a foetal position on the floor, kick my legs, and spin around in circles while crying like a six-year old. But what do YOU do? Well, here’s a thought. How about a time-lapse? If you have a dSLR and a sturdy tripod, then you already have most of the ingredients for this magnificent recipe. So let’s get started!
Equipment
While many dSLRs have an “interval shooting” feature built in already, some don’t, so you’ll also need a way to time and trigger your shutter release. There are several pieces of hardware available, but I like to use a Hähnel Giga T Pro. It’s the only one I’ve ever used, but it seems to work perfectly fine and is easy enough to figure out. Whatever you decide to go with, make sure it has an interval timer function and an exposure count control. Without these two features, you won’t be able to create your time-lapse.

Essential kit, if your camera doesn't have an 'interval shooting' function
For this tutorial, you’ll also need QuickTime software, which you can download here. (If you own a Mac and you’re running Snow Leopard, then you’ll notice that you have QuickTime X and can’t install QuickTime 7. Read this post by Apple to get around this problem.)
The location
You can shoot a time-lapse of just about anything you want. Obviously, it makes more sense to shoot a scene that has a lot of motion in it, such as fast-moving clouds, a busy city square, or a train station. Once you determine your scene, it’s time to get set up. Keep in mind that you’ll need to dedicate some time to this project, so bring along a book or something to keep you occupied while you shoot. ‘How long should I shoot,’ you ask? Well, that depends. And in order to figure that out, you’ll need to do some basic number crunching.
The maths
To determine the time required to shoot your time-lapse, you’ll have to work backwards. For simplicity’s sake, let’s say that we want our final video to be one minute in length. A normal time-lapse video will consist of 15 frames per second. So 15 frames times 60 seconds is 900 frames.
How smooth or choppy you want those 900 frames to flow is up to you. If you’re shooting clouds, then you’ll probably want a smoother effect, so you’ll want to shoot in shorter intervals, say every five seconds. So 900 frames taken every five seconds is 4500 seconds, divided by 60 seconds per minute, which comes out to 75 minutes, or an hour and 15 minutes worth of shooting. Phew!
So now that you have your location picked and how long you’ll be shooting for, let’s get set up.
The set-up
Place your tripod where you want and frame your shot. Make sure your tripod is as stable as you can get it. Any movement during your 900 shots will be very visible once you combine everything together in your final video. If you brought your camera bag with extra gear in it, the added weight could help with stabilisation, so try hooking it onto your tripod.

Get comfy whilst your time-lapse is shooting
Now check your camera for settings. Because you’re taking 900 frames, you’ll want to shoot in JPG to make sure they all fit on your memory card. Also, since your video will likely be used for web-friendly applications like Youtube or Vimeo, you don’t really need to have extra-large high resolution photos.
Make sure you focus your shot and then disable your auto-focus to ensure consistency across all of your frames. You’ll also want to shoot in either manual or aperture-priority mode. If you’re out in an open field during high noon with a lot of clouds in the sky, you’re bound to be in bright sunlight during some shots and darker shade during others, so aperture-priority will help ensure proper exposures throughout your time-lapse.
Once you’re all set up, program your interval timer to the correct settings and start shooting. Grab your book and get comfortable. You’ll be there for the next 75 minutes.
Creating Your Video
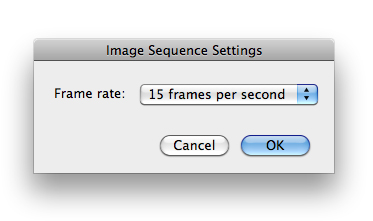
Once you’ve downloaded your photos to a folder on your computer, it’s time to put everything together. Open up QuickTime and click Open Image Sequence under the File menu. Select only the first image in your sequence and click Open. Next, you’ll want to select your frame rate. For our example, we’ll go with 15 frames per second. Click OK and QuickTime will do the rest for you.
You now have your master time-lapse video. Make sure to save it as is. You can then go back to the File menu and choose Export for Web to save the video as a more web-friendly version, ready for Youtubing.

Congratulations, you now have your first time-lapse video!
Extra Steps
While this tutorial simply covers the basics of time-lapse photography, there are plenty of other methods available to play with, so once you get some practice down, you can start experimenting a bit. For example, you may want to batch-edit your photos in Photoshop to create a more unusual time-lapse, such as one in monochrome.
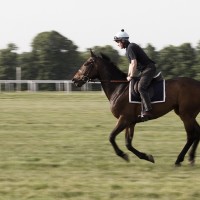
If you’re shooting a busy street at night, you might want to use a slow shutter speed to make the car headlights streak throughout your video. Or you may want your time-lapse to pan across a large scene, a bit like this one, to give your video a wow factor. The options are endless.
Time-lapses can be a great way to create a fun and unique project on a lazy Sunday afternoon. Maybe you have things to do around the house, so you set up your gear in your backyard and shoot while you do your chores. Or maybe you’re at a cafe in a busy city square. Why not shoot a time-lapse of the buzz around you while you sip on a cappuccino and read a book? It’s simple to do and I’m sure you’ll be pleased with your results.
And just so that you know, this is my favourite time-lapse out there:
Hayaku: A Time Lapse Journey Through Japan from Brad Kremer on Vimeo.