


One of the students in the Photocritic Photography School asked us how to deal with a dirty sensor not long ago. Many cameras clean their sensors with a bit of vibration each time that you switch them on or off. That's fine for dust, but it isn't so effective if for dirty splotches. Thankfully, there are ways of dealing with those, too!
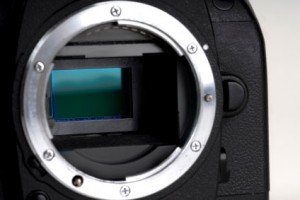
So you have spent thousands on your camera and you’re wondering how to clean it? Well it’s a good question to ask; a dirty sensor will impact every single one of your images, as it is – quite literally – the focal point of all the camera’s technology. That’s right, your hard earned dollars reduced to the mercy of the elements. Scary thought eh? Despair thee not, young padawan, help is at hand…
Your goal is to remove dust (and possibly moisture) off the sensor. You want to do this as carefully and easily as you can. There are myriad people who are delighted to take your money off you to help you do this, so let’s start by picking some of the best:
Sensor Swab
‘Sensor Swab‘ is the preferred method and for a very good reason; it’s a mighty fine product which is recommended by quite a few of the camera manufacturers to boot. Sensor Swab is a wet solution which is applied to the sensor by a, well, swab.
For around $45 you can get yourself a kit and that will remove both wet and dry dust. It is 99.9% effective when done properly and even offers a guarantee in case of damage to the sensor – which is handy, because replacing a damaged sensor is filthy expensive. The downside is that it can’t be shipped by air and is illegal in some countries (due to containing methanol). If you’ve got a decent camera shop nearby, however, they probably stock some – go talk to your friendly neighbourhood lenspeddler to find out.
Brush
Here is the old fashion method. Offering multiple uses and a straight forward method the brush definitely has some advantages. Brushes generally use a method that utilizes static allowing the brush fibers to remove stubborn dust. A brush is also very transportable.
Down sides include the fact that the brush cannot be cleaned and can’t remove wet dust or moisture. A standard brush will cost about $25 while the ‘Brush Off‘ brand (which is more effective) will set you back about $50.
Blower
Using an air blower – like the Giottos Air Rocket – is what your manual will recommend, the reason for this is there is no contact required with the sensor, which reduces the risk of anything going wrong. Unfortunately the downside is that the blower is not that effective, and doesn’t actually remove the dust from the inside of your camera; it merely shuffles it about a bit. In addition, it will struggle to remove dust with a static charge and anything with moisture.
Despite its downsides, using an air blower is often the easiest thing to do when you’re in the field – it’s easy to transport, relatively cheap, and gets rid of the worst dust in a quick and capable way.
Time for a spring clean!
 Every once and again, you need to clean your sensor properly; depends on how much you use your camera, but for me, it’s approximately every 2-3 months or so, a process which involves several of the products above. Here’s how to do it:
Charge the Battery – If your battery dies at any point this can be very bad news and step 2 explains why.
Open Shutter – This is different for all cameras but most have a ‘sensor cleaning mode’ which will open the shutter and move the mirror aside so you can access the sensor for cleaning. If the battery dies during this phase will close and possible take the swab with it which will probably cause damage to the inside of your camera.
Blow out excess dust – Look for a dust free environment and begin blowing, this removes the big particles of dust. Never use compressed air in a ‘spray can’ for this (it leaves a residue) – get one of the bellow-style blowers like the Giottos Air Rocket described earlier in this article. This is extremely important because if this isn’t done at a later stage you can be dragging particles around with the swab, causing scratches and more problems than you had before. (NOTE: Some people will suggest using a foot pump because your hands are free, DO NOT DO THIS. Reason being a foot pump has too much power and sits on the floor drawing in dust and dirt)
Take a look – Use a small torch/flashlight (the little single-LED torches are great for this) to spot exactly where there are dust particles on your sensor
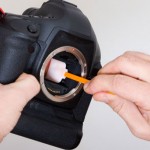
Swab – Use as little swabbing liquid as you can while swabbing and apply with the pressure of the pen. Use one side of the swab for the liquid solution, and the other to wipe when complete – whatever you do, don’t touch the swab itself.
Do some test shots – the easiest way to do this is to take a photo of a blue sky or similar even, bright surface, and look at your image at 100% magnification on your computer. If you still see problems, it’s back to point 1 for a second try.
Now comes the trickiest bit; going back out there and taking shots so awesome that they’re worthy of your freshly cleaned imaging sensor. Good luck and have fun!