new toys

Instagram and Twitter's playground scuffle


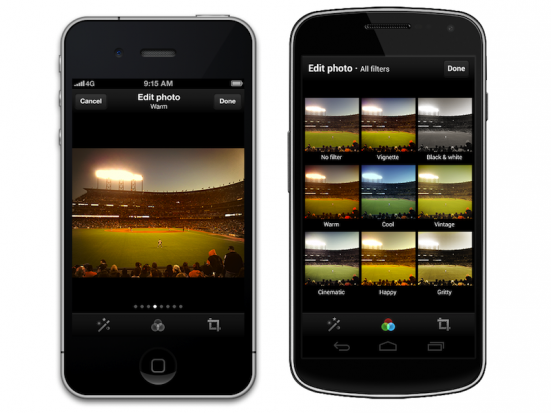
Twitter's new Aviary-powered filters

Instagram and Twitter's current spat is worse than squabbling children. 'Instagram doesn't want to play!' 'But Twitter started it!' 'Well, ner, we'll just play by ourselves then!' 'Fine, we'll find some new toys, too!' I feel like putting them on the naughty step and asking them to explain themselves when they're ready.

This round really kicked off late last week, when Instagram's CEO, Kevin Systrom, confirmed that Instagram will no longer be offering card support on Twitter. That means instead of Instagram pictures appearing directly in a tweet, you'll have to follow a link taking you to Instagram's site.

From Instagram's perspective, this is 'The right thing to do' because it is building on their own social network. Systrom did state that this was in no way a direct result of Instagram's acquisition by Facebook. It is, however, easy to interpret this as Facebook pulling strings and fostering the sort of social networking that prompted the buy-out. Facebook snapped up Instagram because it needed a route into mobile, photographic social networking. By burning bridges with Twitter, it's encouraging its users to stay within its own network, not share the love across them. So really, it isn't so much about being globally socialable, but more about being a global social hegemony. 

From Twitter's perspective there are short-term and long-term implications. In the short-term, it's not that big a deal. That people's Instagram images don't appear directly in tweets is an irritation for some, but Twitter is about so much more than Instagram that it's just that: an irritation. It isn't a fundamental failing. The long-term implications need a bit more thought, though.

From Twitter's perspective, is this that big a deal? I'm inclined to say not really, for now. Twitter is about a great deal more than Instagram. Yes, that people's Instagram images don't appear directly in tweets is an irritation for some, but it's just that: an irritation. Whilst Instagram is a component of Twitter's functionality, Twitter doesn't rely on it for survival. It is, though, a warning signal to Twitter that will need to think about maintaining its attraction to users, because Facebook is gunning for it.

Yesterday, Twitter announced that it has partnered with Aviary–the company that provides image editing services on Flickr and in MailChimp, amongst others–to provide its own photo filters. The timing fits neatly with Instagram's card-retraction move, but isn't a direct result of that. If anything, it's more likely to have been the other way about with Instagram withdrawing cards knowing that Twitter was about to offer its own filters. These filters have thought to have been in the pipeline since Instagram's takeover in April. So Twitter is thinking in terms of its longevity.

As for the in-Twitter editing options, they're available for both iOS and Android, there's a choice of eight filters, all of them can be previewed simultaneously using a grid view, you can crop and zoom, and there's a magic wand to enable auto-correction. It's not nearly as diverse as Instagram's offerings, but it's a start.

Indeed, Instagram made their offerings even more diverse yesterday, too. There was a camera update for iOS users, a new filter called Willow, and some improvements to the tilt-shift effect. The camera update should make it easier to Instagram-ify previously taken photos as well as providing an optional grid when you're taking photos and a permanent grid when you're cropping. That, then, would be a small reminder to its users about the sorts of functionality (barring lack of Twitter integration) that it offers.

Twitter has managed to upset plenty of developers with its stringent API requirements and Instagram seems intent on developing its own (and by extension, Facebook's) network as opposed to playing nicely with others. They might see this as good for their businesses, but the reality is that the users lose out. And it's the users who make these social networks social.

What then for the users? If you're on Instagram for the followers, then you'll have to stick with it, or at least stick with it until you've grown a new network elsewhere. If you use Instagram for its filters and for the purposes of being social, then there are plenty of other ways of doing that.

It's irritating that these big kids can't play nicely and that it has the potential to all end in tears. There really are enough relationships and enough photographs to go around. We don't need to be forced into a social networking hegemony.

You can check out Instagram's update on its blog, and Twitter's update on its blog.

More new stuff from Flickr


Flickr's full-screen fabulousness

Flickr promised more new toys when they announced the shiny, improved Uploadr last week. They've delivered on that today (or yesterday if you are where I am), with new photo sizes for all users and the ability for Pro users to control the sizes of their displayed images.

Head over to the Lightbox and you'll be able to see your images in 2048 and 1600 pixels, provided that they were uploaded after 1 March this year. Should you not have uploaded anything since then, try out the new Uploadr (mine appeared earlier this week) and have a peek.

As a Pro user, you can also upload your images in their original full resolution wonder, but set a limit for the size at which the rest of the world gets to gaze at them. You can do that in the Image Size setting. Sensible naming convention, that.

If you missed it earlier this week, Flickr has also worked with Pinterest to ensure that any photos that are pinned from Flickr are properly attributed. That means your name, the image's name, and a link back to it all come with the photo. Furthermore, if one of your images has been embedded in a blog and someone has pinned it from there, it'll miraculously be attributed to you and linked back to Flickr.

For the Pinterest lovers, there's a new Pinterest button in the 'Share' menu above every image. (It also works for groups and favourites.) For the Pinterest not-so-lovers, you can disable that feature on your images.

They have been having fun over at Flickr. I wonder if they've anything else up their sleeves?

Lightroom's Graduated Filter - not just for skies!

Lightroom-Thumb

When you’re accustomed to using something, it’s easy to forget that its capabilities might stretch beyond just that for which you usually use it. You get into some sort of rut don’t explore whatever it is that you’re using, whether it is your food processor, your mixing desk, or your copy of Lightroom.

Jamie Gladden got in touch with us to tell us about a rather nifty way of putting Lightroom’s Graduated Filter to better use than just applying it to skies. Jamie, it’s over to you…

I recently posted an article on my blog describing some simple portrait retouching techniques using Adobe Photoshop Lightroom. A friend of mine later commented to me that he wasn’t that familiar with some of the Lightroom tools that I’d mentioned, so he’d go off, find some tutorials, and play around with these new toys. Great! There are loads of cool tutorials out there, and he’ll definitely learn some useful techniques which will improve his photo retouching skills.

One of the tools I wrote about was Lightroom’s Graduated Filter, which was introduced in version 2 and is very handy. If you do a Google search for this, you’ll find lots of useful tutorials explaining how to use the tool to pep up your landscape shots, darkening a bright sky to add more detail and produce a more even exposure without changing the area of land beneath the sky. Cool! So that’s a new technique we’ve learned, the Graduated Filter is used to even up the overall exposure of your landscape shots by darkening the skies, just like using a Neutral Density Graduated filter in front of the lens on your camera.

What if you don’t shoot that many landscapes? You’ll never need to use that filter, right? Maybe, maybe not. It’s easy sometimes to get stuck with the idea that some of the features serve one purpose only, but with a little experimentation, you can find new and unexpected things to do with them.

In my own photography, I tend to photograph bands and people more than I do landscapes. If I’m working in a studio, then I’ll have full control over the lighting, and the light goes mainly where I want it to go – most of the time! Sometimes, I’ll need to make minor post-production tweaks here and there to compensate for areas which are a little brighter or darker than I’d like.

From the studio to the Lightroom

Take a look at these two photos.

The top shot is complete up to the point at which I was happy with all the retouching and post-processing work I’d done, apart from one thing. I thought that the model was just a little too bright on the right side of her face and neck for my liking. The main light is coming in from camera right, and I had a fill light off to the left, and it’s the main light which is doing the damage.

I wanted to tone this down a little, but only on the slightly brighter area on the right side of her face. Decreasing the exposure or brightness isn’t really an option, because that would change the exposure/brightness of the whole shot, and that’s not what I wanted.

I could also have used the adjustment brush to paint over the too-bright areas, and then adjust the brightness level which would change only the area I’d painted over. That would certainly do the trick, and it does give you more control, but it can be a little fiddly sometimes, and would take more time.

But wait! What about the Graduated Filter? Couldn’t we use that to give us a subtle darkening of her skin on one side which is too bright without darkening the skin on the other side of her face? Definitely. The grad filter is perfect for that.

You can see the effect in the second photo. It’s quite a subtle difference, but for me it was necessary to fix it. After selecting the grad filter tool, I dragged the crosshair across the photo from right to left, stopping when I thought I’d arranged the markers in the correct position.

Then, I adjusted the grad tool’s exposure setting down to a level that evened up the lighting nicely, and I was happy.

Outdoors, but not about the sky

Here’s another example. This is Alice:

If you’re working outdoors with natural light, then it’s not so simple to move the light source to where you want it to be, so you have to work the light to your advantage, and maybe use a reflector or diffuser to shape the light how you want it. Again, there will usually be some tweaks needed in post-production.

In the first photo, the background in the bottom left is just a touch too bright for my taste, and I think it draws your eye away from her face. Just a quick application of the Graduated Filter, as before, and it was fixed. Simple and quick. Which leaves you more time to go out and take photos, rather than sitting at the computer.

And even for concert photography

For a final, and more dramatic example, here’s a shot of Benjamin Curtis from the band School of Seven Bells:

When you’re shooting bands on stage, you’re totally at the mercy of the stage lights, which often change quite rapidly. Often, I like to make the lights a feature of my shots, rather than using them solely to illuminate the artist.

In the first photo, the lights are quite overpowering, and they detract from the shot, but by just simply adding a grad filter straight down from the top of the picture, we’ve toned it down a lot, and produced a really cool and striking effect from the stage lights.

So, there are just three examples of using Lightroom’s Graduated Filter, and not a single sky has been prodded. One of the real selling points of Lightroom for me is that it’s easy to experiment like this, safe in the knowledge that if it doesn’t work out, it’s so simple to go back to your original RAW file and start again.

About the author

This article was written by Jamie Gladden. Jamie’s a freelance photographer based in London, UK, with interests in music, fashion and portrait photography. He’s passionate about music and loves discovering new bands and artists. He reckons that there’s nothing better than seeing a really talented unsigned band in a cramped room above a pub. He’s similarly passionate about photography, and there’s no greater pleasure for him than being able to combine the two. Check out his site; 3 songs no flash.


Do you enjoy a smattering of random photography links? Well, squire, I welcome thee to join me on Twitter -

© Kamps Consulting Ltd. This article is licenced for use on Pixiq only. Please do not reproduce wholly or in part without a license. More info.