canon 450d

Why I don't need an expensive camera.

On My Flickr Feed, I some times get questions about my use of camera. “Why”, it is asked, “do you shoot with a 450D/550D”?

I understand the question completely. When I was photographing professionally, I wouldn’t have dreamed of using the then-bottom-level camera (the 300D, at the time, I think) even as my back-up camera. The 10D (and later the 20D and 30D) was my the back-up and second-lens camera to my 1D. So how did I end up photographing with the bottom-of-the-range model from Canon only a few short years later?

Let me in on a secret: Even the cheapest d-SLR cameras on the market today are absolutely phenomenal pieces of equipment, and chances are that you don’t need to spend much money to take phenomenal photos.

What am I missing?

"Waves breaking Slowly" - a smoke photo. Taken with a Canon 450D (clicky for full size and details)

As some of you might have noticed, I occasionally dabble in concert photography, and this is where my 550D occasionally lets me down. And then, only in one very specific aspect of my photographic work: I want to take photos faster. I want to be able to take more photos in a shorter period of time. Some times, you realise you’re witnessing something awesome, and you just want to keep the shutter pressed until the awesome has gone away – and then keeping your fingers crossed that one of the six billion photos you’ve taken in the meantime is the shot you were hoping (and praying, if you’re a praying man. Which I’m not. I think I might have gotten better photos with a god on my side, but this is just not That Kind of Blog™) for.

Interestingly, that is the only situation where I’ve ever felt my 550D isn’t up to the job. With the appropriate lighting, my portraiture work comes out lovely. I’ve taken my camera to a load of different countries, and I’ve taken some rather splendid street photos in all of ‘em (if I may say so myself).

The other situation where you might find yourself stuck (although I haven’t had the experience myself, as I make a point of staying as far away from sports as I can) is, er, sports photography.

So, if the 550D is good enough… Is it all just a scam?

You'll often find that lighting is a much bigger factor in photography than the camera you're using. (shot with a Canon EOS 450D. Clickie for bigger)

Wait a minute, cowboy, I never said that. All I’m saying is that at my level (and, I wager to say, at the level of many other photographers), the 550D (and any equivalent low-level SLR cameras) are plenty good.

The problem with photography is that it’s simply too tempting to splash a lot of money for everything, and then end up bankrupting yourself on the wrong things. Sure, I would love to have some of the features offered by more expensive cameras, but I can work around them. For concert photos, I’ve learned to anticipate the movements of the artists, and then try to act on those. I have no doubt that I’ve missed some cracking shots along the way, but equally, I think the limitations of my photographic kit has made me a better photographer. Put differently: Put a 1Ds mk III in my hands now, and I think I’ll be able to take better photos with it than I could have before I learned the limitations of another camera.

The most important thing to remember, though, is that as far as a camera body goes, it doesn’t actually have all that much to do with the picture-taking process itself. Yeah, I know. Controversial. But I said it, and I meant it.

Portrait - taken with a 450D. (click for higher res & info)

Think about it: You are taking a photo of an antelope jumping across a savannah. The sunlight comes from high above, hits the antelope, flies through your lens, into your camera… and the only part of the camera which actually gets involved is the imaging sensor.

I’m not going to lie: I use expensive photographic equipment. I’ve recently splashed a few thousand dollars on lighting equipment. I have some extraordinarily delicious lenses – including my ludicrously fantastic Canon 50mm f/1.4 USM prime lens, a rather sexy 70-200mm f/2.8, etc etc etc. But this illustrates an important point: I’m spending the most money on the bits of kit that will actually impact my photos.

Truth be told, there isn’t that much difference between a 7-year-old Canon digital SLR camera like the 300D and a brand spanking new 550D. Sure, the latter has higher resolution and better toys, but most people simply don’t need the extra resolution. What you need is a shutter that works, a mirror that will move out of the way in time, and a sensor without too many dead pixels. From there on out, it’s all about the quality of your glass (i.e. your lenses), the quality of your light (i.e. sunlight / flash / natural light / diffusers / softboxes / light filters / etc) and… You.

With all the electronics, magnificent optics, and delicious equipment at your beck and call, the sad, scary, horrible truth is that the weakest link in everything I’ve just described is you. A competent photographer can take good photos with a single-use camera.

My advanced motorcycling club has a motto: “Upgrade your skills to match your machine”. In other words: Your motorcycle is probably better than you are, and you need to work smart (and hard) to not kill yourself. Granted, I’d be willing to accept that more people kill themselves with a set of handlebars between their hands than with a SLR, but the point stands: If you haven’t got the skills, there’s no point in blaming your tools.

What are the benefits of pricier cameras?

I quite like the fact that the Canon 450D looks unobtrusive: It makes street photography just that tiny bit easier.

As you go up the Canon and Nikon ranges, you get some very good benefits. If you’re working as a (semi-)professional photographer, the first thing you’ll notice is build quality. The budget cameras aren’t badly put together, but they’re made of plastic. Drop one, and there’s a pretty good chance it’s all just game over. The more pricey cameras are built of aluminium or magnesium, and can take significantly more abuse.

The higher-priced, higher-specced cameras also tend to have better screens, higher-resolution sensors, higher shooting and processing speed, and more gadgets to help you get the photos you desire. I’m not saying this is a bad thing: there’s a ‘right’ tool for every job. Very often, a more advanced tool can be used to do jobs that a cheaper tool could have completed, but not vice-versa.

I also note that ISO speed has come up in the comments a few times, and that had me wondering. I asked a good friend of mine who reviews camera equipment for a living. He explains that ‘budget’ SLR cameras are as good as their larger parents. It is possible to get better performance, of course, but that involves going full-frame, and then you’re suddenly well and truly out of budget-camera-territory, price-wise.

On the ISO front, you sometimes get an improvement with the latest high-end model but it very quickly filters down (see for example how fast the 550D got great high-ISO capabilities so soon after 7D).

Hey, aren’t you meant to be some hot-shot writer?

Again with the street photography! Don't I ever give up? Nope, of course not. (clicky for bigger)

Uhm… Yeah, I’d like to think of myself as one, anyway (and I’ve got the resume to back it up, if you’re particularly curious…), but the truth of the matter is that most of my writing is aimed at photographers who rank from ‘geez, which hole do I look into to see what I’m taking a photo of’ beginners, to ‘Hey, I do wonder what the comparative benefits of shooting in RAW is, compared to taking only JPEGs’ intermediate photographers. Truth is, more expensive cameras are objectively ‘better’.

… But the bottleneck is still the photographers. Take it from me: you’ll be much happier with a ‘cheap’ dSLR, a decent lens, and an oath to work hard on taking better photos, than by owning the hippest, coolest, and newest equipment on the market.

Concert photography is the only time where I'm feeling the 450D can occasionally let me down. But then again, I seem to have learned to work around its weaknesses, and still walk away with some pretty nifty photos... (clicky for bigger)

There’s nothing quite as embarrassing as a clueless newbie behind the wheel of a sportscar. My 550D is the all-rounder that lets me do everything I need to do with a camera.

And best of all? A 550D isn’t throw-away money, but if something horrible were to happen to my camera and I lost or destroyed it somehow, I could swear for 45 minutes straight, before walking into the nearest shop to buy myself another one. A Canon 1Ds mk III is small-family-hatchback territory; not the kind of money I can afford to lose.

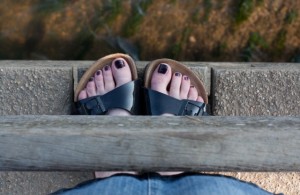
The bottle-neck of good photography is often the photographer. This photo, I could have taken with a disposable camera (well, maybe. Certainly with a compact).

Finally, the 550D is more like the camera that my readers are likely to use. Truth of the matter is that people who own a much more expensive camera are more likely a) to no longer need my articles, b) to think they no longer need my articles, or c) to be so far ahead of the game that I haven’t got anything to offer them anymore.

Oh, and by the way… I sort of like the fact that the 550D is made of plastic. It’s much lighter to travel with, looks cheaper (and so is less likely to get stolen from me) and is less invasive when I’m working with my street photography projects

Which doesn’t mean that I don’t occasionally think about upgrading... The 60D and 600D are both rather tasty cameras - and the ability to sync with Speedlites without an external ST-E2 is tempting... But I don't really hunger for the top-end Canons.

A Lightroom love-in?

This is what happens when you play with vibrance and saturation

In the interests of consumer empowerment, we here at Small Aperture have played around with free editing software and been pretty impressed; we’ve suffered some fairly terrible options at the lower end of paid-for software and picked up on some gems, too. But there are some options out there that cost a wee bit more, as well. So we thought that we’d put the biggest name in photo editing software through its paces and see how it does.

Yes, we’re talking about Adobe Lightroom 3. It costs £232.65. (Or $299) That’s a lot of pennies. (23,265, to be precise.) Is it honestly worth it? We decided to find out in the best way we could think of: we let loose a complete Lightroom novice and an absolute Lightroom junkie on it, with this picture that I took on my Canon 450D one afternoon at the seaside.

Yes, those are my footsies.

The only requirement was to make the picture look better. (And to tell us what they thought of the process.)

Did they manage it?

First impressions

The junkie opened up Lightroom 3 (being all accustomed to Lightroom 2) and went: ‘Cool!’. The novice opened it up and turned white. Lightroom 3 is beautifully laid out, with collapsible panels on all sides, including the five modules that act as the centre of operations across the top of the screen, but as a programme that doesn’t just edit images, but organises and stores them, and prepares them for printing and web uploading (hell, it probably runs the International Space Station, too), there’s a whole heap going on. If you’re not sure what to expect, it’s pretty overwhelming.

Beautifully laid out, but with so much going on, it could be overwhelming

Nerves calmed, with tea, our Intrepid Duo ploughed on.

Setting off

Importing images is straight forward. You plonk yourself in the library module, you tell it if you’re importing directly from your memory card or transfering from a hard drive, you select your images, you press ‘import’. Kaboom! There they are.

So many ways to order your photos

Next, being this swanky image organisation oojimaflip, you get to organise your images according to some gazillion different options. When you’ve found a method that you like, you can save it as a preset. Lightroom likes to let you save things that you do regularly as presets. That’s fairly handy for demon picture editors. Or you can play up to the image of the disorganised artistic type and never use the same system twice.

Whatever, this next bit is one of Lightroom’s key functions: when an image is imported, it keeps the original RAW file perfectly safe. It will let you do all manner of hideous things to your images by sending them lurid shades of red and green and adding ghastly vignettes before you can crawl back to it as a primary school kiddie would her or his teacher and ask feebly: ‘Please Miss, can I have another one?’ Awesome!

Picture successfully imported and saved, our Intrepid Duo slunk onwards to the develop module to, ehm, develop the photo.

Develop

More tools than canapes at a palace tea party

When you switch between modules, the layout of the screen doesn’t change: you still have four collapsible panels around the edges and a large version of your image in the centre of the screen. Top panel are still your modules and bottom panel shows a film strip of the images in the folder you’re working on. What changes is the content of the left and right hand panels.

In the develop module, your right hand panel contains more tools than canapes at a Buckingham Palace garden party and the left hand panel shows a small version of the image and a history of the changes that you’ve made to that particular image.

You’ve also fancy buttons that allow you to compare images side-by-side, on top of each other, and cut in half and moojed together (yes, ‘moojed together’ is a technical term). You can compare two completely different images, or the same image at different stages of editing. It’s just what you need to create the perfect Batman villain.

So now you want to know what our Intrepid Duo did, I suppose, don’t you? I’m getting there. I promise. (But they didn’t create any Batman villains.)

Cropping and rotating

Obviously I’d had one beer too many at lunchtime that day and my angles were all out of kilter. Straightening things up after the event, however, was as easy as pie. (Why is pie regarded as easy? I have no idea.) It was also easy to remove the information-free grey zone in the bottom left corner.

Much better.

Exposure and tweaking

Now I took this photo at about 4pm on a clear day in high summer. The sun was bright, we were near water, but I was doing a good job of shading myself. Still, the exposure needed a bit of help. Boy does Lightroom offer that in spades.

These are the basic developing tools

There’s a histogram. There’s a panel of basic functions to tinker with temperature and tint, to meddle with exposure, brightness, and contrast, and to muck about with clarity. If you want to fiddle with highlights and shadows independently of each other, there’s a tone curve. Then you can play with the hue, saturation, and luminance of eight different colours in the image.

There’s even a groovy widget which adjusts the specific colours prevalent in a given area of the photo. You might not have thought that the purples were overly dominant there, but Lightroom lets you know.

When you’re making your adjustments you can either use the slider to slide between different values, or if you’re a control freak you can type a specific value in the box next to the sliding scale. Whatever adjustment you make, the response is almost instant in the image. Marvellous.

So. What was done to these here foots of mine? For a start, my skin tone belies my Mediterranean heritage and my toes looked almost frostbitten. No problem, warm the light a touch. As I was making an excellent shadow for myself, the picture was a touch dark. Bring on the brightness, Lightroom.

Warmer and brighter, but odd things are happening with the greens and oranges

That had an odd effect on the greens, yellows, and oranges, though. It was, however, superbly easy to correct that, using the hue, saturation, and luminance buttons.

That was about it.

Straighter, brighter, warmer, and with no odd greens, oranges, or yellows

The verdict on exposure and tweaking? There is so much that you can do with one image, where to start? Well, at the top. Work down. Don’t like something? Go back a stage. This is what Lightroom does so well. It’s completely non-destructive and in a panel on the left it tracks every move you make. (You can sing, hum, or whistle The Police now, if you want.) Yes, you can go wrong, but there’s nothing you can’t undo.

Retouching and sharpening

The grains of sand between my toes could easily have been brushed away, but I was at the seaside, so why would we want to do that? And if the picture were sharpened any, those grains of sand would’ve looked like daggers. Not so pretty. But entirely possible. I suppose that the Intrepid Duo could’ve added some drops of blood then, but it might’ve distracted from the overall look. But that doesn’t change how responsive the the tools are, and how many different options you have for brush size and how you might want to use it.

Black and white conversion

The Intrepid Duo was able to flip back to straightened, cropped image to begin their black and white shenanigans, which started with the touch of the black and white button.

Then they began to adjust the black and white mix of the colours that made up the image. Again, there’s a groovy widget that allows you select a specific area and amend the dominant colour within it. In this case, the purple was taken out of my toes, again to stop them looking frost-bitten, and the blue was taken out of my sandal straps to increase the contrast.

Unlike the colour version, the orange and green tones didn’t need to be adjusted. Of course, the Intrepid Duo found this out by fiddling with the sliders for themselves. And when they finally decided to let it be, all they had to do was slip down the history panel and select the version of the image before they’d begun messing with orange and green.

The oranges remain unadulterated.

The verdict on black and white conversion? Lord that was easy.

Toys and stuff

Lightroom 3 comes with 50, yes really 50, presets that allow you to add vignettes and grain and mess with the tones, and make your pictures look 100 years old or as if they come from the future. But even better? The range of functions that it affords you, and being able to save your own specific processes as presets, means that making your own toys is just a matter of trial and error. Whether you want to introduce an air of sepia-toned mystery or pop-art it up, anything is possible. Or you can go read Photocritic’s guide to creating toy camera presets. Oh, and take a look at my pretty butterfly.

This is what happens when you play with vibrance and saturation

Now what?

As you’ve been working on your RAW images, all that remains is to export your final version into whichever folder you want it, or email it directly to your Mum, or upload it straight to Flickr. By the this stage, our Lightroom novice’s face was an incredible mixture of relief and pride, whilst the junkie wanted to start all over again. Yeah, I should’ve taken a photo.

The verdict?

As our novice put it: ‘Honestly, it seems as if there’s nothing that Lightroom 3 can’t do.’ That’s probably an accurate summary. We haven’t even looked at its lens correction capabilities, its split toning function, its red eye removal button, or its groovy graduated filter. And then there’re the slideshow, print, and web modules. I figured that you didn’t want to read something as long as War and Peace, so I’ll just mention that they exist.

The bottom line – is it worth £232.65? If you’re serious about taking pictures, yes. You can fiddle about with its functions until your heart is content and then revert to the original image, or any point along the way, and begin again. You can learn the exact capabilities of each and every element with absolute impunity. You can do as much or as little as you want.

Both the junkie and the novice agreed, however, that if you take pictures occasionally and don’t do that much editing, no, it’s not worth it. There are cheaper, or free, editing packages out there which will do precisely what you want them to, and not overwhelm you in the process.

Lightroom 3 isn’t for everyone, but for those who are its target users, oh it is magnificent.

This article produced in conjunction with morning coffee, lunch courtesy of Innocent, afternoon tea, and home-made carrot cake.