


I think my favourite part of the video is where my hand shows up in frame. It breaks the fourth wall nicely.
With the fantastic response on my Kickstarter project so far, I've had quite a few comments and questions about the pitch video that accompanies the Triggertrap over on Kickstarter, including two High School teachers (hi guys) who wanted to make videos with this with their kids.
First of all, have a quick look at the video as a reminder of what it was all about:
This video is mostly stop-motion animation.
Step one: The audio
Since I knew that I wanted the video to be short, I had to think about what I actually wanted to say. In the film world, this means that you have to write a script. In my case, I've written quite a few voice-over and radio scripts before, as I studied journalism under the rather illustrious Richard Rudin, who is a bit of a broadcasting legend in his own right. Of course, this was all ten years ago, but some of the key points still stuck in my mind.
Eventually, I landed on a script that was going to be about 2 minutes long, which I figured would be a good length for a Kickstarter video. From my days at T3 (I used to edit the gadget website T3.com), we did a fair bit of research about video length etc. Later, when I was producing FiveFWD, we discovered that 2-5 minutes was the perfect length for a web video, but that the longer videos only 'stuck' with people if they were patient and interested in the product. There are examples from Fifth Gear and the Gadget Show, if you're particularly curious.
Anyway, so I decided to make my script as short and to the point as possible. I spend 10 seconds introducing myself, 5 seconds setting the scene for what I've done before, and then, only 21 seconds in, I tell my audience what the idea is, and what it does. 26 seconds in, the hard sell happens, in that I rattle off the main bread-and-butter features of my device, and then at 41 seconds, I start what I believe to be the 'killer feature': The auxiliary port, which opens the device for use in god-knows-how-many-ways: A hackable camera trigger for people who aren't hackers.
Next, I recorded the audio with the video function on my Olympus E-P1. I do have both better cameras (the Canon T1i springs to mind) and better microphones than the one that was built-in, but I wanted to keep it a little bit lo-fi.
When recording the videos, I did re-takes whenever I stumbled over words (you have no idea how hard it is to say 'auxiliary port'. Or 'pressure sensor'), and then edited the audio together in Final Cut Express. I kept the video of my face whilst editing the audio, because it's often easier to edit audio smoothly when you can visualise it, as well. I don't know if you can tell, but the final audio track has about 20 edits in it. The only one that's very obvious is the one where I go from live action (i.e. the very first 4 seconds) to recording sitting much closer to the camera.
The audio recording and editing session took about 90 minutes in total, I think.
I then put my script into Google Spreadsheets, and went through the audio, and timecoded the whole thing. By using a little bit of spreadsheet magic, I was able to automatically calculate how many frames of animation I would need for each phrase or idea in my script, and so I had a shot list.
The full script, should you be curious, is downloadable as a PDF here.
In the original script, I didn't have everything in capitals: Usually, only the words you would emphasize are in capitals, and you would also include extra punctuation to remember to take breaks whilst you're speaking.However, when the time came to start doing the shots, the odd capitalised word was distrating, so I put it all in caps.
Like this: in the ORIGINAL script, I didn't have everything in capitals ... Usually, ONLY the words you would EMPHASIZE , are in capitals ... and you would ALSO include extra punctuation , to REMEMBER to take BREAKS , whilst you're speaking.
It takes a bit of time to get used to reading scripts like this, but once it becomes second nature, it makes it a lot easier to read 'naturally' into a microphone.
Planning the shots
With a solid audio track, I started planning out each one of my shots. My lovely girlfriend Ziah (who has worked in the film industry for many years) helped by asking lots of difficult questions about how we were going to visualise everything.
The video was going to be a mixture of stop motion (i.e. moving toy cars around and taking photos of them), animation (i.e. drawing an idea or a sketch, and taking a photo every few lines, so it would look as if the thing is being drawn right in front of you), Collages (basically, still frames shown on screen) and live footage (Me speaking to camera). As it turned out, once we got about half-way through making the video, it turned out that the sheer amount of rapid cuts we used would have turned the original video into a sensory overload. It is already pretty intense as it is - imagine the same video with another 20 or so cuts added. It wouldn't have been very pleasant to watch.
Anyway, so we reduced the number of shots we needed, and instead expanded the length of some of them a little.
Stop motion animation
Stop motion is when you move an item a few millimeters, take a photo. Move a few millimeters, take a photo. When the photos are played in quick succession, it gives the illusion of movement - hence stop motion. Let's start with an example:
For the stop motion animation of my video, I used the fantastic iStopMotion, by Boinx software to put it all together. It's really easy to use, and if I had a decent video camera (or a good web-cam), it would have been very fast to do the actual animation, too.
Sadly, I didn't have the appropriate camera, so I used a Canon EOS T1i instead, with a home-made remote trigger. I did consider putting together a quick clap sensor (clap your hands, take a photo) especially for this, but figured a quick button to press would work just as well.
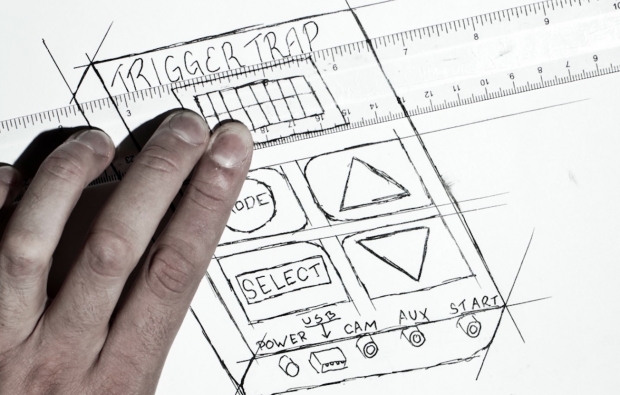
In the video, the part with the robots and the Arduino and the chips moving around is all stop-motion animation.
Animation
Now, my particular brand of animation wasn't exactly super high tech; cell animation (like what you expect from old Disney movies, for example) is a lot more work. Instead, I was inspired by a video I saw by PhD comics:
Dark Matters from PHD Comics on Vimeo.
Of course, there's a pretty big difference between PhD comics and myself: They know what the hell they are doing, and I, quite clearly, do not.
But that has never stopped me before, and I decided that whilst nobody would back Triggertrap with a single nickel if I showed the final drawings, perhaps if I animated it, it would come to life a bit more. I gave it a shot, and it looked like it worked well.
Creating the animation was pretty simple: Set up the camera above the drawing paper, tape the paper to the table, and take a photo. Draw a bit of a line. Take a photo. Repeat.
Again, I imported all the still frames into iStopMotion, and exported them as a movie file. This movie file was then imported into Final Cut Express, and matched up with my audio track.
Editing it all together

Editing this beast turned out to be a royal pain in the arse. After all, I had more than 700 frames of animation, a load of video clips, some photos (of the books and the Triggertrap), and it all had to be edited down to a 2-minute video. Ouch.
For the stop motion, Lightroom turned out to be a complete lifesaver: I was able to make the photographic adjustments to just one of the frames (color balance, crop, spot editing, contrast, etc), and then just copy the settings over to all the other frames, too. If I would have had to do that manually, I think I would have just given up.
Of course, we didn't animate anything more than we absolutely had to, which means that I didn't have any extra footage to 'cut into'.
This is where the still frames came in handy - At the end of each animation, I used the same frame for a few frames (usually about 15; so half a second) to give the reader a visual cue that there was a cut coming. That makes it less stressful to watch, and it saved me from having to come up with extra bits to animate.
The final brainwave I had when I exported the video the first time: The animation doesn't lead the viewer's eye very well, so it's not always clear what I want you to look at - so I introduced 'video movement'. This is basically done digitally, where there are slow zooms out or in (or, in the case of the segment about the auxiliary port, fast movements from important bit to important bit), to help the viewer fix their eyes on what is important.
Then, finally, I discovered that none of the timelapse footage I had shot myself was particularly suitable for the video. I tweeted out a cry for help, and within seconds Tim Haynes sprang to the rescue, and allowed me to use a snippet of his awesome Calanais Sunset timelapse video. You've simply got to love the internet.
 After a few hours of tweaking and fiddling, it all came together nicely in Final Cut Express. I added some final credits, and decided that would have to be good enough - there's only so much time I was going to spend on a video, after all.
The whole thing - from script writing via sound recording, to animation, to final edit, was about 20 hours of solid work, and Ziah helped me for about 6 hours as well, animating part of the video (the bit with the mad scientist is hers, that's why it looks way, way better than the bits I did myself), and coming up with clever ideas for some of the segments.
So, there you have it - The making of the Triggertrap pitch video.
I know you're just itching to see it one more time, aren't you? Awesome. Head over to Kickstarter and press 'play'. Then, if you're impressed enough by what the Triggertrap actually does, why not pre-order one? You know you want to...