When you hear the term 'high-res' thrown about with such abandon when it comes to images for web use, have you ever stopped to think just how big or how high quality and image meant for the web needs to be?
There's an assumption that high-contrast images are more dynamic, more compelling, more inviting. Have a go at some low-contrast photography. You might surprise yourself with the results.
Photographing buildings doesn't have to mean wide-angle lenses and fretting about correcting for the keystone effect. Any lens, and angle. Don't believe us? Let us show you!
In the interests of knowing how it was done and not wishing to rely on filters or presets (or on dodgy film development practices) I had a go at converting one of my self-portraits into a toy-camera looky-likey. I doubt that it's a process I'll do too often, but for the record and because I'm sure other people might be intrigued, here's how I went about it.
Before you start playing with the tonal curves and adding vignettes to your photos to make them look as if they stepped out of 1976 and were bathed in the wrong chemicals, it’s useful to know what to look for in a toy camera-esque image.
Exposure: the light meters in toy cameras tend to be on the inaccurate side of calibrated, leading to badly exposed images
Light leaks: sealing on toy cameras is virtually non-existent, presenting you with huge streaks of light smeared across your photos
Aberrations: Cheap plastic-y lenses mean distortions and vignetting
Cross-processed look: processing film in the wrong chemicals will give images odd colour casts
This is my recipe for a toy-camera flavoured photo. It's fairly subtle because I'd rather not feel as if my eyes are being assaulted by a sweet shop, but you can of course ramp up the numbers to get the effect that you want. We'll start with a studio shot of me. It was part of a series I took when I was getting accustomed to wearing glasses.
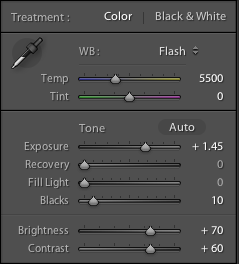
1. Exposure
My first move is to increase the exposure, add some depth to the blacks, and then go overboard with the brightness and contrast. It'll look like a cartoon at this stage, but it's a base on which to build.
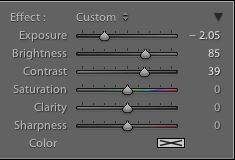
2. Clarity
By nudging the clarity slider to the left it helps to recreate the soft mushiness of a cheap plastic lens.
3. Light leak
Use a pair of graduated filters to add a light leak. I placed one to the left of my ear and another right with roughly opposite settings. This produced a yellow-y smear.
4. Split toning
If you want, you can spend hours messing with the split toning sliders to achieve wildly varying looks that could all pass for cross-processing. It'll be a case of finding what you prefer, and placing more emphasis on the reds and purples or the greens and yellows.
I tried this image with a yellow-y green look initially, but swapped it for a more pinky-red version.
5. Vignette
Without knocking myself over the head with a plastic picture-taking-device, I add a touch of vignette, too.
6. Grain
Finally, add a hint of grain to help recreate the film feel of a toy camera.
Et voila – from studious studio self-portrait to tricksy toy camera creation.
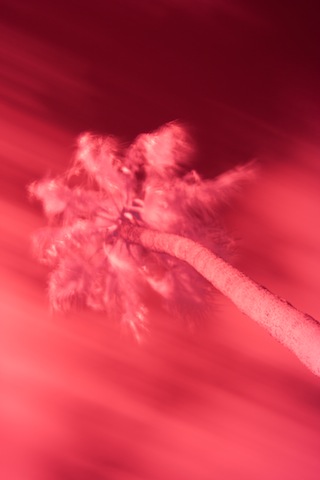
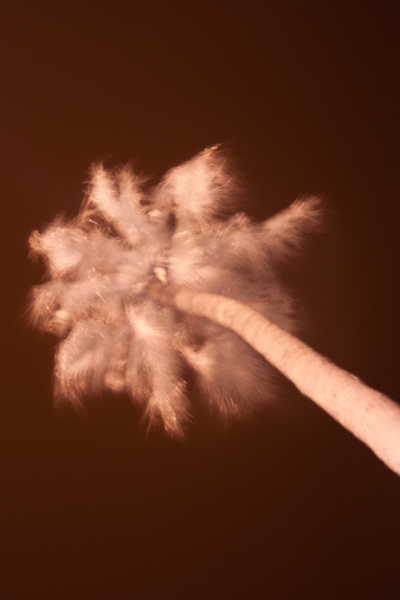
We're accustomed to taking photos with what is somewhat uninspiringly referred to as 'visible light', or the part of the spectrum whose wavelengths measure roughly 400 nanometres (violet) to 750 nanometres (deep red). However, there's an awful lot more to light than just the wavelengths we're able to discern with the naked eye, and it's possible to take photos using that 'invisible light'. In particular we can make use of infrared light (IR), which picks up at 750 nanometres, where visible light drops off, and stretching to approximately 20,0000 nanometres.
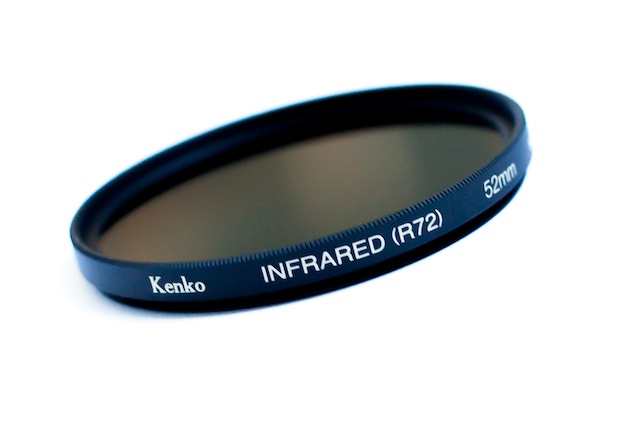
Lots of people think that IR photography is the preserve of specialist infrared adapted cameras, with 'normal' cameras being insensitive to IR light owing to the 'hot mirror' that sits just before the sensor. However, these hot mirrors aren't 100% effective, and with the help of an IR pass filter, you can capture images made with infrared light.
The most common filter is probably the Hoya R72, which is easy to pick up in a camera shop or over the Intergoogles. It won't allow you to capture IR waves at more than 1,300 nanometres, but that should be enough to start. You can always invest in an IR-adapted camera if you find that it really floats your boat.
Got your IR pass filter? Want to give it a shot? Off we go!
IR photography will present you with several hurdles: focusing, exposure, and post-processing. Overcoming all of them is more a case of trial-and-error than hard-and-fast rules and to be fair, that's half of the fun!
1. Choosing a scene
Okay, so you can pretty much photograph anything in IR, provided that there's some light around. However, the most stunning IR images tend to involve foliage, which comes out as bright white, and blue skies or water, which look deeply intense. But that's all after a bit of fiddling. More on that in a moment.
Whatever you choose to photograph, it's not going to be a quick process, so you need to be somewhere that won't put you in people's way or get you into mischief. And it needs to be suitable for a tripod, too.
2. Focusing
The difficulty that you’ll encounter with focusing comes as a result of the IR filter; it blocks out the majority of visible light passing through the lens, leaving you with a dark viewfinder. You don’t have anything to work with when you’re focusing your lens. This means that you have to put your camera into manual focus and set up your shot before placing the IR filter over your lens.
Setting up your shot and then placing the filter over your lens is a bit of a faff, but seeing as you’ll be using a tripod anyway (more on that in a moment), it shouldn’t be too infuriating.
3. Exposure
As for exposure, you’re going to need to use a slow shutter speed, probably between ten and 30 seconds, to allow enough IR light to reach the sensor to expose it sufficiently. This is where your tripod comes in, obviously, as you’ll never manage to hold your camera steady for that length of time. Long exposures also have a tendency to noisiness, so use as low an ISO as you can manage, too.
4. False colour
Don’t be surprised if your infrared photos emerge from your camera with strong red or magenta casts; this is known as false colour. It’s normal and it’s a simple fix in Photoshop to produce a 'traditional' looking infrared photo. If there is such a thing. It involves shifting the white balance to 2000 Kelvin and then flipping the levels in the blue and red channels. In short: open the blue channel and slide 'Red' to 100% and 'Blue' to 0%; in the red channel, 'Blue' needs to be at 100% and 'Red' at 0%. You might want to adjust the contrast and brightness, but that's the basics.
5. You don't have to use Photoshop
However, there's a lot of fun to be had by simply playing around with other editing packages to produce ethereal-looking images. With something like Lightroom you might want to try:
Fiddling with the white balance and tint sliders to produce subtle pink or flaming orange images, and everything in between
Playing with the hue and luminance sliders to alter the colour mix of the photo
Converting to black and white and using the black and white mix sliders to adjust the look of the image
Really, there's no right or wrong and the range of impact that you can have with an infrared image is enormous. It's a lot of fun.
6. Hotspots
Some lenses are prone to producing ‘hot spots’, or patches of much brighter exposure that are usually, and most inconveniently, in the centre of the image. There’s very little that you can do about this in camera except to try a different lens. Prime lenses seem to be less prone to hot spots, but there are no guarantees, and using a smaller aperture will reduce its size. It's possible to try to correct it in post-processing, too.
The twinkling lights and glittering decorations of our Christmas tree are always far too good a photographic opportunity to pass up. Last year they were my testing ground for a Pentax X-5 that I had to review. This year, I decided to play around with zoom bursting, to make it appear as if the lights are bursting out of the image.
While the abstract motion effect of a zoom burst might look as if it's a pain to achieve, it actually isn't that hard. You definitely need a zoom lens on your camera and preferably a tripod; then you just need a bit of patience to get it right.
Compose your frame and focus on your subject. It's actually one occasion when centre-focusing really does work and doesn't leave your composition feeling flat and dull. But of course, it's whatever works for your photo. You'll probably find it easiest to zoom in as close as you can and then lock your focus or set it manually.
In order to achieve the motion effect you'll need a slow shutter speed, so that you have sufficient time to turn the zoom ring on your lens. If you're not confident using full manual control, do flick your camera into Shutter Priority (S or Tv) mode. For this series of photos I experimented with exposure times ranging from one-and-half seconds to ten seconds. The optimal speed seemed to be five seconds, but of course it is going to to vary depending on your subject.
I kept the aperture fairly small and the ISO relatively low. Being a long exposure shot, there was a strong possibility that it would come out over-exposed if I adhered precisely to the camera's meter, so I under-exposed by a stop-and-half. If I'd been shooting in Shutter Priority mode, I would have achieved the same effect by applying exposure compensation.
When you're ready, depress your shutter button, or use a remote release to help avoid camera shake, and then steadily zoom out throughout the course of the exposure. If you'd like to ensure a little more definition for your subject, don't begin to move the zoom ring immediately, but let it rest for about a quarter of the exposure time and then start to move it.
In most cases, you will probably want to zoom out to give the impression of the subject bursting forth from the image. I also played around with zooming in and rather liked the effect. It's all going to depend on what works for your photo.
Once you have the basics down, it'll be a case of playing around to see what looks best. Have fun!
One of the students in the Photocritic Photography School asked us how to deal with a dirty sensor not long ago. Many cameras clean their sensors with a bit of vibration each time that you switch them on or off. That's fine for dust, but it isn't so effective if for dirty splotches. Thankfully, there are ways of dealing with those, too!
So you have spent thousands on your camera and you’re wondering how to clean it? Well it’s a good question to ask; a dirty sensor will impact every single one of your images, as it is – quite literally – the focal point of all the camera’s technology. That’s right, your hard earned dollars reduced to the mercy of the elements. Scary thought eh? Despair thee not, young padawan, help is at hand…
Your goal is to remove dust (and possibly moisture) off the sensor. You want to do this as carefully and easily as you can. There are myriad people who are delighted to take your money off you to help you do this, so let’s start by picking some of the best:
Sensor Swab
‘Sensor Swab‘ is the preferred method and for a very good reason; it’s a mighty fine product which is recommended by quite a few of the camera manufacturers to boot. Sensor Swab is a wet solution which is applied to the sensor by a, well, swab.
For around $45 you can get yourself a kit and that will remove both wet and dry dust. It is 99.9% effective when done properly and even offers a guarantee in case of damage to the sensor – which is handy, because replacing a damaged sensor is filthy expensive. The downside is that it can’t be shipped by air and is illegal in some countries (due to containing methanol). If you’ve got a decent camera shop nearby, however, they probably stock some – go talk to your friendly neighbourhood lenspeddler to find out.
Brush
Here is the old fashion method. Offering multiple uses and a straight forward method the brush definitely has some advantages. Brushes generally use a method that utilizes static allowing the brush fibers to remove stubborn dust. A brush is also very transportable.
Down sides include the fact that the brush cannot be cleaned and can’t remove wet dust or moisture. A standard brush will cost about $25 while the ‘Brush Off‘ brand (which is more effective) will set you back about $50.
Blower
Using an air blower – like the Giottos Air Rocket – is what your manual will recommend, the reason for this is there is no contact required with the sensor, which reduces the risk of anything going wrong. Unfortunately the downside is that the blower is not that effective, and doesn’t actually remove the dust from the inside of your camera; it merely shuffles it about a bit. In addition, it will struggle to remove dust with a static charge and anything with moisture.
Despite its downsides, using an air blower is often the easiest thing to do when you’re in the field – it’s easy to transport, relatively cheap, and gets rid of the worst dust in a quick and capable way.
Time for a spring clean!
Every once and again, you need to clean your sensor properly; depends on how much you use your camera, but for me, it’s approximately every 2-3 months or so, a process which involves several of the products above. Here’s how to do it:
Charge the Battery – If your battery dies at any point this can be very bad news and step 2 explains why.
Open Shutter – This is different for all cameras but most have a ‘sensor cleaning mode’ which will open the shutter and move the mirror aside so you can access the sensor for cleaning. If the battery dies during this phase will close and possible take the swab with it which will probably cause damage to the inside of your camera.
Blow out excess dust – Look for a dust free environment and begin blowing, this removes the big particles of dust. Never use compressed air in a ‘spray can’ for this (it leaves a residue) – get one of the bellow-style blowers like the Giottos Air Rocket described earlier in this article. This is extremely important because if this isn’t done at a later stage you can be dragging particles around with the swab, causing scratches and more problems than you had before. (NOTE: Some people will suggest using a foot pump because your hands are free, DO NOT DO THIS. Reason being a foot pump has too much power and sits on the floor drawing in dust and dirt)
Take a look – Use a small torch/flashlight (the little single-LED torches are great for this) to spot exactly where there are dust particles on your sensor
Swab – Use as little swabbing liquid as you can while swabbing and apply with the pressure of the pen. Use one side of the swab for the liquid solution, and the other to wipe when complete – whatever you do, don’t touch the swab itself.
Do some test shots – the easiest way to do this is to take a photo of a blue sky or similar even, bright surface, and look at your image at 100% magnification on your computer. If you still see problems, it’s back to point 1 for a second try.
Now comes the trickiest bit; going back out there and taking shots so awesome that they’re worthy of your freshly cleaned imaging sensor. Good luck and have fun!
If anyone had wandered along to the Maker Faire in the Elephant and Castle area of London (yes, it's really real; no, there are neither castles nor freely roaming elephants but both would be a vast improvement) on Saturday they would have found me, and the London division of Team Triggertrap, asking people if they wouldn't mind awfully screaming at the top of their lungs for us. Seriously.
You see, we'd set up the Triggertrap ScreamGrab studio because we reckoned that people summoning the exhaustive energy to scream like bellows, and then releasing it in one extended Aiouuuuuuu! would make for fantastic portraiture. And it would give Triggertrap with the sound threshold set to Very Loud Indeed™ a rather good workout. We weren't wrong!
Inspired? Want to know how we did it, so that you can give it a go yourselves? Read on!
The basics
At the least, what you need to do is to get an audio trigger that will take a photo when the volume hits a certain level, and a camera. In our case, we decided to use the Triggertrap Mobile app, but we discovered to our horror that the app itself was way too sensitive: Even with the sensitivity threshold all the way to the top, you didn’t really have to put your back into the scream to trigger the camera (in fact, speaking normally was loud enough to snap a shot). Uh-oh.
In the Android version of the app, there’s a separate slider for sensitivity, but we don’t have that level of control over the iOS app (and I did want to use the iPod Touch I had brought along, so that I wouldn’t have to tie up my phone all day).
After a spot of last-minute panicking, we discovered that there was a very simple, and delightfully low-tech solution to this: I simply stuck a small piece of packaging tape over the microphone on the iPod Touch. Hacky? Well, yes, but who cares – it did the trick!
With the tape in place, we were able to use the sensitivity slider to fine-adjust the triggering threshold. Perfect for what we were trying to do!
In theory, with the app configured and hooked up to the camera using a connection kit, that’s all you need to get the photo. Stick it on a tripod, and you’re good to go – really, everything else is showmanship. But to turn this into a far more fun experience, for us and for our sacrificial victims, we turned it into much more of a show.
The kit
For the ultimate ScreamGrab experience, I set up with the following:
Canon EOS 6D set to manual exposure & manual focus
iPod Touch (connected to power, to make sure it didn't die)
Tripodclamps clamp to hold the iPod Touch in place (so that your screamers can see how loud they need to scream)
Canon ST-E2 flash trigger
2x Canon Speedlite 580EX II flashes
2x light stands
2x white umbrellas
What I did
Let's start with the lighting: I added a Canon ST-E2 infra-red flash transmitter to the camera’s hotshoe, and I set up a couple of Canon EX580 II flashes on super-cheap lighting stands with umbrellas. I fired the flashes on manual output (1/16 each), then set up the camera in manual exposure (1/180 second and f/10, ISO 640) and manual focus. This meant that all the shots were completely repeatable, and I wouldn’t have to make any adjustments throughout the day.
In fact, if it hadn’t been for people being different heights, there wouldn’t have been any reason to touch the set-up at all: even the batteries in the flashes, the flash transmitter, and the camera, lasted all day long. Impressive stuff – but then, battery consumption was the chief reason why I only set the flashes to 1/16 output – in my experience, in modern cameras, you may as well let the ISO do the work, and give your flashguns a break.
Finally, I wanted to ensure that the iPod Touch was clearly visible, so people would be able to see the black ‘needle’ move on the app – so they knew how loud they had to shout to trigger the camera. To achieve that, I used a Tripodclamps clamp. It’s simple: It bolts to the tripod, then squeezes the smartphone firmly to hold it in place. It looks good, and it makes it easy to demo the device, too, which is a bonus.
Someone check for the Four Horsemen of Apocalyspe - I shot in JPEG!
I should also mention at this point that the camera was shooting JPEGs rather than in RAW. The Canon 6D shoots enormous RAW files, and since I had a fully controllable lighting situation, I didn’t expect I’d need to do a lot of adjusting the images. More importantly, the JPEGs are much much faster to download via the tethered connection, faster to process in Lighroom, and it meant that my poor little MacBook Air didn’t slump to its knees. Having said all that, I do generally recommend shooting in Raw. Here is why, and I also wrote an article about why this particular situation (controllable light, need for speed) is an exception where JPEG is acceptable. Because, yes, I’m an insufferable nerd about this sort of stuff.
Turning it into a show
To show off the images, I decided I had to shoot ‘tethered’. I was in luck; my Canon camera comes with a piece of software called EOS Utility, which enables tethered shooting. In this case, I hooked up a27″ monitor to my MacBook Air. I made sure that all photos that were taken were shown on the audience-facing big screen as soon they were shot. Great for instant gratification – even the most reluctant screamers giggled their heads off when they saw their mugs on the big screen.
Instant publishing
I anticipated (correctly) that people would want a copy of their photos – but how do you go about doing that? Quite a few people used Instagram and took a photo of their photo on the big monitor, but obviously we wanted something a little bit better than that. So, I devised a workflow.
I was running Lightroom 4, using the ‘auto import’ feature. In this way, the photos would be downloaded by the Canon EOS Utility to a folder, and Lightroom 4 would automatically import them from that folder into a library. The import script applied a preset to the image (white-balance, some vignetting, some extra contrast and some colour effects to make the photos pop out more). It also applied a description and title to the images, so it would be as quick as possible to publish them online.
From there, I only did one edit to each photo: A quick crop. This was necessary because we didn’t have a lot of time to frame people properly, and besides, a lot of people either jumped or hunched over as they were howling at the camera, so the framing was almost always off anyway.
After cropping, we just dragged the photo to the Flickr publishing tool within Lightroom, and hit the ‘publish’ button. With one person manning the computer, that meant that from squeal to Flickr, it could take as little as a minute or so, including the processing, resizing, and uploading.
We also had an IFTTT set-up, so that we could auto-tweet our ScreamGrabs. Except that Twitter sent us to Twitter Jail for too many tweets!
Other ideas?
It would really have been awesome if we could have had a printer there, and printed out people’s ScreamGrabs as they were taken – but we didn’t really know how many people to expect, and we only had two people at our little stand at any time, so I suppose we wouldn’t really have had time to deal with the logistics of printing anyway — but it would have been amazingly good fun, so perhaps that’s something we’ll do next time.
The other idea that came up, was that perhaps we should have been recording people’s screams! Playing the screams, along with a slide-show of all the photos, would have been a fantastic project, I think – but it didn’t come up as an idea until someone mentioned it to us about half-way through the day. Again, I have no idea how you’d deal with the logistics of matching up the sounds to the pictures… But it would have been great.
In the Triggertrap ScreamGrab booth, everyone can see you scream!
To answer this question, we need to understand a few things about how cameras work. The iPhone - and especially the iPhone 4S - is an extremely capable camera. But it is not perfect: The biggest problem with it is that it uses a rolling shutter.
The iPhone's camera and how it works
What this means is that instead of reading the whole photo at the same time (as you would do with a film-based SLR camera, for example), the camera effectively 'scans' the photo from top to bottom, one row at the time. This process is very fast, but it's not instantaneous.
The other problem with the camera on the iPhone, is that there's no way of influencing its settings; you can focus and take a light metering from a particular point, but that's it: You cannot chose a shutter speed or ISO, and the aperture is fixed at f/2.8. It can't be changed even if Apple gave you a software slider to adjust it: This is a physical limitation of the iPhone's camera.
There are other phones that get around this by implementing much better photo cameras, complete with shutters, apertures, focus mechanisms, and even built-in xenon flashes - but not the iPhone.
How a flash works
A flash, however, is a very different piece of kit; to ensure the correct amount of power output, the flash charges its capacitors, and then dumps a high voltage through a flash tube. The amount of light coming out of the flash tube is directly proportional to the amount of power it dumps through the flash tube - a lot of power means a lot of light.
Advanced flashes even have light-meters built in, where they are able to 'turn off' the flash after microseconds worth of light, for precise light level control. This is a small part of how E-TTL flash metering works with the flash power output to get perfect exposure.
All flashes have the 'one flash only' approach, except so-called 'high sync speed' flashes. Instead of using a single flash, these flashes can synchronise with shutters at speeds of up to 1/16,000th of a second (that's not a typo- but it is absolutely incredible, from a technology point of view). I've written a separate article about high-speed flash sync, if you're curious.
So, can you use an external strobe to take a photo with the iPhone?
In a word, no.
In many words: There are several problems with getting the flash to sync with your iPhone:
The first problem we would have to overcome is to find a way of syncing the flash with the iPhone. The challenge there is that we don't actually have any way of doing that. Remember that a 'normal' shutter speed for the iPhone will be in the region of 1/15th of a second to 1/30,000th of a second (or, at least, that is what the EXIF data of your files reports when you take a photo directly into the sun) or so.
The only indications the iPhone gives that it is taking a photo is the flash (which goes on for about 300 milliseconds - that's about 160 times longer than the duration of a flash). The other indication we can access is the sound the recorded "cah-chunk" sound the iPhone plays when you are taking a photo. Whilst slightly shorter than the LED flash built into the iPhone, it is still way too long to be able to derive an exact shutter duration from - especially if you are planning to use an electronic flash. It goes without saying that trying to synchronise a 1/30,000 second shutter duration (on an iPhone) to a 1/50,000 flash pulse (on a high-end, high-speed flash gun) based exclusively on a light flash that lasts 1/3 seconds is an exercise in utter futility.
However, if we somehow found a way of getting the iPhone to report exactly when it is taking a photo, we have a secondary problem: Since the iPhone uses a rolling shutter, you cannot use the single flash approach. Even if you were able to somehow fire the flash at exactly the right time, it would only affect a very small 'sliver' of the exposure. The problem is obvious, and would look a little bit like this:
So, the first hurdle is finding out when the iPhone camera is triggering. The second hurdle is the rolling shutter. But if you shomehow managed to overcome both of those; we're facing a third problem: Since the iPhone doesn't support any manual settings, and since flashes are too fast for the iPhone once the exposure has started, your photos will almost certainly come out over-exposed.
From the iPhone's point of view, a flash of light (or, more likely, a rapid series of flashes of light, to counteract the rolling shutter issue), is far, far more light than it expects. In the studio, you would 'expose for the backgrounds, and stop down for the flash' - which, in practice, means that if you shoot with a fast shutter speed, you kill off the ambient light (as described in my Darkening a room by adding light article). You would regulate how much of the strobe light you want to have an effect on your photos by choosing a smaller aperture.
Unfortunately, with the iPhone, you only get one aperture (f/2.8), and you have no influence over the shutter speed or ISO. So: When you take an image, your photos would be exposed for the pre-flash lighting situation. Once the flash goes off, the image would be grossly over-exposed and utterly useless for anything.
In summary
In summary; there are three reasons for why you cannot use an external flash with an iPhone: There's no way of knowing exactly when your iPhone is exposing the photo, and even if you did, you would need to ensure the photo is exposed not with a flash, but for the whole duration of the exposure. The iPhone will not report how long an exposure is (it can vary between 1/15th of a second to 1/30,000th of a second...). Even if you managed to overcome these two problems, your iPhone wouldn't be expecting the light, and you'd dramatically over-expose your images.
The work-around
The obvious work-around for improving your lighting quality for iPhone photos, is to not rely on flash synchronisation at all, but to instead use continuous light. This photo, for example, was taken with a desk lamp and the light from an iPad's backlight (!) - for near studio quality lighting:
You're probably familiar with taking photos with a digital camera. If you're adventurous (or mature) enough, you've probably had a go at taking photos on film as well. As a true film aficionado it's interesting to dig deeper into the history of photography, and give wet-plate photography a shot, too. If you manage to avoid poisoning yourself or blowing up half your city, it can give awesome results!
Wet-plate photography is pretty much exactly what it says on the tin: You don't use film; instead, you expose a wet film plate (usually a plate of glass or metal) that is covered in a still-wet chemical solution. You have to 'pour' the plate (i.e. add the chemicals), 'activate' them, expose your photo, and then develop it in a very short span of time - usually less than 20 minutes. That means that you can forget about taking a quick series of photos: Once you've prepared your plate, you have to run and take your photo, run back, develop it, and see how it turned out. If you messed up, you've wasted 20 minutes, and you have to start over again from scratch.
Because your final result isn't an enlargement of a photographic print, the detail in wet-plate photos can be absolutely astonishing - it is as if you are looking at an enormous negative, chock-full of glorious, glorious detail, often without a trace of 'film grain' - because there was no film involved in the first place.
Wet plate photography as it is done today is often known as the Collodion process, invented more than 150 years ago.
It's worth noting that wet-plate photography can be quite dangerous; you are working with volatile chemicals that have been known to catch fire, oxydise or explode (nitric acid, nitrocellulose and ethyl ether). Some of the chemicals used in these processes are poisonous (pyrogallic acid, silver nitrate, zinc bromide, cyanide and denatured alcohol), corrosive (silver nitrate), or bad for you in other ways - it's definitely a good idea to get someone who knows what they are doing to give you a tutorial - in person - before you try it yourself.
What do you need to have a go?
For starters, you would need a View camera (or 'field camera', which is the smaller, more collapsible version of the same). This will usually be a large- or medium-format camera that will accept your plates. It doesn't have to be big - the world's smallest wet-plate camera has a wet-plate size that takes half-inch square plate images, but part of the attraction is the huge sizes you can work with.
Glass plates will become your negatives or positives. For positives, you'd typically use black glass, or you can experiment with aluminium or polished steel if you want a different 'look' to your photos.
In addition, you're going to need a lot of chemicals; there's the Collodion mixture (consisting of pure alcohol and various chemicals), A Siver Nitrate bath used to make the plates light sensitive, a developer to develop the plate, a stop bath (usually just water), and a fixer.
So; it takes a lot of practice to get right, it's dangerous to your health, and taking 10 wet-plate photographs will take approximately twelve thousand times longer than taking the same number of photos with your SLR camera. Sounds like a challenge!
Most local colleges and some photography clubs that have a photography department occasionally run wet-plate induction nights - or search online. There's a few very active forums where you can learn more, and perhaps you'll be able to find someone local to you who can show you the ropes before you blow up your face, set your poodle on fire, and poison most of your city.
Nobody will ever be able to straight-facedly claim that Fujifilm's X100 is without its flaws, but by jove, is it turning it into one of my fave cameras nonetheless. One problem with this little peach is that the lens is exposed, and non-interchangeable - so if you, like me, tend to throw your camera over your shoulder, there's danger abound if you knock it into something.
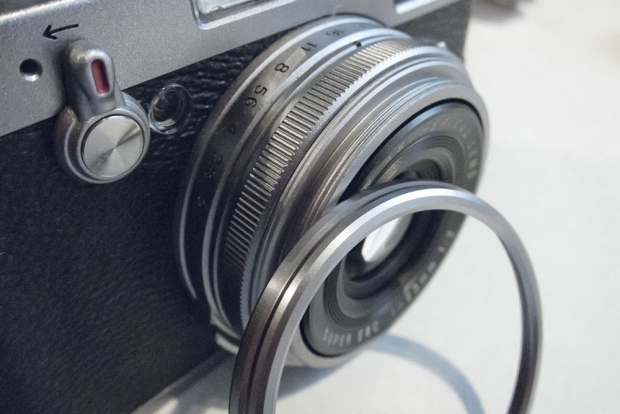
As a double bonus hazard, the camera doesn't have a filter thread, so it's impossible to put an UV filter on the lens for protection. Or is it? It turns out that it does, indeed, have a filter thread, but it's 'backwards' - instead of having the threads facing inwards, like on most cameras, on the X100, the threading is facing out.
"Ah, but that's no problem", I hear you say - "Filters have threading both ways, you can just mount it on the camera backwards!". Well, that's true, but there's a second snag with the X100: Because the inner lens barrel comes quite far out of the camera body, if you simply mount a filter, the lens is liable to get stuck (if you're lucky), or be damaged (if you're less lucky).
So, how to solve this conundrum?
Easy, if a little convoluted.
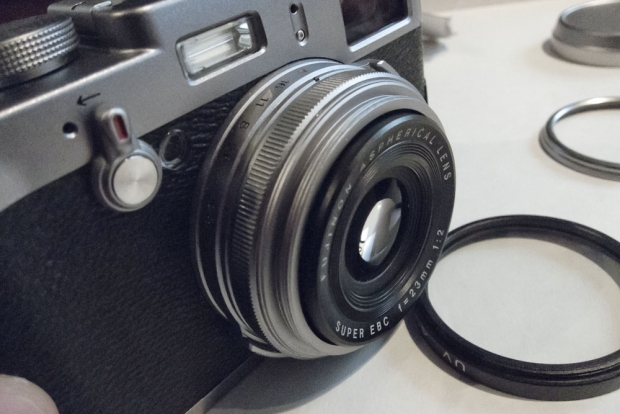
You need to buy two 49-mm filters, and be prepared to sacrifice one of them to The Cause. What we're going to do, is to stack a couple of 49mm filters, in reverse, on the lens.
Step by step:
Step 1
Take off the ornamental ring
Step 2
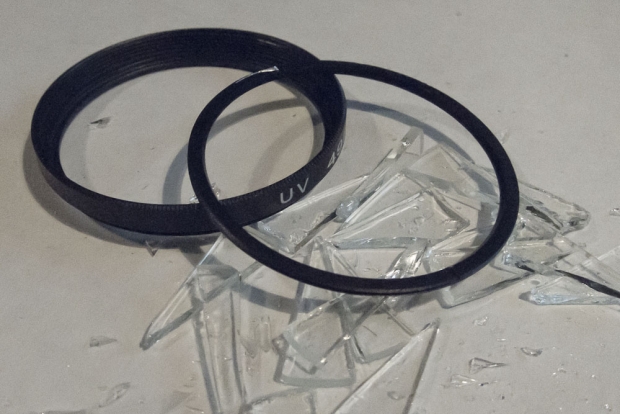
This image shows the problem we are facing: See how far that lens extends? Just attaching a filter would cause trouble...
Step 3
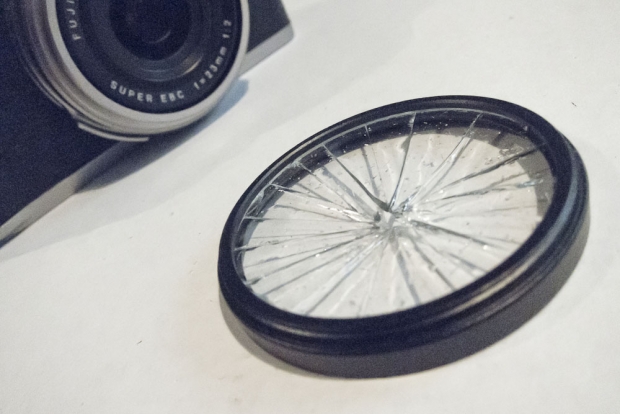
Now, the easiest way to take the glass out of a filter would be to unscrew the retaining ring in the filter. However, these can often be extremely well-attached; if you don't have a special tool, they can be very difficult to loosen. I got frustrated with my filter, and took a violent approach.
Step 4
By giving the filter a sharp blow with a screwdriver, and then carefully removing the shards, I was able to take most of the glass out
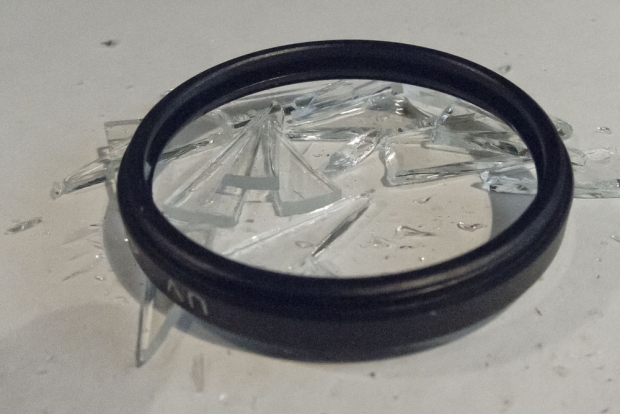
Step 5
Of course, with most of the glass removed, it was possible to take the retaining ring out. I took out the rest of the glass, and made sure there weren't any fragments left.
Step 6
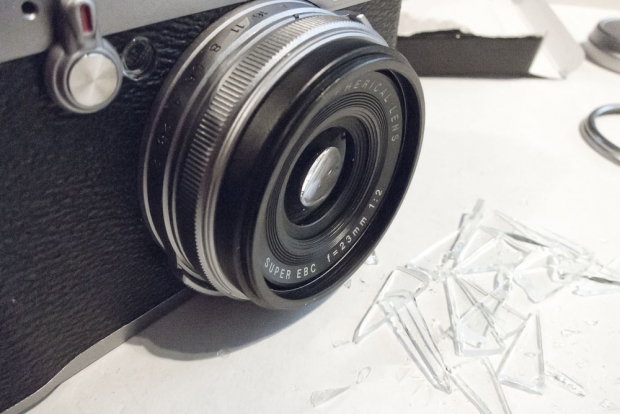
Mount the empty filter threading on your lens
Step 7
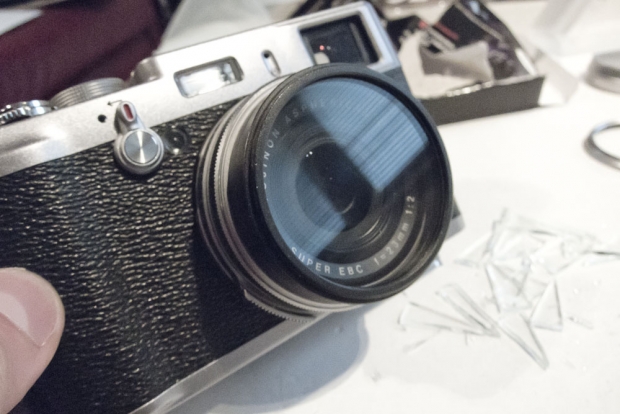
Loosely attach the second filter to the first filter. Then, operate the camera. See how close the lens gets to the filter. Slowly tighten the filter little by little, and keep experimenting with your lens. Be aware that some low-profile filters may not be thick enough to give you enough distance, so being careful at this step is a very good idea indeed.
Step 8
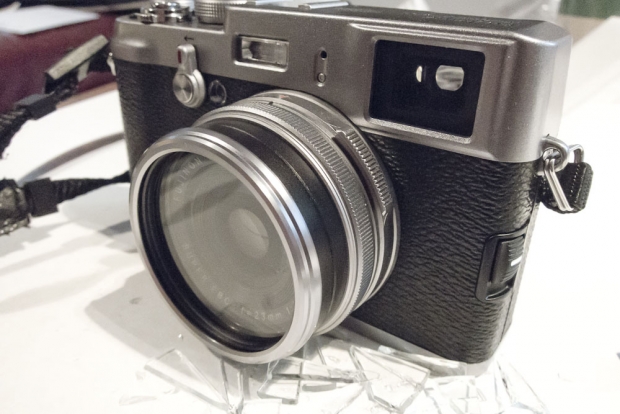
Remember the ornamental ring we took off in step 1? Put it back on, if you like!
That's it!
So, that's how you can mount a filter on your X100 camera. Easy once you know how!
If you're using flashes on the go, you may have noticed that there's lots of ways you can create interesting effects: Bouncing the light of the ceiling, for example (that's possible even if you are using a compact camera, by the way), or similar.
A lot of photographers swear by Light Spheres, such as the ones marketed and sold by Gary Fong, Lumiquest and Sto-Fen. They're good products, there's no doubt about that, but I always had a problem with them: Basically, light doesn't care whether it travels through a pretty, $60 piece of plastic, or anything else.
The idea is simple: You're trying to increase the apparent size of your light source. When you do that, you can create some beautiful, soft light.
Creating the flash diffuser
But does that mean you have to spend a lot of money? Like hell it does. The other day, I was going to go take some photos of my good friend Sherlock Ohms, who was going to do a spot of DJ'ing in central London. I had never been to the venue, so I couldn't know for sure whether the ceilings were light enough to trust bounce flash, and I didn't know how big the venue was, so wasn't sure whether I could bring along an umbrella. (In retrospect, I'm lucky I didn't; there were too many people and too little space).
As I was standing in my living room thinking about this little conundrum, my eye fell on the Jiffy bags I use to ship out my Gray Cards (you have bought a set, haven't you? Because if you haven't, you really ought to), and I had an idea: There's no reason why a bubble envelope shouldn't work as a lovely light diffuser.
Ingredients
A cheeky modification
However, I wanted it to be a little bit directional as well; there's no point in lighting the area behind me, if I need the light to go forward. So I dove into the kitchen drawer and got some aluminium foil. I clad the inside of one side of the envelope with some foil, and simply stapled it into place (if I had had a little more time, I'd probably have glued it, to prevent the staples from scratching my flash).
Final assembly
Finally, all you need to do is to insert the flash head into the top of the envelope. It fit snugly, so I didn't have to do anything else. Perfect! If the envelope had been slightly larger, a rubber band would have been sufficient to hold it in place.
Let's give it a go!
So there you have it; a $1 envelope and about $0.05 worth of aluminium foil made a beautiful light shaper. If it works? Well, let's take a look:
Looks like a studio shot, right? Well, the set-up shot isn't nearly as glamorous:
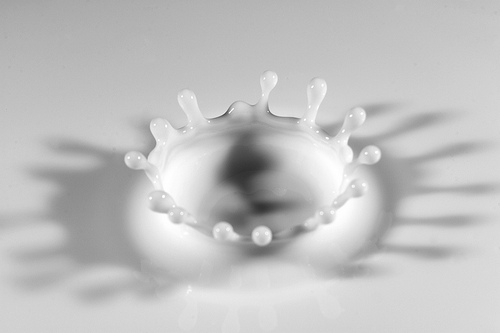
One of the strengths of photography has always been its ability to freeze time. Before the advent of photography, it was impossible to see how a hummingbird moves its wings, how a tennis ball deforms as it is served, or what it looks like when a bullet hits an apple at the speed of sound.
In the microcosmos explored by macro photographers, there are hundreds of similar quick-moving phenomena that lay unexplored. I have a fascination with falling water and the way matches flare up as you strike them, so I decided to take a closer look.
Falling droplets
Edgerton nearly drove himself to despair trying to capture this one photograph
There are photographers out there who have driven themselves to the brink of insanity trying to capture the perfect droplet photo. Harold Edgerton, for example, worked several years of his life in the mid-1950s the hope of one day capturing the perfect corona—the splash impact of a droplet in a layer of liquid transforming into a perfect crown of droplets thrown back from the liquid. Eventually, through years of trial and error, he managed to capture his droplet.
Today, photographers have the advantage of being able to share experience online. Because most photographers work with digital cameras, the experimentation time also decreases drastically. Imagine the poor people who had to wait for an hour for their film to develop properly, just so they could see if they had finally captured the perfect corona!
This photo, by Mattheu Collomp, shows an alternative way of photographing droplets - click the image for a bigger version!
Despite the fact that the technical side of capturing droplets is a lot easier, it is still a labor- and time-intensive mission on which to embark. There is something unique about seeing liquids and their motion frozen in time, however, and as a macro photography project, it is excellent.
I have tried capturing droplets on impact on many occasions throughout my photography lifetime, and every time, I did it a little differently. On the first few attempts, I tried it with an old flash unit connected to a Kodak DC4800 with a PC lead (the same type of connection that connects cameras to studio flashes). The results were not terrible, but the limitations of a digital compact camera turned out to be prohibitive of capturing the photos I wanted. The second time I gave it a shot, I had graduated from digital compacts and was using my first dSLR—one of the first Canon EOS D60s, bought on the very day it was released. The result wasn’t too bad — but it wasn’t great either.
My first attempts at photographing droplets weren't, exactly, what you'd call successful (click on image for larger version on Flickr)
With my shiny new dSLR, I was trapped indoors in a typical miserable rainy day. What could I do other than try to capture some more droplets? This time, I decided to give continuous lighting a try, and I lined up a pair of 600w work lights. Although the light was blindingly bright, in retrospect, there still wasn’t enough light: Even the best of my shots that day had a slight tinge of motion blur on them. Although I did get some spectacular photographs, the blur meant that they weren’t as perfect as I would have liked.
Throughout my experimentation, however, I did discover one thing: The translucency of water makes it difficult to capture the true dynamic of the fluid. If only there was a purely coloured, perfectly opaque liquid I could use—and paint would have created such a mess. My esteemed photography assistant Katherine came up with the idea of using milk, which turned out to be a terrible idea. The hot lamps made the milk turn sour within half an hour, and the smell in my make-shift photo studio stayed for weeks. I’ve since discovered the perfect liquid: long-life coffee creamer! This liquid is slightly thicker than water, doesn’t go bad as easily as milk, and makes a wonderful splash, too!
It took hundreds and hundreds of attempts before I started getting images I started to be happy with. This wasn't one of 'em.
When I started writing my macro book (from which this article is a small extract), I decided it was time to revisit the droplet experiment. Armed with a few containers of coffee creamer and using a 28-135mm macro lens with a 25mm extension tube and the Canon Twin Lite macro flash, I started experimenting again.
There are many ways to capture droplets, all depending on your taste. It’s possible to create tranquil photos, like the one Matthieu Collump shot above, but personally, I prefer the drama of liquid hitting liquid.
For my droplet shots, I used a large, flat surface with a very thin layer of coffee creamer in the bottom. I then used an eyedropper to let droplets of creamer fall into the film of creamer. (If you don’t have an eyedropper, you should be able to buy one inexpensively at a photography store or pharmacy.)
After a few photos, I started getting the knack of the timing, so that I took the photo a fraction of a second after the droplet impacted. From then on, it was four hours of patience, changing the batteries in the flash and camera, and refilling the eyedropper.
A nearly perfect corona. But only nearly.
It is the kind of activity that makes your family and friends question your sanity, no doubt about it, but in the end, I was left with about half a dozen photos I’m very fond of, including the photo above, which is nearly a perfect corona.
But only nearly…
Learn more about macro photography
My book!
This is an extract from chapter 4: The Macro in Everyday Objects, published by Wiley Publishing, and written by yours truly.
Obviously, I’m biased, but I highly recommend you get hold of a copy of my book, because it’s awesome. You can get it from Amazon in the US and in the UK, and most other good bookstores around the world.
It’s also available in Polish, Czech and Chinese, so if you prefer reading one of those languages, nip along to your local bookstore or book-peddling interwebsiteshop.
In my second round of videos for the Nokia N8 Camera School, I'm getting up close and personal – with some bumble bees. In this video, you’ll see the Nokia N8′s macro mode in action, and the results? Well, let's just say that the compact camera manufactures have plenty to be getting worried about...
Do you enjoy a smattering of random photography links? Well, squire, I welcome thee to join me on Twitter - Follow @Photocritic
When you think 'Product shoot', you probably wouldn't immediately think of taking a load of photos with your mobile phone... or would you? I'm exploring how you can take fantastic product photos - with a Nokia N8.
Do you enjoy a smattering of random photography links? Well, squire, I welcome thee to join me on Twitter - Follow @Photocritic
So, you like the idea of doing macro photography, but you think you can’t afford it? Think again – with less than £10 worth of equipment, a little bit of sweat and tears (and blood, if you, like me, are a bit on the clumsy side), and you can build yourself a surprisingly good macro lens. Don’t believe me? Well, have a look at the article, and think again!
Of course, as I’m using a Pringles can to make this lens, you also have the opportunity to pause for a snack. Now that’s the type of DIY projects I like.
So you want to take pictures of things up close, do you? You have gone tired of all the regular ways of doing so? Ready for bellows and reversing rings, but can’t afford them? Have no fear, there is a far cheaper way to get a reasonably good result!
Also, Before we go any further… Need I say that you do all of this on your own risk? If you chop a finger off, ruin a lens or your camera body, it’s your own fault, and your own problem. Just be really careful, and you should be fine.
Cannibalising lens covers
This project takes base in cannibalising a few of the lens- and body covers that most of us have laying around. These are great, seeing as they are already created to connect to the camera – the easiest way to get the correct bayonet fittings to attach stuff to your camera body and lenses!
Obviously, the covers are solid, which is no good to us. So, in order to get them into an useful state, I attacked them with a Dremel tool.
Such a grind…
Carefully chopping the fronts out of a camera body cover and a lens cover takes quite a bit of time, not least because I wanted to do it as neatly as possible.
When you are done, remember to matte the cut by using emory paper (sanding paper): You want to make sure it doesn’t reflect light.
Pringles tube to the rescue
What you make the actual distance tube out of is relatively unimportant, as long as it is completely light-proof. I decided to use a pringles tube because I have done projects in the past with them, so I knew that they were approximately the right size. It turned out, in fact, that it was exactly the right size. Nifty.
After removing the top and decantering all the lovely crisps into a bowl (nope, I’m not affiliated with Pringles. And the jury is still out if the crisps type have any impact on the photo quality of the end product), it was time to attack the bottom of the tube…
Sparks! Oh, the pretty sparks!
Cutting out the bottom of the pringles can caused a lot of pretty sparks, so I couldn’t resist the temptation of taking a few shots.
Ladies: sorry about the unwashed hair, beard stubbles, messy room, and general colour mismatching of this photo. If this turns you on, marriage proposals go on an ePostcard to the address at the bottom of the article.
So… Why the lens cover?
There was no logistical reason for why I decided to cut holes in both the body and the lens cover, other than that I thought it might come in handy later. With the final design, it turned out to not be necessary. It did, however, come in quite handy: The lens cover cap works as a flare-reducing hood, and it helps protect the electrical contacts built into the lens. In addition, it makes it easier to grab on to the lens as it is stuck in the tube.
Chalk that one up to luck rather than than planning, but cut a hole in a lens cover as well, because it makes your life easier, and it reduces the chance of putting one of your lenses out of commission. I don’t know about you, but I prefer to keep my lenses in one piece. I’m not that rich: I’m writing an “on the cheap” guide.
A Sticky situation
So, once the pringles tube had a big hole in the bottom, I set out to attaching the body cover and the Pringles tube.
Any strong glue should do. I suspect a hot-glue gun would probably be best, but I was out of glue sticks, so decided to use epoxy glue instead.
Anything to make the two pieces stick firmly to each other. If the glue you use sets translucent, you may want to take a black felt-tip pen and colour it dark, to prevent light leaks.
Firmly attached
After the epoxy glue had set, I had to try to see if it fitted on my Canon 20D.
Sure enough, it was a perfect fit.
Professionality aside, I gladly admit to doing a minor victory dance at this point.
A snug fit – banishing light
My idea was to use black felt to block out the light leaks from outside the lens.
The particular lens I decided to use for this project is the cheapest Canon standard lenses, namely the Canon 50mm f/1.8 MKII.
It is just the right size, and despite being cheap as chips, it has a couple of tricks up its sleeve – more about that in a minute. Ideally, using an older lens would be a better idea – especially if it has manual aperture controls.
By wrapping black fabric (in my case, a t-shirt I didn’t really like anymore) tightly around the lens, I managed to block out all superfluous light.
Textile Hack
I’ll gladly admit that getting it right took a couple of tries, but eventually I found exactly how much fabric was needed. To hold the bundle together, I decided to tape it all together.
After this, the lens fitted snugly in the Pringles container. Not only did it not fall out, it slides quite easily, so if you need to move it, you can just push or pull it to where you need it. Once you let go, it stays put. This is actually quite important, as it’s part of the focussing strategy: You don’t focus using focus rings, but by moving the lens closer or further away from whatever you are photographing.
Finally: Taking photos!
Right, everything has come together, and now it is time to do the fun stuff: Take pictures!
Depth of field in Macro photography
You’ll probably find that, essentially, you have no depth of field at all. In macro- and microphotography, moving an item half a millimetre forward or backward from the lens changes things dramatically. Of course, you’ll learn soon enough to draw this to your advantage, but there is actually something you can do to increase your depth of field, if only a little: Stop down the lens – more info about that here.
Focussing
Focussing is a serious challenge with microphotography, and it can be bitterly frustrating: The slightest movement throws the object completely out of focus, and even finding your object again can be a nightmare.
My only advice: Try it slowly. Wave your object in front of the lens, and then try focusing it by holding it in your hand, looking through the viewfinder. Once you get the hang of it, understanding how it works, you can try and set it up in a static setup: You are going to want to use a remote release button or the camera’s self timer to reduce shutter shake, so make sure everything is sturdily set up!
Exposure
The internal light-meter is actually a good starting point – it isn’t always accurate, but it gives you an idea. The great thing with digital SLRs, of course, is that you can try and err as much as you like. And trust me, there will be a lot of that while you try and figure out macro photography.
Taking the photo
As mentioned briefly earlier, you’ll want to hold the camera perfectly still. Use the self-timer or use a remote shutter lead to make sure everything is perfectly still.
The photo below is off a simple Bic ballpoint pen (it was the first thing I had to reach).
It is by no means a great macro photo, but it does give an impression of how big things get. That is an un-cropped photo, by the way: I have the photographs below in all their 8 megapixel glory.
The reason for the glare in this photo is that the inside of the Pringles tube was still metallic. The light was bouncing around on the inside of the tube, causing it to look very fuzzy.
Ballpoint pen – Canon 50mm f/1.8 stopped down to f/16, shutter time approx. 10 seconds, ISO 100. Not cropped. (see bigger version)
Ballpoint pen – Canon 50mm f/1.8 stopped down to f/4.0, shutter time approx. 0.3 seconds, ISO 100. Slightly cropped. (see bigger version)
Now in video form!
This article was published in Make Magazine vol.6, and in late 2009, Make Magazine made this their Video Project! I’m proud to say that Kip and the rest of the Make team made a great video guide of it – check it out:
Further improving the system
The first change I made to my initial design was to add a layer of black paper inside the Pringles box. Ideally, black felt or another completely light-eating surface would be better, but felt costs money, and I decided to keep this project as cheap as possible.
Photos taken with the system
During my further experimentation, I decided to have a go at a pack of matches that was conveniently within an arm’s length:
(For all three images, click on them to see them bigger on Flickr. While you’re there, why not add them as favourites while you’re at it?)
Postscript
I hope this article has inspired you to build a macro lens of your own. It is a tremendous amount of fun, and in the process you are likely to learn a lot about photography and optics: Which, in turn, will improve your overall photography performance. You can’t lose!
Every photographer experiences a creative block at some time or another. So what do you do when this happens? I personally fall into a foetal position on the floor, kick my legs, and spin around in circles while crying like a six-year old. But what do YOU do? Well, here’s a thought. How about a time-lapse? If you have a dSLR and a sturdy tripod, then you already have most of the ingredients for this magnificent recipe. So let’s get started!
Equipment
While many dSLRs have an “interval shooting” feature built in already, some don’t, so you’ll also need a way to time and trigger your shutter release. There are several pieces of hardware available, but I like to use a Hähnel Giga T Pro. It’s the only one I’ve ever used, but it seems to work perfectly fine and is easy enough to figure out. Whatever you decide to go with, make sure it has an interval timer function and an exposure count control. Without these two features, you won’t be able to create your time-lapse.
Essential kit, if your camera doesn't have an 'interval shooting' function
For this tutorial, you’ll also need QuickTime software, which you can download here. (If you own a Mac and you’re running Snow Leopard, then you’ll notice that you have QuickTime X and can’t install QuickTime 7. Read this post by Apple to get around this problem.)
The location
You can shoot a time-lapse of just about anything you want. Obviously, it makes more sense to shoot a scene that has a lot of motion in it, such as fast-moving clouds, a busy city square, or a train station. Once you determine your scene, it’s time to get set up. Keep in mind that you’ll need to dedicate some time to this project, so bring along a book or something to keep you occupied while you shoot. ‘How long should I shoot,’ you ask? Well, that depends. And in order to figure that out, you’ll need to do some basic number crunching.
The maths
To determine the time required to shoot your time-lapse, you’ll have to work backwards. For simplicity’s sake, let’s say that we want our final video to be one minute in length. A normal time-lapse video will consist of 15 frames per second. So 15 frames times 60 seconds is 900 frames.
How smooth or choppy you want those 900 frames to flow is up to you. If you’re shooting clouds, then you’ll probably want a smoother effect, so you’ll want to shoot in shorter intervals, say every five seconds. So 900 frames taken every five seconds is 4500 seconds, divided by 60 seconds per minute, which comes out to 75 minutes, or an hour and 15 minutes worth of shooting. Phew!
So now that you have your location picked and how long you’ll be shooting for, let’s get set up.
The set-up
Place your tripod where you want and frame your shot. Make sure your tripod is as stable as you can get it. Any movement during your 900 shots will be very visible once you combine everything together in your final video. If you brought your camera bag with extra gear in it, the added weight could help with stabilisation, so try hooking it onto your tripod.
Get comfy whilst your time-lapse is shooting
Now check your camera for settings. Because you’re taking 900 frames, you’ll want to shoot in JPG to make sure they all fit on your memory card. Also, since your video will likely be used for web-friendly applications like Youtube or Vimeo, you don’t really need to have extra-large high resolution photos.
Make sure you focus your shot and then disable your auto-focus to ensure consistency across all of your frames. You’ll also want to shoot in either manual or aperture-priority mode. If you’re out in an open field during high noon with a lot of clouds in the sky, you’re bound to be in bright sunlight during some shots and darker shade during others, so aperture-priority will help ensure proper exposures throughout your time-lapse.
Once you’re all set up, program your interval timer to the correct settings and start shooting. Grab your book and get comfortable. You’ll be there for the next 75 minutes.
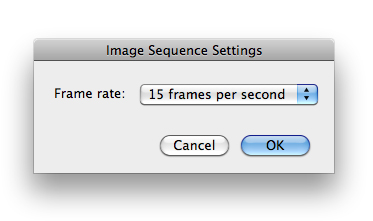
Creating Your Video
Once you’ve downloaded your photos to a folder on your computer, it’s time to put everything together. Open up QuickTime and click Open Image Sequence under the File menu. Select only the first image in your sequence and click Open. Next, you’ll want to select your frame rate. For our example, we’ll go with 15 frames per second. Click OK and QuickTime will do the rest for you.
You now have your master time-lapse video. Make sure to save it as is. You can then go back to the File menu and choose Export for Web to save the video as a more web-friendly version, ready for Youtubing.
Congratulations, you now have your first time-lapse video!
Extra Steps
While this tutorial simply covers the basics of time-lapse photography, there are plenty of other methods available to play with, so once you get some practice down, you can start experimenting a bit. For example, you may want to batch-edit your photos in Photoshop to create a more unusual time-lapse, such as one in monochrome.
If you’re shooting a busy street at night, you might want to use a slow shutter speed to make the car headlights streak throughout your video. Or you may want your time-lapse to pan across a large scene, a bit like this one, to give your video a wow factor. The options are endless.
Time-lapses can be a great way to create a fun and unique project on a lazy Sunday afternoon. Maybe you have things to do around the house, so you set up your gear in your backyard and shoot while you do your chores. Or maybe you’re at a cafe in a busy city square. Why not shoot a time-lapse of the buzz around you while you sip on a cappuccino and read a book? It’s simple to do and I’m sure you’ll be pleased with your results.
And just so that you know, this is my favourite time-lapse out there:
So taking photos should be fun, right? Right! And sometimes we want to have a bit of fun with our photos themselves, right? Right! So, ehm, what can we do with our photos to play around with them a bit more? Well, we’ve been pooling braincells over here at the Small Aperture mansion, and just before they expired from over-use, we came up with the following.
First of all, you could go out and buy yourself a toy camera. But maybe you don’t really want to. Perhaps you’d rather fiddle with photos you’ve already taken with your top-of-the-range dSLR. In which case, Photocritic has the perfect tutorial for creating your own post-processing pre-sets in Lightroom.
Or perhaps you’d prefer to go the vintage route? Take a look at Photojojo’s four ways to vintage-ify your pics. This one covers all sorts, from post-processing ideas to tips such as vaseline on the lens or shooting through an old stocking.
Over at befunky.com they’ve what feel like hundreds of different effects that you can apply to your pictures. My personal favourite would be the speech bubbles, though.
And Gareth, a member of the Small Aperture Scriptorium, has this easy method to cartoon-ify your pictures. Begin by selecting an image. How about this one?
And then:
Open said selected image in Photoshop
Create a duplicate layer
Turn that layer to black and white using desaturate (Image>Adjustments>Desaturate)
Duplicate the black and white layer and invert it (Image>Adjustments>Invert)
In the layers panel, set the blend mode to Colour Dodge
You should now have three layers. Select the top layer, the inverted one, and go to Filter>Other>Minimum to add the sketch effect. The higher the value of the pixel radius, the more pronounced the sketch effect.
If you want to re-add colour, duplicate the bottom layer (the non-black-and-white one) and add it to the top of the stack. Set the blend mode to Colour.
There are loads of reasons for why you could want to trigger your camera remotely – to avoid camera shake, for example, or to be able to take a photograph of yourself without having to rely on a timer. If you want to build more ambitious projects, however, you may have to consider getting more exotic.
I recently built a little device which triggers my camera whenever a laser beam is broken. It is about as simple an electronics project as you can pull off, but it’s going to form the base of a couple of other cool projects I’ll be working on going forward (stay tuned…), so I figured I’d do a quick post explaining how I did this.
Talking to the camera
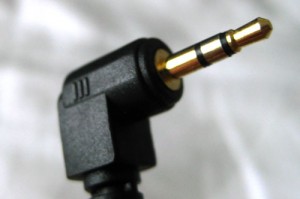
This looks a lot like a headphone jack, but it is not - headphone jacks are 3.5mm, this is 2.5mm.
Even though it isn’t strictly necessary, I decided to use my Arduino (check out Arduino.cc) as the base for this project.
I say ‘not necessary’ because you can build this project using just electronic components, which makes it all a lot simpler – however, what I really wanted to do is to build a base on which I can build further in the future. If you want to get more advanced, it becomes a lot easier to use a programmable micro-controller like the Arduino, so I figured I may as well start where I mean to continue.
I stripped the wires from the remote lead. Connecting green and red triggers the camera.
To interface with the camera, I decided to keep things as simple as possible, and I used the 2.5mm jack port on the side of my Canon EOS 450D. If your camera has a different remote control port, you should still be able to use the tips described in this post, but you’ll have to source the actual plug yourself.
Using the remote control port has several advantages, the biggest of which is that it’s really easy to trigger the camera this way. All you need to do is to make a connection between two wires! I bought a couple of cheap remote controls from China and used one of ‘em to interface with my camera, but you can go into your local electronics store to pick up a 2.5mm jack for next to no money…
Triggering the camera with the Arduino
This is the most important part of this mini-project: As soon as you can trigger the camera with the Arduino, only your imagination will stop you from coming up with ways of using this. Because the Arduino will accept input from any number of sources, you can program it to take photos in just about any circumstance imaginable. Just a few ideas:
Motion sensor (trigger the camera when it senses movement)
Heat sensor (take a picture when the)
Sound sensor (take a picture when the dog barks or the phone rings)
Telephone trigger (Hook up the arduino to a mobile phone. Call or SMS the mobile phone to take a picture)
Timelapse photography (Program the Arduino to take a photo every minute)
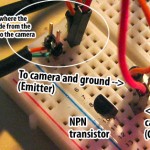
There are a few different ways you can use the Arduino to trigger the camera – I considered using a relay, but the problem is that even very fast relays are quite slow, so I decided to use a transistor instead:
You! At the back! no sniggering at my atroceous schematic drawing skills!
The Arduino sends a signal to the transistor, which connects the two leads leading to the camera, which triggers the camera.
Forgive the rubbish picture - I was prototyping, so it's less than clear what's going on here. The important bits are in the schematic above. Honest, it's piss easy.
Getting the laser trigger to work
I hooked up a LDR (Light-dependent resistor) with a pull-down resistor to ensure that it wouldn’t trigger randomly to the analog sensor pin 0 on the Arduino. The programme uploaded to the Arduino is as follows:
int sensorPin = 0; int sensorValue = 0; int cameraTrigger = 13; void setup() { pinMode (cameraTrigger, OUTPUT); } void loop() { sensorValue = analogRead(sensorPin); if (sensorValue > 700) { // trigger is quite low, might need to be higher in daylight digitalWrite (cameraTrigger, LOW); } else { digitalWrite (cameraTrigger, HIGH); delay(10); digitalWrite (cameraTrigger, LOW); delay(1000); // Take max 1 pic per second } }
Pull-down resistor to ensure true readings, and a LDR to do the actual light measuring.
With the arduino all programmed, I just had to add the LDR.
Now, I rigged up a laser module aimed at the LDR, and I checked what the common sensor values were – turns out that it drops to about 200 when the laser beam wasn’t hitting the sensor, and goes up to about 900 or so when it is hitting the sensor. I set the sensor trigger to about 700 to give me some leeway.
In the above snippet of code, the interesting stuff happens in the loop: Basically, it checks if the sensor has gone ‘dark’. If it hasn’t, it simply checks again.
The bright pink bit in the photo here is the laser beam hitting the LDR.
If the Arduino detects that the sensor has gone ‘dark’, it triggers the camera for 10 milliseconds, then untriggers it. This is to ensure that the camera doesn’t continue taking photos for the duration of the beam being broken – I have my camera set to ‘one shot’ anyway, but by adding this line of code, it should still work if the camera is set to continuous shooting when the shutter button is held down.
When the Arduino detects a broken beam, it takes a photo, then waits for a second, before checking for a broken beam again. If it’s still broken, it’ll take another photo and then waits another second.
Does it even work?
Yup. But a video says more than a thousand words so check ‘er out:
(forgive the crummy video quality, but you get the idea)
So, er, what the hell can you use this for?
It’s all a little bit theoretical at this point, because I haven’t actually used the trigger for anything useful yet. For one thing, it’s not very portable yet, but I’m planning to take a version of this and solder it all together so it’s a bit more sturdy. At least I know it works, which was the purpose of the exercise.
I have a couple of fantastic ideas for how I can create some pretty cool projects where the camera can just stand there and take photos automatically. Think birds on a bird-feeder, people walking through a doorway, balls in flight, etc.
If you plan to use the kit to take people by surprise, you may have to hide the lasers away a bit better. In a cleanish room, the red laser is pretty much invisible anyway (although it shows up in specs of dust etc), but if you want the sensor to be completely invisible, you can just use an IR laser instead – it’ll make it invisible to the naked eye.
Disclaimer
I haven’t broken my own camera equipment doing any of this, but if you balls things up, there’s a good chance you might. Be careful, know what you’re doing, and don’t come running to me if you blow up your camera, please!
Do you enjoy a smattering of random photography links? Well, squire, I welcome thee to join me on Twitter - Follow @Photocritic
Portraiture is one of the most exhilarating forms of photography. It’s rewarding, exciting, challenging, and a lot of fun. But people have a way of hiding from the camera: Clothes. Nude photography is essentially portraiture sans clothing, which is what makes it such a fun topic to explore and develop as a photographer. Personally, I’m completely convinced that a photographer who starts developing their nudes also becomes a better portrait photographer.
One of the things people frequently e-mail me about is how to get started in nude photography – some of you want to make a living out of it, many just want to have a go and experiment, but don’t know how to begin.
Of course, Photocritic already has a series of articles on the topic already, including an introduction, and an interview with acclaimed nude photographer photographer Renoux.
Well, today you’re all in for a phenomenal treat, as my good friend Tammy guest-writes an article on taking the first steps into nude photography, by inviting your girlfriend to model for you.
Needless to say, depending on what you do for a living, this article may not be ‘safe for work’.
Take it away Tammy…
Let’s start with the basics: You already know that your girlfriend is gorgeous. While you may not be a digital pro, you’re still pretty handy with a camera, and you’d love to be able to capture some of your girlfriend’s natural beauty – if you’ve never tried before, here are a few tips to get you on your right way!
Ask permission.
Much like that nervous first date, the prospect of nude photography can be a little scary and intimidating, both for the photographer and the model. Though most women enjoy feeling beautiful, they also realise there is only room for so many supermodels in the world, and many women are self-conscious about how they look, particularly in the nude. There is great security in clothing and taking it all off, even for a camera, can be like having an audience when you’re at your most vulnerable.
If you are interested in taking nude photographs of your girlfriend (or girl who is a friend. Or boyfriend, for that matter), make sure you sit down and really talk to her about this ahead of time. If she doesn’t appear convinced, perhaps it’s worth reminding her how beautiful you think she is and that you’d love for her to be able to see for herself and let you try some nude candid shots. She might not leap on the opportunity, but give her some space to mull about it.
Sometimes the best things come to those who can wait patiently. Chances are good that if she didn’t have sex with you the first night, she might will not be ready to jump into nude photography the first time the two of you talk about it either.
Less is more.
Trust is an important aspect of every relationship, and there is definitely a deep kind of trust that needs to be present before a woman feels open to this sort of photography. Do not pressure her to do anything that she doesn’t feel comfortable with. In fact, do everything you can to make sure that she feels comfortable. Involve her ideas, discuss her fears and concerns, and find out what she might like to try.
It might help to thumb through some photographs or magazines for ideas and possible poses. See what she likes. If she’s nervous about exposing a body part like her nipples, illustrate different ways that she can pose nude without having to show whatever part she’s shy about.
Of course, there’s myriad ways to get around the whole nudity thing – even if a model is naked, they don’t have to look it in the photographs. Come to think of it, even if they do look naked, you don’t have to show off all (or, indeed, any) of the ‘naughty bits’:
You can ask her to cup her hands around her breasts so that she feels less exposed. Or the first time she poses, let her warm up to the idea in a sexy lingerie outfit or a skimpy swimsuit in the bathtub. If she’s worried about her frontal view, she can pose on her stomach. Try shots that focus on the small of her back, her bottom, and her neck (they’re all vastly sexy bits of the body, if you photograph them right!).
If she’s worried about showing her face, allow her to hide it – get creative, and it doesn’t have to be of detriment to the final result. Try profile shots, silhouette shots in a dimly lim room, or experiment with black and white photographs. Often, you’ll find that subtlety is hot, and truly sexy photos are often the ones that hide more than they show, anyway.
If she’s concerned about anything, big or small, make sure to take her concerns seriously – I know we’re harping on about this point, but that’s only because it’s important: Listening and paying attention to detail are two of the greatest things you can do to help her relax and feel completely comfortable with the idea of being in front of the camera
Get Close. Closer. Nope, still not close enough.
The main focus of your photographs should be your girlfriend. Don’t be afraid to experiment with close up shots and interesting angles. If your girlfriend has a particular feature that you find very erotic or sensual, try to highlight that feature in the photo.
This is your chance to experiment and discover new sides both of her and what you think of her – and if the photos turn out as well as you hope, then chances are that she’ll appreciate your, er, appreciation as well!
Don’t act like an idiot.
After you find something she’s decided she’s willing to try, make sure to mention how beautiful you think she will look. Especially for a woman who feels shy or self-conscious, reassurance is a must. If she’s never posed nude before she may feel like she doesn’t know what she’s doing.
It’s important for you, as the photographer, to be prepared to offer assurance and encouragement, but most of all, instruction: you see how the photos are turning out, so you have to offer direction. Show her that you know what you’re doing, and even if you don’t, by all means at least act like a professional :)
Remember that she’s your girlfriend, not a porn star, and not a stripper (unless, of course, your girlfriend is a stripper or a pornstar, but in that case you’ll probably not really need this write-up).
If you are respectful and loving, chances are that she will relax and get more into this. Make it about her and about how beautiful you think she is, and she’ll return the appreciation.
Talk about how the photos will be used
A final word of warning: Taking the photos will be a learning experience for both of you, and you may end up with some mighty fine photographs. Nonetheless, take care to talk about how the resulting photographs will be used, and who will see them: Nude photographs might not be something that your girlfriend wants the entire world to see. Before you rush right out and upload them all onto your Facebook or MySpace pages, make sure you defer the control of the photos back to her. The photos are of her, so she should be the one to decide what you can and cannot do with them. Don’t be surprised if this is a private activity that she wants kept between just the two of you.
That means that if she wants the memory card formatted, or requests that you delete certain images that she doesn’t like it’d be rather rude not to.
Once she trusts that you’re really not going to do anything with the photos that she isn’t okay with, the chances are good that the next time you experiment with a camera she’ll be more relaxed and more willing to try different things.
Have fun!
If you’re being tense and worried about the experiment, it isn’t going to work. if you have to, take the memory card out of your camera, and just shoot ‘blanks’ for the fun of it. Get used to seeing nude skin through the viewfinder, and make sure your girl is comfortable with the sound of the shutter, the lights of your flashes, and with taking instructions throughout the shoot.
Basic rule: If you’re not both having fun, someone’s doing something wrong.


 My first move is to increase the exposure, add some depth to the blacks, and then go overboard with the brightness and contrast. It'll look like a cartoon at this stage, but it's a base on which to build.
 By nudging the clarity slider to the left it helps to recreate the soft mushiness of a cheap plastic lens.
 Use a pair of graduated filters to add a light leak. I placed one to the left of my ear and another right with roughly opposite settings. This produced a yellow-y smear.


 However, there's a lot of fun to be had by simply playing around with other editing packages to produce ethereal-looking images. With something like Lightroom you might want to try:
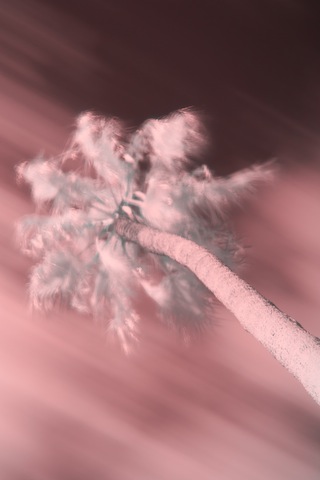
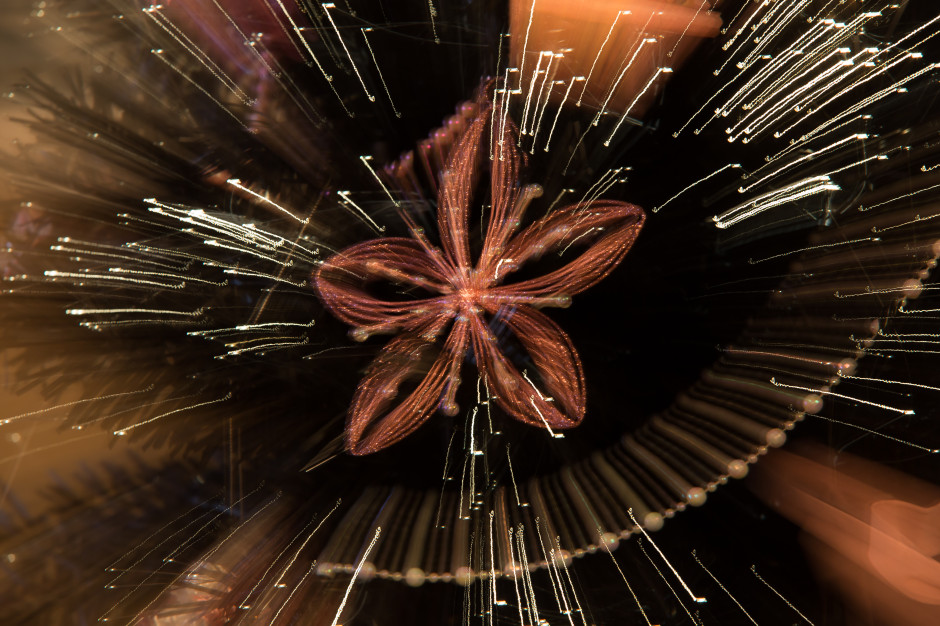
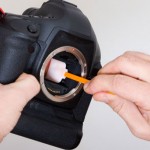
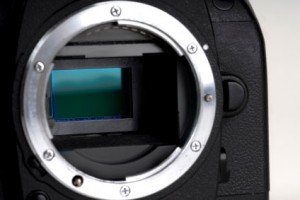 Every once and again, you need to clean your sensor properly; depends on how much you use your camera, but for me, it’s approximately every 2-3 months or so, a process which involves several of the products above. Here’s how to do it:


 As a double bonus hazard, the camera doesn't have a filter thread, so it's impossible to put an UV filter on the lens for protection. Or is it? It turns out that it does, indeed, have a filter thread, but it's 'backwards' - instead of having the threads facing inwards, like on most cameras, on the X100, the threading is facing out.